
|
|
BMW AIRHEADS: 4 & 5 speed transmissions
How they work. Shifting smoothly; preloading the shift lever; clutch effects.
Oil types. Break-in. Noises. Rattles. Shift linkage. Neutral switches.
Serial numbers, model year, changes. Pawl spring breakage. Rubber piece
located on the shift lever.
5-speed output shaft snap ring (circlip) & groove.
Bearings.
Shift kits. Input shaft seal. Kickstarter problems.
Throw-out bearings & pushrod.
Gear ratios. Doing It Yourself .....etc.
� Copyright 2024, R. Fleischer Preliminary & Introduction: Many folks have problems understanding, let alone visualizing, how BMW transmissions operate. I am putting some links at the beginning of this article to help with understanding; and, these links also have some information, and photos, on overhauling a transmission. I STRONGLY RECOMMEND you look at all these links! Link #1: From the BMW Factory School on the 5 speed gearbox and both early and late clutches. This article covers the design, parts, how they fit and work, disassembly and assembly, specifications, etc., of the gearbox and the two types of clutches. Link #2: Commentary. http://micapeak.com/bmw-gs/trans.html Link #3: https://www.schweizerschrauber.ch/mot/gearbox.html Overhauling information, with photographs. Link #4: At the end of this paragraph is a link to an article that has vastly more information, and while it does cover some information on how the transmissions operate (4 and 5 speed), there is an emphasis on how and where any wear happens, hints, recommendations, testing, etc. It includes what to watch out for during rebuilding/repairs, and a lot more. Some quite good information on testing & details. The article describes the broken clutch lever pin problems, & you will find the part numbers & information in my
https://bmwmotorcycletech.info/clutch.htm article for your Airhead. Duane's article does not cover a lot of what I do & certainly does not cover all my missing circlip testing, nor how to go about any ideas of overhauling a transmission, shimming it, nor ANYthing about the 17.5� gear angle change, etc. My article is more complete, particularly about 5 speed transmission problems; but, Duane's article has things I do NOT cover. I think Duane's article is nearly a must-read. NOTE that Duane's article covers mostly the /5 and /6 era transmissions, but a lot of the information is applicable to ALL Airhead transmissions, including the /2 era. Transmission ratios for Airheads, 1970-1995.
https://bmwmotorcycletech.info/transmission.htm
59A
https://bmwmotorcycletech.info/Gearbox-and-clutch.pdf
https://w6rec.com/bmw-motorcycle-5-transmission-gearbox-service-and-repair/
Availability, article for beginners and moderately advanced folks, who want to work on their 5 speed transmissions, is a copy of an issue of The Airhead. This contains sketches, lots of details, etc. This is located in Snowbum's personal BMW STUFF folder in his main computer, titled V4-Issue 6.pdf. This is a full copy of the last issue (?) of The Airhead, a publication that was produced for a BMW club in the UK. It is the March, 2019 issue, Volume 4, Issue 6. The 5 speed article is hardly the only thing in this Issue.
I can possibly e-mail this entire Issue. I have never widely published any of my HOW-TO transmission articles, and this issue of The Airhead has some very nice information. You will have to ask me. A contribution to my PayPal account would be appreciated, after you get the E. There are some links in the Issue, too.
Link #4: https://largiader.com/tech/airtrans/ Be sure to look at this article!
Note: if interested in the pre-1970 models, see:
https://bmwmotorcycletech.info/ringgears.htm
Gear
4 speed ratio
5 speed ratio
Comments
1st
3.896
4.400
2nd
2.578
2.860
3rd
1.875
2.070
4th
1.500
1.670
5th
1.500
OIL:
BMW has never wavered in its Airhead motorcycles' transmission oil recommendations, and this includes the first and last of the Airheads. While straight grades are listed in the Owner's Handbook, the only listed multigrade oil is 80W90. BMW did not restrict use of petroleum and synthetic oils, stating only to use a GL5 oil (& that it be a Brand Name ...BMW-speak for "quality").
In the past I recommended you use ONLY a quality petroleum GL5 oil in your Airhead transmission; preferably in grade 80W90 for most conditions. I also said that you could use 75W90, 80W90, or 85W90, depending on weather. There are oils available that replace the "90" with 120 or even 145..... I recommended that you do not use them unless: you live in an area where the temperature that you start the bike at will be ~100�F or more, and that you will be riding fast &/or with heavy loading, or pulling a sidecar or trailer ...all in very hot weather ...that means consistently 100�F or more. There is an exception; some very few transmissions will stiffen-up gear changing when the oil is hot, and different SAE grades can be tried.
My present recommendation is that, if you want to, you can use a synthetic gear oil of good quality. Synthetic gearbox oils are very much improved, hence my changed recommendations. There is no question in my mind that HIGH QUALITY SYNTHETIC GL5-rated oils WILL SIGNIFICANTLY PROLONG the life of a transmission (& rear drive) that does not have previous problems or wrong assembly clearances. In some instances seals & synthetic oils may not be perfectly compatible. If you change from a petroleum to a synthetic, & get some weeping or leaks, change to another type of synthetic, or go back to a petroleum. With the change back to dino oil, the seal(s) are then likely to reshape with some miles & time and stop weeping. Seals have varied in materials over the years, even with the same part number. I recommend that you NOT use any additive if your transmission is filled with synthetic oil. One such additive is made by Dow Corning and sold, $$$$, by bearing sales companies, and must not be used in strength (amount) as stated on the container, in BMW motorcycles. I do not recommend ANY additives except in very special circumstances. For a synthetic oil, I am presently recommending only Spectro brand gear oil, in 75W90 in the version version called "Platinum", for the transmission & the rear drive of Airheads & Classic K bikes. I have no objection to it being used in the driveshaft (of those models using oil there). In fairness, I will also note here that one experienced transmission rebuilder, Tom Cutter, my words here, believes synthetic gear oil in your Airhead is not good, leading to unspecified WEAR. I absolutely think the opposite, but there are instances that I think wear from using a synthetic oil IS going to happen. I have NO objection to Castrol 80W90 GL5 oil in NON-synthetic; NOR do I have any objection to any of Spectro's GL5 rated gear oils, in appropriate SAE viscosities.
Any oil will thin & thicken with temperature changes on 'its own chart curve'. How this happens is a property of the base oils & additives. Using a thicker (higher viscosity) PETROLEUM oil (than the stock 80, 90, or 80W90), ending in 120 or 140 or 145, will take the transmission operation out of the design operating area, as far as gears & parts speeding up & slowing down during shifting due to oil friction, etc, ....>>thus gear changing up & down can be different, and may give problems. Restating this: One difference is in spin up & spin down time for shifting. Gear clashing can be different. I am also concerned that, when colder than approximately 90�F (or maybe somewhat more) air temperature; and/or the engine not being used at high output (which produces more heat, which certainly does get to the transmission, and transmission internal friction also adds heat), lubrication is possibly reduced, protection could be decreased, & there are other not-so-nice things. For example: 80W145. That oil at any normal operating temperature will ALWAYS be thicker than if the oil was any lighter grade, including 80W90. If you wish to think about this in a different way, imagine the oil is rated at 80W20000, & THINK about what that means. Thus, at most any temperature you will be riding at, even after a full warm-up, the oil is thicker, a lot thicker. NOTE ALSO that the thicker oil will have more horsepower losses associated with it ....more friction within the moving oil itself too ....besides the various gears, etc., changing shifting characteristics due to different slow-down and speed-up slowing. The oil may additionally heat up more due to the added friction. So, in general, I highly recommend you do NOT use 80W145 and similar very wide range gearbox and rear drive oils, no matter if synthetic or petroleum.
There is an oil rating called Viscosity Index (VI or v.i.), which is the RATE of thickness change of the oil with temperature change. A straight weight oil, such as SAE 80, will thin much more than a 80W90 as temperature rises. For such as a 80W145, as just one example of oils with a much higher top number; as your parts & oil rise in temperature, the oil thins less, & the specific lubrication qualities of friction inherent in thicker oils, are modified. Note what I mentioned about speed of parts slowing-down or speeding-up being changed from AS DESIGNED. The base stock & the additives control this. BMW wants you to use what it specifies. That's generally a very good idea. BMW's transmission designer/manufacturer, Getrag, specifically designed the transmission to use either straight 80, straight 90, or 80W90 multigrade, all in only GL5. Just in case you were 'guessing' here ...no, the objective here is NOT super high viscosity index. Spacing of parts, spin-down and spin-up times, etc., all change as the transmission heats up; and the oil grade is specified to help match other transmission characteristics. A reasonable VI is assumed, and that is very likely what you will get with the standard oils, and I am not making specific recommendations, besides using Spectro's gear oils.
Better oils are now available, compared to when your bike was made, but 80W90 quality oils rated GL5 are still excellent, although a quality 75W90 may be slightly better, especially for those who ride (or start their rides) in colder temperatures.
NOTE: do NOT try to compare gear oil viscosities with motorcycle or car engine oil viscosities. The oils are NOT tested NOR RATED the same way!
Any oil for use in your vehicles need to be of types that leaves a very thin layer that sticks to the gears & bearings rather than drip completely away during overnight or longer storage. This is particularly so for the 5 speed transmission. You will not be able to easily find out about YOUR PROPOSED OIL, in this regards. This is another reason to use a QUALITY oil which has a good history.
I believe the transmission & rear drive oil should be changed every 10,000 miles; with the synthetics at 15-20,000. I believe it will pay you over the long run to use MY recommended oil change intervals.
HINT: Yearly, remove the forward band clamp on the rubber bellows at the Universal Joint area at the back of the transmission. Use fingers and push back a bit of the forward part of the rubber bellows, and check the tightness (DO NOT loosen first) of the 4 special bolts at the U-Joint. I usually have the transmission in gear, & use the clutch lever to enable rotating the flange to the 4 positions that will be needed (rear wheel is off the ground). Then have a helper if needed to apply the rear brake as you try to tighten the 4 bolts, one by one. Your method can vary. Use the proper adaptor tool, on your torque wrench, and check the 4 special bolts at 25 to 29 footpounds, said torque to be at the bolt itself, so use the torque wrench adaptor at 90 degrees; or, if the adaptor is used straight out, adjust the torque wrench lower, as calculated, to enable the proper 25 to 29 ftlbs.
If there are lockwashers under the 4 bolts, remove, and obtain the proper slightly shorter bolts, do NOT install lockwashers or washers of any type. If you install with clean and dry threads, use 25-29 ftlbs. If you install with one drop of medium strength (blue) Loctite, then tighten to 25 ftlbs. When checking torque in the future, always check tightness, do NOT loosen first. If you install as I recommend, then replacing the bolts at every use is not needed, as they will not have stretched permanently.HINT: If your Airhead transmission is stuck or difficult to shift; perhaps the lever seems somewhat disconnected inside the transmission:
Check the shift lever at the transmission. If it has a Allen screw in its center be SURE that screw is moderately tight because if the screw backs out much, the lever will move & shifting can be difficult, or even not work. Much easier to fix than a broken pawl spring inside the transmission!
Transmission rattling noises (oil hot, idle rpm, transmission in neutral, handlebar clutch lever forward---not pulled back. Motorcycle is stationary):
It is NORMAL for Airheads to have a gearbox rattle noise at idle RPM, with the oil hot from riding. Usually there is no rattle with cold thick transmission oil. Old Airheads were pretty noisy. Worse as various bits & pieces wear. It is usually not indicative of any problem. The rattle typically sounds worse if the carburetors are out of sync, or anything that allows the cylinders to be a bit unbalanced in operation. This includes irregular ignition timing ....rather common on the pre-1979 models, but all Airheads can exhibit the rattle noise. The irregular ignition timing can be seen with an ignition-fired strobe light shining on the timing hole. There will be substantial double images. The rattle will be worse with timing chain sprocket wear, or other associated items, like the chain, guide, etc. Identification: When you pull-in the clutch lever with your left hand, and often if the rpm is raised a bit, the rattle noise will stop. Explanation, etc., follows:
The cam that operates the valves is a jerky load on the timing chain. That can cause irregular power pulses, primarily but not exclusively from irregular ignition timing. A bent cam tip, as on pre-1979 models, even as little as 0.001", can make it worse due to irregular ignition timing & is not unusual. The irregular power pulses cause the engine to not rotate smoothly; that causes jerkiness on parts in the transmission, causing the "Airhead Rattle". The tell-tale sign is that the noise goes totally away when you pull-in the clutch lever at the handlebars & also typically tends to go away if you raise the idle rpm some with the throttle, clutch lever not pulled-in.
Do not have the engine idling too slow. Some books may show as low as 800 rpm. Back in the old days of heavy flywheels, especially on models prior to 1970, it was common for folks to brag about how smooth & silent their engine was at idle. Unfortunately, trying to idle the engine so low (many would try for 500 or 600 rpm, let alone 800), is BAD for the engine; particularly a worn engine. I suggest 900-1025 rpm for all models from 1970, and 850 for prior models.
If the idle RPM is too slow, oiling (lubrication and cooling) to the timing chain & sprockets will likely be low enough to accelerate wear on those items. This is worse with an older worn engine. The only oil these parts get on an Airhead is from the relief hole in the oil pressure regulator. If the oil is hot & thin & idle rpm is low, then oil pressure is low, & there is no or much less oiling.
Airhead rattle is LESS likely and less noisy, on models from 1979 due to the improved ignition stability (cam drive to the ignition is much improved), and even slightly better from 1981, and the somewhat better chain tautness control; at least early-on, but DOES deteriorate with increasing miles.
Transmission problems, checks, testing:
Drain the transmission oil after a ride. You can wait until the oil is warm and not hot. Put #1 eyeball on the magnetic drain plug. If there is anything more than a modest amount of soft fuzz felt between your fingers, then there is a problem. NO SHARP PARTICLES NOR PIECES should be felt. If there is anything small & sharp, you may (or may not!) be safe for a reasonable amount of riding to where the transmission can be opened. Anything large? ....take an in-focus close-up photo, post it in at a free hosting site on the Internet, then inquire on the AIRHEADS LIST, with a link to the photo.
Four common things that are not usually a transmission-failing problem:
(1) Small/modest amounts of 'fuzz' on the magnetic drain plug, seen at every scheduled 10Kmi gear oil change. The fuzz will NOT have sharp particles, not feel like sand. The fuzz is paste-like, & smooth feeling.
(2) Rattling noise from gearbox in neutral, at idle rpm, after thorough warm-up, clutch lever not pulled in at the handlebars. Noise disappears with handle bars clutch lever pulled rearwards.
(3) Mild to moderate shifting problems, especially from 2nd gear downward to 1st. This usually means that your input splines need lubrication. Unplated early input splines usually need cleaning & lubrication at 12,000 to 20,000 mile intervals, nickel plated shafts at maybe 20,000 to 35,000 mile intervals ....depending on riding conditions, number of heat/cool cycles, time (in years?) & type of gear oil used. I recommend 12,000 to 20,000 mile checks. If at all rusty, lower the mileage between servicing.
(4) Shifts not always made. Check the allen screw in the shift arm (if you have that type with the screw in the middle) ...they are known to loosen. Use a dab of Loctite blue on those screw threads. Perhaps your boot tips are overly thick ....reset the linkage, or adjust the footpeg.
If you have a sudden vibration while riding, and possibly noises (or not), and the vibration ceases (or does not!) when the clutch is pulled in while riding and throttle turned off ...and ...you can also try in the various gears, and in neutral, ......This is the time to stop and investigate what is going on, as best you can. If it is not something with the wheels/tires, etc., and the noise is present with the bike not going down the road, have the bike towed. Failure to comply will likely, within a few miles, lead to a massive failure. I can not emphasize this enough...stop riding, now ...not in 50 miles ...otherwise, it can cost you a bunch more money; and, you risk the rear of the motorcycle locking-up.
NOTE! A considerable amount of this article deals with the no-circlip problem. Be aware that the 5th gear bearing on the 5 speed gearboxes can fail, even if there IS a circlip. If you hear noises from the gearbox, and have metal particles on the magnetic drainplug, you really need to stop riding and look into the situation, as the longer you ride using a noisy gearbox, the higher the $ cost to repair it, and, eventually, the gearbox could even lock-up, etc.
If you do regular checks on the magnetic drain plug (what? ...you don't have a magnetic one?) ....you are much less likely to have such sudden problems. These regular checks really should be done often if your Airhead motorcycle is model year 1984 to 1995. While the problem is unlikely for 1984 and prior models, I am including them here. If you know ...by the transmission having been apart! ...that you have the circlip, you probably will have no need to check the magnetic drain plug except at regular gear oil changes (10Kmi)....unless you start having NOISES!
These links are to the BMW Service Information bulletin about the transmission circlip. This SI is here only for you to more visualize the problem area...do NOT use these for actual work, until you have carefully read all that is in the article you are reading:
If your transmission is in the range of the ones possibly not having the circlip (detailed information later in this article, but, basically, late 1984 to 1995), you might consider an overhaul well before you have a failure, as the number of $$ parts to be replaced always greatly increases as you accumulate mileage. If you watch the transmission as FULLY outlined, you can consider NOT doing a preventative overhaul.
Even if you hear & feel nothing peculiar; every few thousand miles, put the bike on the center-stand, when the engine & transmission are thoroughly warmed up from a ride. With engine off, and transmission in neutral, spin the rear wheel & listen for growly sounds. Turn the wheel slowly & feel for notchiness. When the engine & transmission have cooled overnight, check the magnetic drain plug. GENERALLY the degradation is slow, but sometimes it does come on suddenly, with noises and/or vibration. Some remove the drain plug; and instead of draining and replacing the oil, they have a rubber or cork plug, so the drain plug can be inspected and replaced with very little oil loss. Others check the magnetic plug only at normal transmission oil change time (10,000 miles). It is up to YOU.
BMW, like most manufacturing companies, is tight-lipped regarding engineering details/changes. BMW tends to be more tight-lipped than many companies, probably from both a corporate policy & the Germanic 'WE don't have problems'. BMW may issue Service Bulletins of various sorts now & then, but these often do NOT spell out details that one might like to have, & sometimes what is said is confusing, especially considering what is NOT said. We have to live with that. Sometimes some of us 'Wrenches' manage to "get information". In some instances I have been given information that might be considered Company Top Secret. I can NOT divulge in such circumstances my source(s) ...BUT!!.....one way or the other, in almost every instance, I DO manage to get the information to you.
DETAILED (more) TESTING:
What are some other checks & tests you can do to determine if your 5 speed transmission has a problem developing?
(1) AFTER a 20+ mile ride to THOROUGHLY warm up the engine & transmission; on an appropriate stretch of road, in 5th gear, at maybe 5500 rpm (if possible, because that is FAST!), suddenly whack the throttle wide open. 5th & 5500 is such a high speed, so you may have to test at lower rpm. If you feel some vibration that is unusual, for SURE you will want to do all the tests below, and other places in this article ....as the forward bearing on the output shaft may be disintegrating.
(2A) With a warm/hot gearbox, whether or not test (1) shows anything, jack or otherwise raise the rear wheel so it is slightly off the ground. With engine off, in neutral, spin the rear wheel by hand fairly fast & listen to the gearbox. This spins the output shaft bearings only. No bearing noises should be heard. Now, rotate the rear wheel forward slowly. No roughness & no notchiness should be felt. These two tests are best done with transmission quite hot from riding. These tests tend to also show up a bad bearing caused by allowing water to get into the transmission, usually from over-vigorous spraying during washing (at the hollow speedometer cable bolt), or from a bad speedometer cable rubber boot (very common problem; both water problems can lead to $$$ repairs). There is a fair amount to know about this speedometer cable boot area. Please see the complete write-up in article 7B (~half-way down), the control cables article. I highly recommend making sure that your speedometer cable boot fits snugly, & is sealed at the top with silicone RTV. If the top is poor, water can run down into the transmission, causing $$$ damage. Milky (coffee with cream) look to transmission oil is very bad ...it destroys bearings.
(2B) This is an additional test THAT SHOULD BE DONE. You will need an inexpensive mechanic's stethoscope. The best test is with standard 80W90 or 75W90 transmission oil. The motorcycle needs to be ridden enough so the transmission oil is hot. As soon as you get back from your ride (maybe 20 miles, but twice that is better), immediately put the motorcycle on its center-stand. You should have determined before the ride how to block the rear wheel safely off the ground, because you are going to be running the engine, transmission in both 4th and 5th gear, and rear wheel turning rather fast. Because of these things, there is no way to 100% safely do this test without a buddy helping (although plenty of folks have followed my directions and done it without problems, sans buddy). With the engine restarted (remember, the transmission oil must be hot from your ride), put the transmission into 4th gear and ~3000 rpm. Listen to the transmission using the stethoscope. The stethoscope rod should be touching the top of the transmission on the right side, forward. Change to 5th gear and 5000 rpm, listen again. Go back to 4th, then 5th. What you hear should be reasonably close to being the same, comparing both gears. If things are very much worse in 5th gear, then the front output shaft bearing is failing. This is a very definitive test.
(3) Re-start the engine (with already hot engine & hot transmission) & let it idle in neutral. Pull in the clutch lever for a few seconds & then let it out. When the clutch then re-engages, this spins the input shaft & cluster shaft bearings only. There should not be a bunch of bearing noise(s) when you let the clutch lever out (you may hear some normal clutch spline chatter and transmission rattles).
(4) If the slightest suspicion, or just because you want to be very cautious, I recommend you unbolt the driveshaft Universal Joint from the output flange of the transmission; &, in neutral, rotate that transmission flange with your fingers. Any roughness or notchy feeling is cause for the transmission to be overhauled. This test can be used to show up bad driveshaft u-joints on the Paralever models, & disconnecting the U-joint at the transmission output flange, & rotating first the transmission flange and then the U-joint, will, or may, allow a yes or no on U-joint & transmission.
Note! The U-joint at the transmission output on any Airhead model can be a bit stiff, especially if cold, and still be perfectly OK.
(5) This test is best done by screwing at least two opposing bolts into the flange, just to provide something to grab onto. Try to move the flange in and out. Any free play is likely caused by internal problems.
(6) The transmission output flange has 4 special bolts; they are not to be used with any type of lockwasher, contrary to old literature or what you may be told. The thread length of the latest & proper bolts is slightly shorter. Split-lockwashers & longer bolts should be removed, if present. There is information on this website about this: https://bmwmotorcycletech.info/drvshftboltstoolstorque.htm
The threads of both the flange and the 4 bolts should be cleaned, and not oily. Apply one drop of Loctite blue (medium strength). Tighten in a cross-pattern to 25 or 26 foot pounds. There are various methods of enabling use of a torque wrench at this place. You can also just give the bolts a good grunt with a short 12 point wrench. It is best to torque them properly. See prior link, and also https://bmwmotorcycletech.info/tools.htm
The above tests are important. Usually any problem reveals itself, even if there is nothing much on the magnetic drain plug.
(7) Please scan way down this article, and read the following section (or, just click on this link) (or, read it later):
MORE DISCUSSION
The Circlip problem applies to many 5 speed transmission from calendar year 1984 to the last of Airhead production in 1995/1996, including the R80R and R100R, Mystic, etc.
THE PREVENTION of damage caused by movement of the forward-most gear on the output shaft is not 100.00% guaranteed by adding the circlip; but you can expect that, if properly done, it will be a permanent fix, in nearly all instances. Contact your favorite transmission overhauler about their personal method of ensuring that the gear does not move or have a problem with the circlip or wire spacer, etc: Tom Cutter, Ted Porter, Bob Clement, etc.
A link to a 5-1/2 minute video by Ted Porter. Many folks comprehend better with visual presentations; after which they are ready for the in-depth explanation. |
| http://largiader.com/articles/circlip/ is one of two transmission articles on Anton Largiader's website that you will find of interest. http://largiader.com/ is his HomePage. Anton has two articles to look at, possibly not overly clearly shown as being two different links, so look on the left side list of articles. Put mousepointer over "transmission" in "Airhead transmissions and circlip problem". The word 'transmission' will then be seen to be a link to one article. Click on the word. When finished looking at that article, go back to Anton's HomePage again and this time put the mouse pointer over "circlip problem" and click for the other article. |
OVERVIEW of the circlip problems (vastly more information later):
From sometime in the late 1983 production year for 1984 calendar year Airheads, BMW's transmission maker, Getrag, made a modification to the transmission. Not all transmissions had this modification, particularly not so, or unlikely, with the early 1984 models. As time went on, more and more transmissions had the modification.
On the output shaft, Getrag left out a snap ring (circlip) & shortly thereafter (?) they no longer even machined a groove for that snap ring into the associated output shaft. The no-circlip modification has caused a lot of grief. Years later the design supposedly reverted back to the original reliable version with a circlip, the exact date of which is not truly known, and BMW's own information seems in error. BMW's explanation of why that change-back is corporate lawyer-ezz nonsense, IMO. Note that, trying to be 'somewhat' more fair to BMW here, some very few transmissions with a circlip have had problems with the 5th gear moving a bit.
Note that BMW's information regarding the transmission serial number at which the change was made back to a circlip is not accurate. You can not trust the serial numbers.
A substantial number of 'circlipless' transmissions have failed, some catastrophically ripped the transmission to pieces. Transmissions seldom fail without warning. Most transmissions do not fail. Interestingly (?), quite a few have been taken apart, at fairly high mileages, found to have the circlip, & no problems; but, in others, with no problems seen or felt by the rider, there have been some movement of the circlip & bearing, but bad damage had not yet occurred. It is my belief that if your transmission does not have the circlip, you're vastly more likely to have problems.
| Many years ago there was not 100% agreement on the exact mode & reason for the failures of circlip-less transmissions. I have not seen anyone espouse the main minority opinion for some time now. I still have the two basic opinions later in the below article. AFAIK, the circlip information first appeared relatively widespread in a 2001 Airheads LIST posting by Bob Clement of BMW-Montana, who gave me permission then to post his correspondence with me, which I did the majority of, on that LIST. In the below article I have added comments from private communications from several transmission experts, & you also get my own verbose input. ...and, as noted, the two different ideas & opinions about the circlips is included. |
This is not so easy, not so cut & dried; there simply is no perfect method of determination for the earliest transmissions without taking them apart! If we had specific information with every serial number for every transmission that Getrag made for BMW, that would probably do fine. None such has ever been released to even BMW dealerships, AFAIK. A BMW bulletin in 1986 gave no specifics on year & transmission serial number. There was no change in part number for the output shaft. BMW is known to sometimes make a production part change and to use the same part number. It appears that the earliest transmissions that were affected were shipped with motorcycles of build date near the end of 1984, so that means that some late 1984 models may not have the circlip. Since I often have requested transmission overhaul information on the Airheads LIST, ETC., I refer you to the charting/listing I have later in this article; you will see the 1984 year status. Take a look at the 1994-1995 information too.
There was another, later, factory bulletin, #280, dated 12/08/97, explaining that the circlip (& therefore the groove) was reinstated, & the shaft number was changed. However, it appears that the shaft is actually the same as the 5 speed output shafts built from 1974 into 1984. The specified 'new' shaft is 23-21-1-338-793. BMW raised the price of this shaft tremendously.
One can, & competent transmission overhaulers do, modify the non-circlip shaft, but this needs to be done very carefully. It can not be done if the gear mounting area has noticeable taper wear from the gear wobbling. The bulletin also mentioned a 'special bearing' for the front of the output shaft. There is some controversy about this, and this bearing was made by a Japanese bearing manufacturer. More later herein.
Transmissions beginning with serial 240765 supposedly had the circlip re-installed. Do not depend on BMW's bulletin information using that serial number!!
It is my strong belief that you cannot depend on even a 1995 bike as having the circlip. See my list of reported transmissions, much later in this article. You also cannot depend on any 1984 to have, or not have, the circlip. Still, the best information, if your transmission isn't being taken apart, will be had by testing as I have outlined; and, looking at the transmission serial number. Even that is sometimes questionable, if you look at the charting later on this page. However, it seems likely that most 1984 transmissions are going to be OK. It presently appears that 1995 is going to be mixed, with most (?) being OK.
Summing-up, to this point in this article:
It is possible for a transmission built from 1984 (& possibly somewhat earlier, perhaps late 1983), & certainly from 1985, until even after transmission serial number 240765, to not have the circlip and possibly the shaft has or has not a groove for the circlip. I have had reports of transmissions after 240765 as not having the groove nor the circlip! Any I have definitive information on are listed well below. Thus, BMW's use, in BMW bulletins, of 240765, is not to be relied upon.
Transmission serial numbers are found in one of three places. Early transmissions, from 1974 to 1981 (or, I believe, as late as late 1983, depending on country the motorcycle was shipped to), will have the serial number on the top rear center or top front center, where you can not see it without removing the air cleaner assembly. In 1978 (& until the serials were put on the left outside, in approximately 1984), the serial was on the front inside face of the casting. Thereafter, the serial number is located at the top area of the left side, just barely below where the left rectangular airbox outlet hose connects; so you have to squat down to see it. Serials are stamped into the aluminum transmission case. There are some variances so noted below.
When reading in this article about 'year', be advised that BMW's 'model year' includes motorcycles that were built near the end of the prior calendar year, & it is quite possible to see a build date as early as the beginning of September, to be included in the following year's models ...and, there is occasionally an anomaly & an even earlier than September-made model will be dated in the following calendar year; which I suspect was from there being motorcycles on the production line at the time the company vacation began. BMW closes the company for the annual month-long holiday (vacation) which is in August. A September, October, November, & December production almost always will be the next calendar year's bike.
1974: Serial numbers ranged from Y-4300 -> Y20050; after which the numbers continued without the Y letter. Serial numbers are located at top rear, at center of case.
1975: Information sketchy, some end of 1974 transmissions probably used, may have Y prefixes; otherwise no Y. Numbers from 4225 -> 13500 have been identified, without the Y prefix. Serial number same place as 1974.
1977: Some from 1976 used, so one can expect serial numbers from 46000 to 63000. Serial numbers either at top rear center or top front center, in front portion of casting.
1978: 72400 -> 83000, and after those had a prefix letter Z which may have been early 1979 transmissions made in late 1978, as Z-0870 -> Z-0940. Serials are now on the front inside face of the casting. The 1978 transmissions had gusset reinforcement running only from front to rear (none left-right).
1979: All have Z number prefix, from Z-19100 -> Z-36750 (at least).
Beginning in 79 the gusset reinforcements at the bottom of the case were cross hatch like a crossword puzzle. Changed was the shift linkage. It now pivoted from the footrest, & was more positive. 1979+ transmission cases were RIBBED. This ribbing makes the cases stiffer, preventing, mostly, any change in shimming dimensions with high mileage, etc.
Note: BMW has had fun & games with transmission serial numbers. It is possible that early transmissions with kickstarters have ZSA serials, for one example.
1980: The Z number now begins with a zero: Z-052800 -> Z-064950
From 1981, for awhile, at least to 1982, things get confused, with serial numbers lower.
1981: There are some numbers that seem to fall in the 1980 group, but the casting is different. Most will find that the serial number is now on the left exterior side, top rear. Expect serial numbers of Z-006111 -> Z-029900. Z & ZSA models in Europe, & maybe some to the USA, from s/n 56476 have the shift kit, & from same with s/n 58225 have the 17.5� change to the helical gears.
Note that the leading zero may not be present.
Oak told me that some 1981 castings for engines or transmissions had incorrect dimensions, which could cause perpetual failures of the input shaft of the transmission. There is no fix for that, I think. I have no information (just suspicions!) about whether or not this could also be the cause for the quite rare instances of continuing spline failures of the clutch friction disc.
In mid or later 1981 (this is unclear to me, although the serial number of the transmission is known, see just above and just below), & probably happened fully by mid-1982, BMW installed the so-called 'shift kit' inside the transmission. This is a fairly extensive kit with a revised cam shape, modified shifter arm, etc. It is retrofitable, & can be considered for earlier transmissions when overhauled, but it makes only a slight difference in the heavy flywheel models. BMW has a habit of phasing in changes, sometimes on some models long before others ...and on occasion one might find a far later serial number without the shift kit change; & transmissions with partial changes. As has been noted well above, the 1984+ transmissions had the transmission serial number on the left outside, just under the air-box fitting surface (just below the air tube to the left carburetor). Earlier transmissions had the serial number at either the rear top, or front top, but you must pull the air-box to see the number. You will do that at the spline service anyway. The serial number for the beginning of the shift kit installation is: 56477 (some sources, including BMW SI, say from 56476). The prefix was Z or ZSA. Yes, this information seems to conflict with the charting of transmission numbers here!
1982: Z-036600 -> Z-060400.
1983: Z-074700 -> Z-084299. Beginning in very late 1983, or possibly in early 1984, the serial number is then located on the left side, just below the air-cleaner outlet to the left carburetor.
1984: Z-084339 -> Z-104600 Transmissions well above that number have been seen, and positively identified as true 1984 model and calendar year motorcycles.
1985: Z-113701 -> Z-130150. Many transmissions lower than Z113701 have been reported on 1985 model year motorcycles.
1986: ZSA-125500 -> Z-125600. No other data has been provided, nor accumulated, for 1986. Obviously, there were more than 100 motorcycles made. See the charting of transmissions by VIN and transmission serial numbers, for 1986, later in this article.
Note: BMW seems to be using, at least a fair amount of time, the letters ZSA for kickstart transmissions.
1987: Unknown, but it appears that most after Z-125600 were produced after the return from the company 1986 vacation, and thus should be 1987 models, but are anomalies, see the information later in this article, by years.
1988: Z letter is dropped (tentative information for date this happened). From whatever time in 1988, serial numbers all now have a 3 letter suffix. Expect numbers from 0147440. AAB -> 0164300AAI. Suffix's may, however, be AAB, AAI, AAJ, ETC.
1989: 0154140 -> 0176330 and suffix (note from snowbum: I am sure that the serials go higher in the 0176xxx)
1990: 0180939 and suffix. Have not collected any further information on factory listing of supposed s/n range.
1991: 0190460 -> 0198650, and suffix. For sure some were built in mid-year (not after the Vacation) that had even higher serial numbers.
1992: 0207050 -> 0215650, and suffix.
1993: 0204190 -> 0230075, and suffix. I am certain some later serial numbers were 1993 and 1994 models.
1994: 0237930 -> 0238660, and suffix. There were some 1994 models built in 1993, that had lower transmission numbers.
1995: 0236539 -> 0254340, and suffix. NOTE that bikes have been built with end of 1995 dates, and I think into 1996 a bit, for Authorities. Details are not clear. Note the overlap into 1994 serials.
A close look at the serial numbers range of the transmissions for any given year may confuse you. The answer is that BMW did not always sequence numbering for transmissions, depending on the model, and what country it was going to. Thus, the listing for transmission numbers is only approximate. Some transmissions, by their serial number, may have been put into motorcycles identified by VIN numbers as from a full year, even in rare instances more than a year, out of the irregular sequence, above. Example: your bike is a late mfr'd 1991; has a transmission serial of 0204xxx plus some 3 character suffix noted in the 1988+ year, above. Transmission use by serial number is quite confusing at times, and is often model specific. Look at 1992 and 1993 above, and then 1995. Suffixes can also look like this: AA1; AAB; etc.
5-speed transmissions; Circlip/Groove tabulation; reports from owners & overhaulers:
For many years, I have been collecting information on Airhead motorcycles that were known, by disassembly, to be circlip-less five-speed transmissions ....and some reported on that were found with circlips. I tried to select for this article those transmissions that were likely never opened previously for repairs; obviously, that is not going to be 100% perfect, but there ARE telltale signs that are often quite usable. In a few instances I have added information to the charting of transmissions WITH the groove & circlip, where such information may be helpful. Information received, after I independently confirm the VIN, serial number, year, month of production, may be posted to this article in this section, always without identifying the owner's or overhauler's name. Some few transmission reports are not usable and I qA unable to get the needed information. In some instances the information I have received is not useful, or not pertinent, so I have not included that motorcycle nor transmission.
| I want to receive only information on 1983-1985; & 1990-1995 (and 1996 if you have one of those very rare ones) transmissions, both with & without circlips, as found. If no circlip, I want to know if the shaft was grooved, or not. I want to complete my tabulation and fully identify, if possible, earliest & last date of bikes with such transmissions. Please provide full VIN number & full transmission number, & any pertinent information, such as if the transmission was ever opened before. If no 17 character VIN number, please provide what information you can, from right side frame stamping, dipstick area serial number (if present), and information stamped into the milled boss area below-forward of left cylinder. As much information as possible is requested. Information published in this transmission article does not identify you. https://bmwmotorcycletech.info/emailimage.htm |
Reports:
There have been no motorcycles reported to me that were built in calendar year 1983, that had NO circlip.
1983-1984 motorcycles:
This section, for 1983-1984, was done separately, as I felt it was quite important to try to identify any transmission serial numbers and VIN or other vehicle numbers, to see what the earliest no-circlip models might be.
a. R100RT, USA model, transmission Z094331, VIN WB1044904E6243388. This bike was reported to me as having the circlip (& the wire clip located at it). The E in the VIN shows it to be a 1984 USA model, but, the serial number, 6243388, shows it was built June 15th, 1983. This dating anomaly is not uncommon for 1983-1984 bikes.
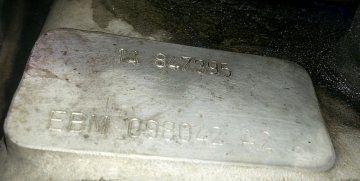
b. R80RT, 1984 USA model. Had the groove, did not have the circlip. This transmission definitely had never been opened. Transmission Z105671, VIN WB1044802E6173763, production 03/1984. The left side engine boss shows: 14 847395. Thus, this engine/bike was made in the 14th week of 1984. This goes right along with the BMW internal information of the motorcycle being built in March 1984, & the serial of the production is 7395. All this seems to be reasonable. Note that other characteristics of this motorcycle back up its production dates, such as not having dipstick area serial stamping, a driveshaft tag with the E year same as the stamped VIN.
c. R80RT, 1984 USA model, Canadian options. HAD groove, HAD circlip. Transmission with kickstart, ZSA 098774, VIN WB1044807E6173502. From the milled boss, engine was done in 47th week of 1983. The week and year stamping was year first, week next, shown as 83 4704 39. This is one of the anomalies. The serial number of bike identified it as being built the 46th week of 1983, not 47th. At the present moment, the conclusion MAY be that sometime after the factory returned from the August 1983 vacation, date unknown yet, maybe December of 1984 or later, the leaving off of the circlip began. This is not fully confirmed yet.
d. R100/T, version is USA R100CS last edition. VIN WB1043502E6177343. Transmission Z105851. This transmission was likely opened previously, perhaps for a broken pawl spring. This transmission was found to have the groove, but NO circlip. The production was confirmed in several ways. The E means 1984 year. I confirmed that this vehicle was dated 3-01-1984.
e. This is another 1984 bike I know about. I have been unable to confirm that the transmission had never been opened up, but believe that is true. This is an Australian bike. The milled-boss area shows 33 845294, meaning the 33rd week of 1984. This agrees with the vehicle identification number stamped into the right lower frame tube: 6354483R65LS (yes, not a 17 character VIN). It also agrees with the Australian Compliance Plate (which was not riveted over that frame tube stamping just noted ...it was riveted ahead of it ....so both could be seen. The plate said R65LS and 6354483. The transmission number is Z 108683. Had groove, but no circlip. BMW sources confirmed a build of 08/1984, ECE (Euro) model. Note, another number that was on the bike: 33845294652VB.
CONCLUSION (with the limited number of above 1983 and 1984 reports), TENTATIVELY, the actual changeover probably occurred with the resumption of production JUST AFTER the August BMW Vacation.By year listings:
If no details are shown assume that the transmission had NO circlip when opened-up. If a full date of mfr is shown, it is in USA standard format: MONTH, DAY if known, YEAR. If a full date of mfr is shown, it is in USA standard format: MONTH, DAY, YEAR.
1985 R80 USA, transmission Z111812, VIN WB1046307F6480009, production 12/1984, no circlip, but shaft had groove, original owner, never been apart before.
1985 R80, transmission Z111168, serial 6440490, production 12/1984, no circlip, but shaft had groove.
1985 R80RT, transmission Z112553, VIN WB1046408F6490109, production 01/1985; series code 2472, no circlip, but shaft had the groove.
1985 R80GS, transmission ZSA 11260, serial 6363139, production 02/1985; series code 2471, no circlip, but shaft had the groove.
1985 R80RT, transmission Z113701, VIN WB1046401F6490338, production 2/1985.
1985 R80, transmission Z115902, VIN WB104630XF6480439, production 3/1985.
1985 R80RT, transmission Z114405, VIN WB1046400F6490413, production 2/1985, no circlip, no groove.
1985 R80, transmission Z114317, VIN ending in 6480354, production 2/1985, no circlip, no groove, transmission known to have never been opened previously.
1986 R80, transmission Z122275, VIN WB1046307G6480545, production Sept 5th, 1985, no circlip.
1986 R65, transmission Z127619, ECE (Australian model bike). NO circlip, NO groove, production 12/85.
1986 R80GS, transmission ZSA124393, VIN WB1034805G6363255, production 10/85.
1986 R65, transmission Z123469, VIN........................6128105, production 9/1985.
1986 R80, USA model, transmission Z124295, VIN WB1046306G6480598, production 10/04/1985, NO circlip; virgin unopened transmission.
1986 R80, transmission Z125576, VIN WB1046303G6480655, production 10/1985.
1986 R80GS, transmission # unknown, VIN WB1034801G6363284, production 10/1985.
1986 R80GS, USA model, transmission ZA126409 (with kickstarter as shipped from factory), VIN WB1034802G6363343, produced 11/25/1985.
1986 R80, transmission Z128362, VIN WB104630XG6480782, production 12/1985.
1986 R80, USA, transmission Z135754, VIN WB1046301H6480851, production 07/1986, yet has H identification which makes it a 1987 model. This bike was a California model, ordered by distributor (?) with two front discs.
1987 R80RT, transmission Z138188, VIN WB1046407H6491304, production 10/1986.
1987 R80 USA, transmission 0144961AAB, VIN WB1046304H6481119, production 05/1987.
1987 R80, transmission 0138910AAB, VIN WB1046301H6481093, production 11/1986.
1988 R100GS, transmission 0151096AAI, VIN WB104780XJ6152090, production 11/1987.
1988 R100GS, transmission 0155023AAI, VIN WB104780XJ6152610, production 02/1988.
1988 R100GS, transmission 0154855AAI, VIN WB1047801J6152611, production 02/1988.
1988 R100GS, transmission 0156870AAI, VIN WB1047803J6152688, production 03/1988.
1988 R100GS, transmission 0155282AAi, VIN WB1047304J6277710, production 02/1988, NO circlip, NO groove.
1988 R80 monolever, transmission 0161951AAB, bike serial number 6448037, production 09/1988.
1988 R100RS, USA model, transmission 0154894AAB, VIN WB1046600J6247481, production 02/1988.
1988 R100RT, USA model, transmission 0162792AAB, VIN WB1046907K6293354, production 10/1988.
1989 R100GS, transmission 0163629AAI, VIN WB1047809K6153197, production 10/1988.
1989 R100GS, transmission 0164105AAI, VIN WB1047302K6332169, production 11/1988.
1989 R100PD, transmission 0171806AA1, VIN WB1047905L6134016, production 06/1989.
1989 R80GS, transmission 0176603AAI, frame serial 6249769, production 11/89. No circlip, NO groove.
1990 R100RT, transmission 0180939AAB, VIN WB1046902L6293473, production 04/1990.
1990 R100GSPD, transmission 0174962AA1, VIN WB1047902L6134300, production 09/1989, no circlip, no groove.
1990 R100GSPD, transmission 0174086AA1, VIN WB1047901L6134207, production 07/1989 (anomaly date), no groove, no circlip.
1990 R100GS, transmission 0179717AAI, no groove.
1991 R100RT, transmission 0185431AAB, VIN WB1046908M6293561, production 08/1990.
1991 R100RT, transmission 0191171AAB, VIN WB1046909M6293598, production 01/1991, model code 0469, USA, no circlip, no groove.
1991 R100GS, transmission 0191372AA1, VIN WB 1048802M0230178, production 01/1991, model code 0488, USA, no groove, no circlip.
1991 R100GS, transmission 01292165AA1, VIN WB1048803M0230223, production 02/1991.
1991 (reported). R100R, transmission 0204599 AAI, VIN WB1048707N0280111, production 10/1991, actually a 1992 model, per VIN.
1992 R100GS, transmission 0198991AA1, VIN WB1048808N0230445, production of 07/1991 (officially ID'd as a 1992 model by the VIN, etc.). NO groove, and hence no circlip.
1992 R100R, transmission 0204810AA1, VIN WB1048701N0280119, production of 10/15/1991, no groove, and hence no circlip.
1992 R100R, transmission 0204181AAI, VIN WB1048706N0280049, production 10/1991.
1992 R100GS, transmission , VIN WB1048803N0230711, production 10/1991.
1992 R100GS, transmission 0205604AA1, VIN WB1048800N0230763, production 10/91, USA model, vehicle code 0488, no clip, no groove.
1992 R100GS/PD, transmission 0209970AA1, VIN WB1048909N0047487, production 01/1992.
1992 R100 (R91)(R100R), transmission 0209230AA1, VIN WB1048709N0280269, production 01/1992, USA model, vehicle code 0487, no clip, no groove.
1993 R100GS, transmission 0210818AA1, no groove and no rear cover gasket (sealant used)
1993 R100RT, USA, transmission 0221583AAB, VIN WB1046903P6293892, no circlip, no groove, production 09/08/1992.
1993 R100GS, transmission 022756AA1, VIN WB1048801P0231259, production 09/1992.
1993 R100GS, transmission 0224420AA1, VIN WB1048804P0231319, production 10/1992.
1993 R100GS, transmission 0226691AA1, VIN WB1048304P6467330, production 12/1992.
1993 R100GS, transmission 0228652AAJ, VIN .....646450, production 01/1993.
1993 R100GS-PD, EURO, transmission 0232033AAJ, VIN 0069483, no circlip, no groove, production 04/01/1993.
1994 R100R, transmission 0234197AA1, VIN WB1048705R0280808, production October 27, 1993.
1994 R80R-R91, ECE model, transmission 0238143AAI, serial number 0263257, production 12/1993, no groove.
1994 R100RT, USA model, transmission 0236278AAB, VIN WB1046904R6294018, production 09/03/1994. No groove, & no circlip of course. I believe the actual production was probably 09/03/1993.
1994 R100RT, USA Model, transmission 0236280AAB, VIN WB1046906R6294019, production 09/1993. NO circlip and NO groove.
1994 R100R, transmission 0236159AAI, VIN WB1048708R0280799, production 09/10/1993, USA model. Preventative maintenance was done at 80K miles, gearbox never previously opened, no problems with gearbox. NO circlip, NO groove.
1994 R100R, transmission 023696AA1, VIN WB1048709R0280858, production 01/1994.
1994 R100R, transmission 238655AA1 no details furnished.
1994 R100GSPD, transmission 0238596AAJ, VIN WB1048408R0340374, production 01/1994 ECE model, no groove.
1994 R100GS, transmission 0237931AA1, lug stamped NI.
1994 R100GS, transmission 0238984AA1, VIN WB1048805R0231610, production 01/1994, no groove.
1994 R100GS, transmission 0238225AA1, VIN WB1048801R0231538, production 01/1994, USA model, no groove.
1994 R100R Mystic, USA model, VIN WB1049705S0400201, had clip & groove. Production 09/28/1994. Transmission number unknown, never reported to me. S indicates an official 1995 model.
1994 R100M, transmission 0240810AA1, had circlip. VIN not reported, 1994 assumed.
1995 R100GSPD, transmission 0246168AAI, VIN WB104890XS0048207, production 01/05/1995, USA model. Purchased new. Had circlip.
1995 R100GS, transmission 0243394AA1 & stamped N1, VIN WB1048802S0231635. Production 07/21/1994. Transmission had higher number than 240765, yet had no groove, no circlip. This is another of the many anomalies, this one being produced before the factory yearly vacation in the prior year.
1995 R100GSPD, transmission 0244317AAI, VIN WB1048905S0048177, production 09/1994, type 0489, had circlip.
1995 R100RT, USA model, transmission 0243572, VIN WB1046902S6294248, production 08/31/1994, transmission DID have the circlip. Virgin unopened transmission.
1995 R100GS; transmission 0243880AA1, owner had it since brand-new. California model. VIN WB1048801S0231688. Produced 09-13-1994. Transmission was overhauled, & noted as having the circlip (so, of course, had the groove for it).
1995 R100R Classic, Euro version (also known as R100-R91), serial 6469362, production 04/1995, with transmission 0249173AAI. Had groove, had circlip, was original, never previously opened.
The following is the highest transmission number reported to me, so far with no circlip. 1995 R100M (Mystic), transmission 0251758AA1, VIN WB1049706S0400255, production 09/12/1995, had no groove, no circlip.
As you can see from the collected information, it is not easy to determine if a bike's transmission has a circlip, or not, from model, year, serial number of transmission, nor VIN or other ID number. Note some of the strangeness of the 1995 models, above. Compare to earlier years too. Note that some 1995 production bikes, after the BMW bulletin's official number for reinstatement, still had no groove/circlip.
Bottom line: It is probably "possible" for any Airhead built from near the end of 1983 (possibly from 1 September) as a 1984 model, to the end of Airhead production, to not have the circlip.
#1: This is the much more commonly accepted viewpoint & one I personally agree with:
The front gear teeth on the output shaft is manufactured on an angle, that is, the gear is helical cut. Its mate obviously must also have that cut and must have the same angle. Picture in your mind such a pair of helical meshing gears. If power is fed to one, then the other has force such as would try to move that gear along the axis of the shaft, not just rotated. This direction of axial force reverses, depending on powering from the engine, or engine braking. In the 5 speed transmission, even in neutral, the forward gear (5th) gear on the output shaft is being pushed forward any time the clutch is engaged, even in neutral, except in the coasting condition. A boss on the front of that gear pushes against the rear face of the inside race of the front output shaft bearing. That rear face of the inside race of the front output shaft bearing is the thrust surface for 5th gear. Simplified: 5th gear pushes against the front bearing. Another way to look at this, is that forces try to move the helical 5th gear forward and move the shaft backwards, the gear moving on the shaft. Because of this, the front bearing is always damaged, and sometimes the rear bearing, and even the rear cover plate! ....all happening when there is no circlip to prevent (one hopes) movement.
There is a tiny amount of end to end float in the shafts fitment in the transmission case (a few thousandths of an inch), established during the shimming process, which ensures that the bearings are not subjected to end-preloading. Ball bearings, used in this transmission at that point, do NOT like preloading, that would make them heat up, and then fail. There ARE some very special types of ball bearings designed for end loading, used in such as the worm drive shaft on electric winches, but this is not pertinent here (those bearings are also VERY pricey).
Prior to probably late 1984, there was a hardened snap ring, a CIRCLIP, that fit in a machined groove on the output shaft, it was just forward of the gear, & prevented the bearing from moving forward from that mentioned angled (helical) cut gear pressure. That kept the pressure from eliminating any decrease in the shimmed float. There is also a tiny spacer clip, almost a wire clip in size, alongside one end of the bearing, more on that later.
When the circlip is not installed, axial thrust from 5th gear still tries...& may well actually cause, the gear to move/push the inner race of the output bearing ...along the shaft towards the front of the transmission, as the shaft, in essence, moves rearward & the gear moves forward on it. If the bearing race moves far enough, it will eliminate any end float. This places an axial load on the bearing, that will cause it to eventually overheat & fail.
SO: the large front bearing overheats, begins to self-destruct (the cage which keeps the balls in place starts coming apart & metal goes all over the place inside the gearbox). More clearance develops, the output shaft can actually wobble in the bearing. This will, of course, start tapering the metal on the shaft; that RUINS THE $$$ SHAFT. If bad enough, the output flange on the transmission (driveshaft U-joint flange) contacts the transmission lip area where the boot is, & the output rear bearing distorts; &, with metal bits already getting into things, all sorts of mechanical mayhem happens, & rather quickly. From the first sign of unusual vibration, things deteriorate rather quickly. If allowed to proceed, gears, bearings, shift fork, & even the rear case of the transmission, are ruined.
#2: This is a far less-accepted viewpoint. I am not sure anyone still thinks this way:
This point of view is quite different. I do not agree with it. This view is that while the helical cut gear does move forward under load, it presses the inner race of the bearing, & it takes that load OK because the outer ring is against the gearbox case ....and thus the circlip is of no matter. Thus if the clip IS there, the entire shaft moves forward & the bearing always takes the axial load, & no force moves the inner race relative to the shaft. This point of view is thus that the smaller bearing should fail first if preload was a problem ....and ....there are NO circlips on any of the other shafts ....and, further, the purpose of the circlip was to assist with disassembly! During the heating of the transmission, the case should release all bearings, but a circlip-less large bearing dould remain in the case when the shafts are removed, & it is a bit of work to remove the bearing ....that one, as it is larger, sticks in the case recess ....so the clip was used. The folks who believed in this theory agreed that the clip removal coincided with the increased bearing failures ....but say that the increased failures are NOT caused by the clip removal; rather, it was coincidental with the Paralever introduction. They say that the GS Paralever introduction, with its extra travel, puts forward thrust into the gearbox, & even an angular thrust due to the changed design (dual travel angles of the Paralever), & that said angular thrust is taken up by that large 6403 bearing ....& 'proof' is that no extra large rear bearing was installed by the manufacturer. Thus, these folks believed external forces are the cause for the gearbox failures; they tend to blame too high spring preloads & poor lubrication on the splines. They feel that BMW put the circlip method back into production as it was cheap to do, & 'showed' that BMW 'did something'.
Snowbum's rebuttal: The above #2 viewpoint is faulty. Many circlip-less gearboxes on non-Paralever have certainly failed in this area ....negating the above arguments. I know of no failures of any gearboxes in the fashion mentioned in this article that were not fixed permanently by modifying the shaft (if no groove) & installing the circlip (with new bearings, etc. ...as required). I just can't buy their argument; especially when considering the thrust given by helical gears. I could write a fair more here about each technical aspect, but my reply is good enough.
Note: It has been reported to me that the stock Paralever driveshaft has exactly the same pivoting length as the swing-arm, assuming the rubber damper is OK, and as long as that is intact, there are no axial forces on the output shaft. Another reason for negating some of argument #2.
There have been several versions of the 6403 bearing sold/installed by BMW. Initially, without a very good look, all seem to appear similar to any other 6403-C3 bearing; but, the front face of the latest/greatest inner race (forward edge of the inner race, the side of the bearing which has writing on it) is cut with a 90� angle (much smaller taper to it than the rear face of the inner race) between the face & the inner hole where the bearing slides over the output shaft instead of the 6403-C3 bearing which has a tapered angle. The forward taper is almost absent. Perhaps this was done to minimize the possibility of bearing creep as the bearing is pushed against the retaining circlip by 5th gear. This modification may well have never been needed. The regular bearing worked fine, never a problem with bearing creep leading to bearing axial overloading ....until BMW started leaving out the bearing retaining clip. This new bearing may be the accepted choice ...but: the more commonly accepted view is that the elimination of the cheap clip & associated groove caused the problems ...and ...I have received word that if one now orders the 'special bearing', you might get a STANDARD 6403-C3, without the modified inner race face. The 'special bearing' was used only for awhile; then BMW went back to the regular old bearing? Not enough confirmation yet.
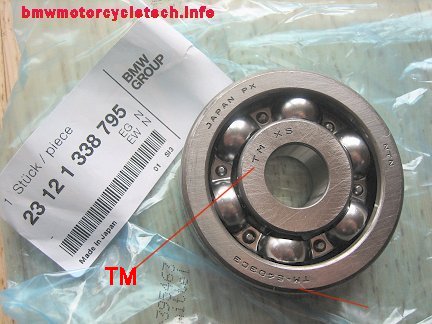
This is confusing, so the part needs inspection. However, the 6403-C3 bearing under part number 23-12-1-338-795 may be received by you with this ID on the bearing: NTN-TM. It will have a sharp edge on the circlip side, so the tiny ring used with it is not needed.
Modifying the shaft, installing the clip, new bearings, seals, re-shimming, etc., will be favorably priced, compared to just a new shaft from BMW. Those doing their own overhauls can have a good machinist cut the groove to accept the snap ring. Re-shimming is, of course, necessary with new bearings, etc.
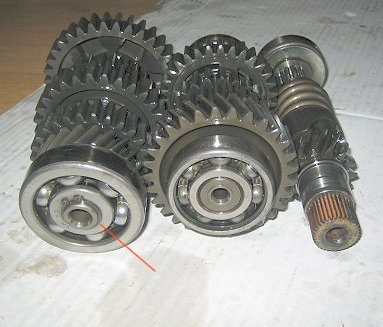
This is the 5 speed transmission gearset. Note the red line pointing to a circlip (snap ring). See links later in this article for a view of the actual circlip problem area. Notice the gear behind the bearing that the red line points to, and its mate on the center unit. Those are HELICAL gears.
Below is the 'improved' bearing, same part number, note the TM on the bearing.
MORE on the 6403 bearing! (READ CAREFULLY, and compare with above information!).
The following was copied from the Airheads LIST on 06/21/2017. The reason I am placing it here is for 2 reasons:
(1) It fully explains, together with the above information, what you need to know about the versions of this bearing.
(2) So you will have a good idea of why most owners send their transmissions out for repair to qualified well-experienced specialists with Airhead transmissions. In this case, the Specialist is Tom Cutter who does business as the Rubber Chicken Racing Garage, located at 1360 Colony Way, Yardley, PA, 19067. [email protected] (215) 321-7944.
I have edited this slightly for ease of reading, but have not edited out mistakes on part numbers.
Brook Reams asked: This bearing (part# 23 12 1 233 808) has a rubber cover over the race on the side that fits into the hole in the rear cover......
Why is this the only bearing with a cover? The new one I bought does not spin as freely as the other bearings that don't have the cover. I assume the cover adds some resistance when the bearing rotates. Is this normal?
Tom answered:
"That is a 6304 C3 2RS2 sealed bearing, with one side seal removed. BMW did that to create an oil reservoir between the bearing and cover, where particles of swarf could accumulate, and remain trapped. This also directed as much oil as possible down the center of the intermediate shaft, improving the lubrication of the free-wheeling gears on that shaft, which are turning, relative to the shaft, all the time when you are in top gear. The bearing itself gets enough oil from the shaft churning in the oil (it is partially submerged in the oil when the level is correct).
"Be aware that the BMW parts fiches have for several years listed the location and quantity of that bearing incorrectly. The half-sealed bearing goes on the rear of the intermediate shaft only. The open -495 bearing (also a 6304 C3) goes on the front (closest to the helical gear) end of the intermediate shaft as well as on the rear of the input shaft. The rear of the output shaft also gets a -495 (also a 6304 C3) bearing on the non-paralever models, The paralever models get a fully-sealed (also a 6304 C3) bearing at the rear end of the output shaft, part number 23 12 1 338 466.
Tom further said:
"Confused yet? Build a couple thousand BMW gearboxes and you will appreciate that there are hundreds of little details to know about the internals, changes, what works with what, etc. This will be my last public post about internal transmission stuff, because it is not a task that has a forgiving learning curve. People get hurt and killed when transmissions fail on motorcycles. I don't want to be the one who made people feel that a few tools and some Internet learnin' will do it."
MORE DISCUSSION:
Here is a Snowbum edited query & reply, from the Airheads LIST in November 2004, that will explain about something you might otherwise overlook if you are overhauling a transmission, etc:
The transmission was from a 1983 or 1984 R100RS. The owner decided to do an overhaul. It had been done previously, probably by him; the mileage was now around 200,000 km. He noticed a small "rumble" or notchiness when revolving the output flange, the driveshaft shaft disconnected. No sound, no notchiness when tested from the wheel with the driveshaft connected. A transmission oil change (done every 6 months!) showed normal metal powder on the drain plug magnet.
Transmission was removed & he slightly released the gearbox cover screws (1-2 turns) & the notchy feeling disappeared totally. Sounds like a preload problem?? The owner then measured the clearance between the output shaft snap ring & the big bearing (6403) inner race; the inner race pushed as far as it goes down the shaft. A 0.25 mm feeler gauge was a bit tight but a 0.20 mm loose. So, he concluded that there must be more than 0.20 mm "undefined" clearance in the shaft & it seemed to him that there is no reasonable way to shim the shaft within 0.1 mm as required especially if the bearing may drift along the shaft. The owner then felt that he would have to shim the snap ring & the bearing inner race to zero clearance.
The owner continued....(Snowbum editing here): "My actual question is about the "bearing drifting along the shaft due to missing snap ring "theory". If the front bearing inner race moves along the shaft (despite press fit) ...what ...is holding the shaft in place ...that the drift can take place? If it is the smaller bearing then the snap ring push will really prevent big bearing drift but this may cause a situation where the shaft drifts in the smaller bearing, not the big one. Again, a preload will result. He also wanted to know what happens to the bearing outer races in operating temperatures? Do they float ie. are they free to move away from their assembled positions? The operating temperature is not very far from the assembly temperature where the bearings practically can be dropped in their places.
Tom Cutter replied (slightly edited here by Snowbum):
There are several forces at work that can dislodge the bearing inner race from the shaft. One is the weight & forces of the driveshaft as it undergoes normal rotation, the forces placed upon the output shaft are cyclical, both rotationally & axially. The bearing is designed to be captivated by the clip to preclude ANY axial movement of the bearing race upon the shaft. Unfortunately, the bearing now sold for the output shaft is dimensionally slightly different from the one designed for in the original plan. That bearing had a square corner on the rear face of the inner race, so that it would press evenly upon the circlip. BMW only offered that bearing for a relatively short period, then they substituted a standard 6403 C3 bearing in its place in the parts system. The standard 6403 bearing has a very generous radius on the inner bore, which makes the race bear on the very outer edge of the circlip. In some cases the clip becomes dislodged into the adjacent void. The problem is exactly as you have mentioned, & is the cause of the premature failure of so many gearboxes. The cure is to shim the inner race so that there is no possibility that the bearing can be displaced. This can be done with flat shims, although BMW do not offer such, or by simply fitting the round wire expansion ring that BMW used for the purpose.
This round wire expansion ring sits down in the radius of the bearing bore, & effectively fills the void so that there is metal-to-metal contact from bearing to circlip (snap ring). The circlip is: 07-11-9-934-100 (size 17 x 1). This is the same circlip used on the shift shackle in the transmission, in case you get curious about it.
The round wire expansion ring is 23-21-1-235-006. BMW uses the term Expansion Ring for the wire spacer at the bearing under discussion, & the word circlip or snap ring means the part that goes into the shaft groove.
The output shaft 0.040" (1.01 mm) groove is 0.5 mm deep, located at 17.00 mm from the step on the forward end of the shaft where the 6403 ball bearing sits. Machining should be by 1.00 mm carbide tool. Be sure to check your shaft, & these numbers, don't trust me here. The groove must be very precisely located & done so that the round wire expansion ring, mentioned above, can be installed. The inner race of the bearing we have been discussing must be installed so it presses (well, touches) on the circlip. It should not be installed towards the rear (maximum space between inner race & circlip). My feeling is that if things are done precisely, then the expansion ring must be installed. However ....I have mixed feelings on that.
More on the machining, and presented differently: Oak drew a sketch with his usual very specific and accurate dimension numbers on it for the machining; from the shaft face that the pressed-on bearing can be fitted against, the circlip groove begins at 0.6693" to 0.6713". The shaft bearing fitment area is ~0.670" diameter, for the pressed-fit bearing and the cut begins at 0.6693 to 0.6713". The circlip groove begins at the number noted, and proceeds to the shaft end, with a groove cut to 0.0394" to 0.0400" in width (Oak said the maximum was 0.041"). The groove must be cut square without radius in the cut. The depth of the cut is 0.020".
Another way of saying it all (Oak posted the information in several formats over the years) was that the clip itself (07-11-9-934-100, and use only BMW's clip) was measured numerous times, and the ID measured ~15.73 mm when relaxed. If you absolutely insist on using an aftermarket clip, use one that is specified in mm (metric). The factory groove depths on the shaft varies a bit, from 15.98 mm to 16.18 mm. The conclusion was that the nominal groove diameter was 16.00 mm (16.00 to 16.02 mm OD). The bearings measure exactly 17.00 mm thick. The groove must have the edge towards the shoulder at 17.00 mm...plus perhaps up to two thousandths of an inch. The bearing needs to be snugged-up against the circlip, so the bearing cannot move.
I, unfortunately, never took photos nor drew a sketch besides the one that was on my lathe, when doing the circlip machining job. However, here is a link to an article with photos. I agree with the article, for the most part, with some hesitancy about BMW not using the round wire expansion ring at times. The article will show you what the shaft looks like, the groove being cut, etc.
http://www.gunsmoke.com/motorcycling/r100gs/tranny_circlip/index.html
Here is another article with photos. Be sure to look at this one: http://www.largiader.com/articles/circlip/
http://www.largiader.com/ is Anton's HomePage. Anton has two articles to look at, not overly clearly shown as two different links, at least not in my browser. Look on the left side, and find 'Transmission, clutch, final drive'. Put your mouse pointer over "transmission" in "Airhead transmissions and circlip problem". The word 'transmission' will be seen to be a link to his article. Click on the word. When finished looking at that article, go back to Anton's HomePage and this time put the mouse pointer over "circlip problem" and click for the other article.The throwout bearing area problem (and, pushrods, etc):
This is being put into this transmission article in case someone thinks that the transmission itself has a problem. It is expanded upon here: https://bmwmotorcycletech.info/clutch.htm
Typically, the problem shows up as clutch slippage, when the transmission gets fully warmed from riding. There have also been instances of stiff clutch, or frozen or nearly so clutch operation (not same as clutch disc sticking to flywheel in humid climates ...for that, see clutch article, above link).
Some tolerances on some transmissions throwout area bore sizes, & throwout pistons, were not held tightly enough, for the normal operating temperature range. Generally this is thought of as from 1981, when BMW changed the clutch design radically. If the piston fits into the bore a bit too tightly ...it may still operate smooth enough, but under some circumstances (temperature, as in hot!, rarely cold) may stick. Measure the piston, & if it is over about 1.13" (28.7 mm), you may want to reduce the outside diameter a bit. I have seen these as large as about 1.142" that still worked OK. I can't give a hard & fast rule here, but if yours is up to 1.141 or so, I would certainly see how it fits, & if a bit too much friction, I would recommend sanding the OD a bit. The pressure on them in operation is rather square, so if any doubt, ....if careful... you can chuck the rather short shaft tip end in a drill press and use some rather fine sandpaper for this. Inspect the bearing, & if it looks bad, replace it. Grease it with a good light non-synthetic grease (not moly). The reason to use light grease is that it takes time & miles for the transmission oil to reach this throw-out bearing. Oil the outside of the piston as you assemble this area. Clean & lubricate the arm & associated parts. BMW has a replacement piston 23-13-1-464-167 which is pricey as it includes the bearing & is a new design, that supposedly eliminates the clearance problem of the old style piston, but you do not need to purchase it, unless you cannot find a new old-style bearing (if your bearing is no good); or, you don't wish to sand your old piston, if required. Early versions of the updated -167 part may stick as the transmission heats up.
The original piston is not a one-piece metal part, rather, it is a part-metal-colored-plastic-piston item (many were made with the piston being aluminum), & it expands much faster than the surrounding aluminum alloy casting hole (whose tolerance seems to vary), so common 'feel' for clearances may end up leaving it too tight. There also seems to be instances of them expanding after no problems for very large mileages. One can speculate about the oil causing this. The updated part fits directly, no problems (probably; but I have had reports of them grabbing....) .....you measure & decide. I sometimes test the fit with the transmission at operating temperature. I personally don't bother purchasing the new style, I just do what is needed with the original (sanding the outside diameter).
There is much more extensive information on the clutch throwout bearing and the lever, etc., here: https://bmwmotorcycletech.info/clutch.htm. That article has a photo of the later style clutch throwout parts, the actuating rod, & notes on the felt on the pre-1981 rods, etc.
The 4 speed transmission & the early 5 speed transmission (pre-1981) clutch push rods had felts located in a groove on the pushrod; are installed best from the front, as installing them from the rear will require a special tapered tool you must make. The 1981+ transmissions did not use a felt; had a rather conventional rear seal instead; the rod should be installed from the rear only. The rod is stronger, & aluminum ones better match the transmission changes with temperature. 1981 & later models have a lipped seal at the rear cover for the pushrod, that is not easily replaced ....the transmission must come apart. Install that pushrod, oiled, from the rear, rotating it a bit, to avoid damaging the seal (which you will, if you install from the front, like you do on earlier transmissions & clutches).
The 4 speed transmission had a balls-type throwout bearing. The early 5 speed transmission had a radial needle bearing. From 1981, BMW went back to the ball bearing. The radial bearing is a poor design, & if it fails, the needles can flat-spot, the bearing can seize, etc. However, that is rare. Most throwout bearing failures are due to moisture getting into the gearbox.
See the following article on how to replace a neutral switch on a 5 speed transmission: https://bmwmotorcycletech.info/neutralswitch.htm
Removing a transmission from the motorcycle :
For twin rear shock absorber models, remove the U-joint 4 bolts, remove the entire driveshaft & rear drive & swing arm completely; or, loosen the swing arm pivot pin locknuts (27mm) & remove the pins (allen wrench). Do this carefully to avoid thread damage, then use bungees or rope to pull the rear drive to the rear somewhat. You can then loosen the top battery mounts, tilt the battery mount rearwards a bit, remove the battery, and then remove the transmission, how is obvious. Protect the frame paint, protect the clutch lever mounting bosses (I remove that lever), remove the air cleaner items. This is not a step by step procedure, and you will find things I did not mention ....that are minor.
For the Monoshock bikes, it is similar ...but not exactly the same, particularly on very late models.
For the Paralever bikes, it is more work. I suggest you go to the archives of the Airheads List, and read the long message, quite detailed, on how to do a really nice job. The information is also somewhat useful for those with twin shock or Monoshock Airheads. Here are the details on the Airheads List message you want to find:
From: Tom Cutter
Sent: Tuesday, June 10, 2014 11:40 PM
To: [email protected] &
[email protected]
Subject: Re: Gearbox removal R100 GSPD - - {PRINT AND SAVE THIS}
Hedz- (6/11/2014 Copyright tom cutter)
Replacing the input shaft seal:
This can be relatively easy, or can be difficult. Often when the seal leaks, the transmission is about ready for an overhaul. Let's assume that is not the case. If the seal leaks, oil from the transmission can flow along the splined input shaft into the clutch, oiling the clutch, which then slips. When you have the transmission either out (or backwards some), to do the normal scheduled input spline cleaning & re-greasing, put your #1 eyeball on the transmission input seal. If leaking, remove the transmission to the workbench. It is important to not score or damage the input shaft when removing the seal. You can make a tool to try to remove the seal. Heating the area with a moderately broad flame of a gas torch will help. If the seal is not going to come out, the next step is to drill quite a few holes into the seal, the holes should be perhaps with a 1/32" drill bit. Drill the holes as close as you can around at the outer diameter of the seal, but DO NOT drill into the aluminum of the transmission case that is surrounding the seal's outside diameter. I suggest you use a shop vacuum cleaner to get all the drilled metal pieces into the vacuum cleaner, not the transmission. Some use small drywall type of screws (be careful!). Remove the center of the seal then try to remove the outer part. If this does not work, you will have to remove the front cover of the transmission to press out the seal. Once the seal is out, use a strong solvent & if needed clean up the mounting area very carefully, using fine grit sandpaper if you have to, & use the vacuum cleaner. When replacing the seal, oil or grease it, otherwise you may dislodge the coiled spring in the seal. Use some sort of tool such as a socket or big washer, so the seal goes in squarely.
Replacing the shifter seal:
There are two different shifter seals for the five-speed gearbox, because the bore & shaft diameters were changed. The early 5 speed transmissions had a 16 x 24 x 6.5 mm seal 23-12-1-451-027 up to 09/1974. For the 1975 model year, which began 09/1974 and all later motorcycles, the seal is 16 x 26 x 7 mm 23-12-1-338-740. Be careful when ordering this seal, be sure to measure your seal.
Replacing a leaking shifter seal is fairly easy. You can drain the transmission some, or all, if you want to, but you can also not bother with any draining, just lay the bike on its right side (you don't have to lay it completely over, which might damage a fairing, etc). The idea is to have the transmission oil level well below the shifter area.
Before removing the seal, note the depth of the seal. Replace the seal to the same depth, which should be about 2 mm. Remove the seal with a small seal removal tool, or, even a flat blade screwdriver ...just be careful!! ...to NOT scratch the seal area bore. Use a small piece of wood, if you need to, to pry against with the screwdriver shank; perhaps at several places. Be sure to put the seal in squarely. I use an appropriate outside diameter socket to push the seal in.
MORE Transmission information:
Excessive end play of the transmission input shaft can cause a quite-grabby clutch operation. It can happen cold and/or hot, but more often when hot. To fix this, one must remove & open the transmission & work on the shaft shimming. One can get an idea if that is a problem by removing the transmission, heating it to about the temperature of boiling water & measuring, with a dial indicator, the input shaft end play. Anything over a few thousandths of an inch is suspect. I'd not want over ~ 0.005". This problem with transmissions causing a grabby clutch is not very common, but it seems to be more so for the 1979 models. Another cause is excessive end-play on the crankshaft. That is rather rare, ~ .007" is the maximum I personally would allow, & that is for a dry assembly, which means you cannot take a measurement that means much, when oil is in the end parts! Note also that other things can cause a grabby clutch, including the throwout bearing & the throwout bearing piston being slightly too large in diameter.
Excessively worn crankshaft bearings can cause transmission rattle noises, but this is much more rare than the rattle noises at idle with hot transmission oil, described much earlier in this article.
The 5 speed transmissions weighs about 24 pounds, without lever and without oil.
Sometimes I am asked about the various years of transmissions as to good points, bad points, etc. A lot of information is in the article you are reading; some modest amount is in https://bmwmotorcycletech.info/models.htm. The 1974 transmission is a special instance. This was the transition year for BMW, from the /5 with its 4 speed transmission to the /6 with its 5 speed transmission. There were some things not good in the 1974 transmission. The pawl springs tended to break. The kickstart parts were soft & use of the kickstarter is not recommended. There were problems in positively locating the neutral position, & that wasn't fixed until later. Note that the fix for the neutral position was done before the "Shift Kit" was installed by BMW. The Shift Kit addressed other problems; many confuse these things. The 1974 transmissions, in other words, did not hold up well. Some parts are no longer available. This parts problem extends into the 17.5 & 15 degree parts area (you might find some parts not available that are needed to match your 15 degree parts; so you'd have to convert to 17.5 degree parts). When you see the parts prices, you will scream. If a 1974 transmission is really bad, you might want to consider a new transmission; or, preferably, a really expert rebuilt one (especially one originally manufactured after 1974) ...as the price is less, the quality will be ...or can be ....better than a brand-new one! Quite often, the best thing to do with a really bad 1974 transmission is to obtain a later model; those up to 1980 will install with no problems, much more on this a few paragraphs below.
1974 and 1981 were not good years for the transmissions. Besides what was mentioned above, the seventies 5 speed transmissions had a habit of breaking the gear dogs off. The gear dogs & associated gears are not the same as later models, parts availability is complicated or just NLA for earlier gearboxes; and, this subject can get very involved. You would typically find one or two dogs broken off & in the drained oil. Cause was the shape of the dog and lousy machining (it wasn't perfectly at 90 degrees). One dog carried nearly all the load; broke off, then another might break. Ask about this on the Airheads List if you are confused; or, perhaps you want to know if you can continue riding ....a big maybe.
Occasionally, someone reports their 1974 transmission shift lever rubber (the part your toe pushes on) is splitting quickly. Be aware that the '74 shift lever is thicker than later ones...so, use the shift lever rubber for the 4 speed transmissions.
A subject that comes up often is if you can substitute early & a late transmissions (either direction). Here are some basics:
1. You can substitute 4 speed & 5 speed transmissions up to anytime before the Clutch Carrier light clutch models that came out in 1980/1981. Problems will be minor for 4 & early 5 speed substitutions.
2. To install an early 5 speed transmission into a 1981 (& later) bike means a different input shaft on the transmission is needed; and, you will have to re-shim the transmission, etc. It will then work OK. Note that one way to save money is to shorten the input shaft spline length on earlier transmissions, to fit the 1981 & later clutch. Read the information later this article!
3. To install a later 5 speed into an earlier bike you need to change the input shaft, or ....read on....>>
4. It is possible to put later components into an earlier 5 speed & then use it in an earlier bike. That can get complicated, you may need the input shaft, the rear cover, shift parts, input shaft gear, etc.
5. The best method, & cheapest, of putting a later (1980/81+) 5 speed transmission into an earlier bike, is probably to install the later clutch & clutch carrier. That means that from (and including) the flywheel back, you install all the later items. Direct fit. I highly recommend you do not use the 1981 clutch items, unless they were updated (the 1981 was weak; could disintegrate) ...see my clutch article: https://bmwmotorcycletech.info/clutch.htm. It is possible a very few 1980 models had the weak clutch of 1981.
Here's more information on a variety of transmission things:
1. http://www.largiader.com/tech/airtrans/ Has a number of photos & descriptions that you may find very useful in understanding the 4 & 5 speed transmissions in a few areas, such as the input gear that has the shock absorber cam ears that sometimes break on the early 17.5� transmissions; information on the shifting mechanism & 'shift kit', etc. I recommend you review that article ....and the links at the bottom. Note that 17.5� gears were supposedly installed from 1982, & I am not at all sure that is totally correct. Contrary to what Anton says at the bottom of his article, regarding my article that you are presently reading, stating that I cover mostly 'historical' information, I cover a huge amount more than just history. I suspect Anton looked at my article, & did not scan down very far. I get into more depth on things, including the input cam-gear ears, etc. Regarding that input gear: see #3, just a bit below here...for a more vigorous treatment of the input cam gear and the 17.5� transmission, ETC. Anton's article now has photos showing how the cam changes fixed the neutral finding problem, and, later changes in the Shift Kit, that came about in 1981+. Many have confused these fixes, as BMW made changes to improve neutral-finding many years before that.
2. https://bmwmotorcycletech.info/oiltransfers.htm. The output shaft oil seal on all models except the Paralever, have the open side facing rearward.
The Paralever output shaft oil seal open side faces forwards. A new style seal is now being used on the Paralevers, install dry, shaped for a couple hours on some sort of mandrel, & then be very careful about the installation to avoid the seal being damaged by the speedometer drive. You can use some tape over the drive gear to avoid damaging the seal. The new style seal used on R100 GS transmission output: https://bmwmotorcycletech.info/SI-00-053-88-new-style-seals.pdf
If you have an early model of the Paralever, there may be a goodly sized V-vent at 12 O'Clock in the housing. Block this vent & drill it 1mm. Later models have this already modified.
If you have a NON-Paralever model (wet driveshaft models used a green seal) ..... and oil is transferring from driveshaft to transmission, you probably have one or more of: too high driveshaft oil level; sacked suspension; extreme downhill riding; ...and may want to fill the 12:00 notch ....be sure to leave it with a teeny hole in the filling. You must have such a hole if you fill the notch.
Only the 1970 & 1971 4 speed transmissions did not have the tiny notch for breathing, at the transmission output seal 12:00 position (Paralever boxes generally have the notch sealed or a tiny hole). Because of this, the driveshafts on the 1970-1971 bikes tend to have their 'rubber bellows' swell up in hot weather riding. This slight pressurization can also cause oil transfer problems. An article about this is in the September 1981 BMW News. The only good cure is to add the transmission output vent ...which is a drilled hole or a hand-filed hole. Other forms of venting, even modifying the driveshaft oil plug, etc., do not work well (even with a several inch long line run upwards). The shaft housing could be vented in the more forward area, but the best fix, if you want to fix this bellow swelling and/or oil transfer problem, is to put a vent in the transmission output area, as in later Airheads. Best time to do it is when the transmission is out of the bike, perhaps for input spline lubrication.
3. The input gear on the 5 speed transmissions has been changed four times, used with three different gearsets. The original input gear was 23-21-1-231-519, often just called the -519 gear. This was used from 1974 to sometime in 1982. The 1979 to 1982 ones have been known to crack. Some from a bit later have also cracked. The 5 speed transmissions have (on the input shaft) a cam & spring shock absorbing system. This gear must be replaced if it appears to have worn to even vaguely questionable; the replacement gear from BMW is hardened.
For the helical, cluster, and 5th gear, BMW changed all by approximately mid-1982 (supposedly at transmission serial 58225), from a helical gear angle of 15� to new angle of 17-1/2�. The fiche may show earlier in 1982. The actual changed angle is not exactly the part of the gear appearance you might think; rather, it was the tooth profile. The purpose was reduction in noise & increased strength. Because of this change, the -519 gear had to be changed. BMW did so, and still had problems with it ...so they did another change, beefing it up. They also had to change the input shaft. This occurred in 04/1982, & continued until other changes, in 02/1985. The new shaft for the 17.5� gears was 23-21-2-302-331 for no kickstarter; & -332 for with kickstarter. The shaft was shipped complete, except for rear bearing.
Further explanation....some possible confusion...then more explanations.... :
Some 1981 bikes had a change of the 17.5� gear on the input shaft ....this was the small shaft, with a coarse spline. The 1981-2 change was to a finer spline ...and then even later to a larger diameter gear set! The 17.5� input gears, from 04/1982 to 02/1985, might break ears. This is when BMW added splines to the drive dog that mates with the input gear. This change occurred with transmission serial number 115167 on 03/1985 (I think). One point of confusion is that there were two changes of the 17.5� gear to especially know about. I am going to clear up that confusion for you in the next two paragraphs.
Confused?? Here some of the above information is presented differently, for clarity (I hope!):
In April of 1982 (from serial 58225 on the transmission??) the helical-cut gears in the transmission were changed from 15� to 17.5�. The new 17.5� gears are identified by a cross or star or X marking on one end. They are not interchangeable with the older 15� ones, & only 17.5� matching gearsets can be used. Supposedly BMW also identified these updated transmissions with blue paint dot on the airfilter housing surface of the transmission. However, the later transmissions (1984+) do have serial numbers on the outside, check for yours just barely below the air cleaner box on left outside. From 115167 (from April 1985?) the input shaft assembly was redesigned. The earlier gear had a smaller ID, and fit the smaller input shaft OD ...with short splines. The reason for the second generation update was because the first generation of the 17.5� input shaft gears (4/82>>4/85) were weak & the drive ears might break. These updated parts can be fitted to an earlier gearbox with the 17.5� gears. The original fragile input gear is probably still available from BMW. However, the best thing is to install the complete second generation input shaft assembly. The part is 23-21-2-302-331 if you have no kickstart gear; and 23-21-2-302-332 if you do have the kickstart gear. Supposedly these transmissions are identified by a black painted panel in the ribs in the aircleaner mounting area. Note that in one other respect the input shaft used on the 1981+ models is not the same as the older gearboxes, due to the redesign of the clutch, etc., the earlier ones have a longer nose, see #8 below. Thus there were at least two changes to the input shaft.
You must be very careful when changing parts to not mix the wrong gears; this can easily happen with the bevel-cut 5th gear on the output shaft ...yes, the one that can have the circlip area problem. BMW officially changed to the 17.5 helical gears. You already know that the 17.5� gear has an identifying mark on it. What may not be clear to you, is that if you need a new intermediate shaft (& have access to the large 20 ton+ type of press needed to disassemble that shaft-set), updating the gear on the intermediate shaft means you must change the output shaft bevel gear to the later 17.5� type. .....and, you must change the -519 gear on the input shaft. BMW does not sell the intermediate shaft except as an assembly and it is very pricey; which is why some use old gearboxes for parts! Early versions of the intermediate shaft are NLA from BMW! Because of the possibility of you using wrong parts, it is best to inquire on the Airheads LIST if you are at all confused! ....or, let an expert do your transmission job!
4. There are quite a few things that don't readily appear to someone taking apart a gearbox. For a truly good operating gearbox, that is smooth, positive shifting, and will last ...you WILL ...or should ...consider a Specialist.
5. The 1974 transmissions had a soft kickstart gear on the input shaft, which can cause problems. It is best not to use the kickstarter, except in an emergency. BMW replacement part will be hardened. See #7, just below.
6. As you have already read about, many changes were made to the transmissions over the years. But, there were many more I did not get into. There are dozens of these 'nice to know', or 'need to know' items. Sometimes the serial numbers of the transmissions, or bike serial number, were not well identified as to when changes were made. It can get very complicated, one of the reasons I recommend Airhead transmission specialists. Some examples here would include the shifter fork groove on the sliding gears that changed from 6.5 mm to 5.7 mm; square undercut dogs (and associated 'windows') for 3rd, 4th, and 5th gears; the detent spring change on the selector bracket; the casting was changed for a stronger selector fork shaft, old was 100 mm, new was 105 mm. BMW changed the shifting parts numerous times. They did not incorporate all the changes at the same time; nor, all the models at the same time. The offset segment for pawl spring clearance was such a change. Several changes occurred at serial Z5A79720.
7. The /6 kickstarters should not be used much. I suggest never using it unless necessary. The 1974 was weak. Never just jump on the kickstart lever. Be sure it is properly engaged. My method for all years & models of kickstart transmissions is to use light foot pressure, until ...or if ...the lever seems to meet a mechanical stop, then use the clutch lever at the bars to allow the kickstart lever to move downward an additional small amount (full mesh). This ensures proper engagement. Release the clutch lever, keeping light pressure on the kickstarter lever. Then, push the kickstarter down briskly.
The kickstarter lever on /5 and later will 'bottom' on the footrest rubber. It is important that it not be a pure metal contact, and on the /2 bikes, there is a rubber bumper. The rubber must be intact. I recommend the 4 speed kickstarter shaft be modified with a drilled and tapped hole, and apply blue Loctite to the added screw and use a large washer. Information and a photo are well below in this article.
8. Improved shifting parts, for external linkage mounted off the footrest, are probably still available as a kit, for the earlier 5 speed transmissions. The design change occurred in 1978.
9. In 1981 BMW made changes in the transmission-located clutch throwout bearing area, internally as well as to the external shift lever. Also in 1981, BMW made a large change to the clutch & flywheel, which became a totally different design, & the flywheel was now called a Clutch Carrier, & the transmission input shaft was made shorter to accommodate those changes. The input shaft is about 24 mm long on the early transmissions, and from 1981, it is about 19 mm long. It is also possible to shorten the input shaft on an early transmission, in order to fit it to a later clutch unit by simply using a cutoff disc, etc., even with the transmission still together! Be sure to radius the forward edge properly. Within certain guidelines, such as the input shaft length and neutral switch model, most transmissions generally interchange. Pay attention to the Monolever & Paralever versions.
10. Shift kit and pawl spring, etc:
Inside your transmission is a detent 'Pawl' spring, that enables the shifting mechanism to shift gears. If that spring breaks you are stuck in whatever gear you happen to be in. You might be able to remove the fuel tank, turn the bike upside down, & then shift into a gear, maybe. I've heard of this, never done it myself; especially since I have never had a pawl spring of my own break.
On 07/27/2016 I was informed that the upside-down procedure had been done by someone, but they only managed to get the transmission into 5th. The photos I received definitely confirmed the procedure ...the bike was upside down, being lifted by several guys. "A bloke from the West Australian club recently went to South Australia with the vintage club and had this problem. As you can see by the photos the remedy they attempted. It was stuck in 2nd gear and they hoped to get it to 4th, but 5th was all they could manage and he rode it back to Perth in 5th, around 2000 miles. Yes the box had to be repaired."
In the transmissions I have worked on, I make sure the pawl spring cannot break from being around a too large boss, but there are other considerations too.
There are homemade tools that you can make that you stick into the transmission oil level hole after removing the threaded oil fill/inspection plug. It is tricky to use the tool, and if you contemplate making or purchasing such a tool, I highly suggest you look at a transmission with the cover off, while you manipulate that transmission with your tool to see what twisting and turning is needed. There is an article on this website about these tools, with pictures and construction information:
https://bmwmotorcycletech.info/emergency-shifting-tool.htm. Any such tool will be difficult to use without practice. The tool will enable you to shift into any gear you want, but not during riding! Use of 2nd gear would be the most likely practical gear to leave the transmission in. All the 5 speed transmissions up to the early 1980's could have this pawl spring breakage defect. This particular spring is used in all years all transmissions.
WHY the breakage? The early spring rubs on itself during operation, wearing itself thinner. The spring may wind too tight on the large boss which may also be too large in diameter, causing excessive force on the spring. Possibly some faulty springs, possibly a few other things. See Anton's article I mentioned earlier, as it has some photos.
Pawl spring breakage fixes: One can turn down the boss it rides on by about .060". The boss needs to be around 0.613" or below. If yours is about .630, then machine it down. The boss size was probably fixed in production, but exactly when is questionable; but, as I note later, perhaps in 1975 or all before 1976 model year? Tom Cutter posted to the Airheads list that the original was 15.95-16.0 mm; (0.628-.630").... and the change should be to 15.55-15.6 (0.612-0.614). So, Tom and I agree on that, well, sort-of, so read-on. In my opinion the post the spring is on has had its diameter changed in the 'shift kits'. You can certainly reduce the diameter of the stock type. The spring must not bind-up in its operation. Certain of the so-called 'shift-kit' parts, pawl 23-31-1-242-892; and Segment (offset link) 23-31-1-231-578, supposedly will 'cure' broken pawl spring problems, but modifications work well. The offset segment for pawl spring clearance was one of BMW's changes.
What has not been said hardly anyplace, except perhaps Anton Largiader's page, is that the Shift Kit version, incorporated by the factory since sometime in 1981, will keep the pawl engaged, if the spring breaks.The shift kit uses spring 23-31-1-242-910, and you must use that spring with the shift kit.
In mid or later 1981 (this is not truly clear, although the serial number of the transmission is known, see just below), BMW installed the so-called 'shift kit' inside the transmission. This is a fairly extensive kit with a revised cam shape, modified shifter arm, etc. It is retrofitable, and can be considered when transmissions are overhauled. I would probably not install it in an earlier bike that still had the heavy flywheel, as the cost is high, and the improvement small. BMW has a habit of phasing in changes, sometimes on some models long before others ....and on occasion one might find a far later serial number without the shift kit change; and transmissions with partial changes. The serial number for the beginning of the shift kit installation is: 56477. The prefix was Z or ZSA. Frankly, I do not trust that serial number.
Prior to the shift kit, BMW had made changes to help eliminate the sometimes false neutrals. The shift kit was to fix several problems, the major one being over-shifts, due to the lowering of clutch and clutch carrier (prev. called flywheel) inertia from lighter weight. It is, however, true that some shifting improvements in the neutral finding were incorporated, but not to the extent you may think. The kit is part number 23-31-9-056-150. The kit as such is no longer available, but the parts are. The shift kit 'fixes', or at least additional help for false neutrals do not have the same level of improvement in the heavy flywheel models as the later clutch carrier models. http://www.largiader.com/tech/airtrans/ is a page on Anton's site that shows the primary upgrades for the neutral; and, the shift kit, with photos.
To make this very clear: The shift kit was installed by BMW in some models in 1981 and all by 1982 and later, primarily to fix over-shifting during gear selection. This was for the clutch carrier models, which, being much lighter, reduce the inertia of the rotating mechanism, compared to the heavy flywheel models. The Shift Kit is no longer available as a Kit. There are some reliability improvements by installing the Kit parts into a heavy flywheel 5 speed, but the shifting improvement is small to modest, although it is noticeable.
As mentioned earlier; numerous parts changes in the shift mechanism occurred over a number of years ....such as the offset segments and pawl spring changes.
In the September 2003 issue of BMW Owners News, from page 34, is an illustrated article on replacing a broken pawl spring in the transmission. Comments by me: In illustration 15, the torque obviously should not be 24 foot pounds; 5 to 6 foot pounds is correct. In the article, the author does not mention that the BOSS needs to be relieved to be sure the spring does not bind up & break again! In the November 2003 issue of BMW Owners News, from page 34, is an article on installing the updated shift kit. There are some errors in the article:
a. In the first column of page 34, second paragraph, the kit does not necessarily allow shifting with a broken spring.
b. On page 34, photo #1 text, it is not true that there are no differences. There is a design change. The 1974 and 1975 had a reverse neutral ....that is ....the plate protruded at neutral, rather than being detented. The new design makes finding neutral more distinct and positive. The neutral switch was changed, and although they look similar, they are not. The newer plate shaft is changed to insure against clashing with the pawl arm. Photo #3 text should not really have the second sentence worded like that.
c. On page 35, photo #4 text, it is not true that there are no differences. The new arm has an offset to avoid binding.
11. The "shift kit" is most effective on the 1981 and 1982 models (to maybe 1983, depends on exactly when BMW phased in the shift kit themselves, on the various models), because these have the lightened flywheel, called a clutch carrier. The shift kit might improve earlier transmissions slightly to modestly, certainly the pawl spring breakage problem is lessened. Using pawl 23-31-1-242-892; & Segment 23-31-1-231-578, supposedly will 'cure' broken pawl spring problems ....but; modifications to the stock boss (as discussed earlier) and/or use of the upgraded spring work well for that particular problem. The shift kit will help if the early heavy flywheel has been lightened. The shift kit did not come with any instructions.
I would not put the shift kit into a stock early heavy clutch/flywheel motorcycle unless the owner understood the cost, and what will be helped, or not. Certainly, the earlier transmissions can be re-worked without the Kit parts, for improved reliability, as noted well above, such as boss size changes, etc. There is no problem learning how to do the nice slightly slower shifting with the old setup. Pre-pressuring works delightfully.
Note what I said much earlier in this article: The thickness (viscosity) of the oil has a substantial effect, depending on temperature, as to shifting characteristics. The oil …and quite a few other factors in the gearbox design, have an effect on how the gearbox parts slow down, as you attempt to shift downwards. That is one of the two reasons (the other being cold lubrication) that I do not recommend anything but 80W90; or 75W90 gearbox oil, GL5. The speed at which the slowdown (or speedup) happens affects how the gearbox seems to you to shift; going up a gear or going down a gear. Shifting speed is not just something involved with the 'shift kit', it is also involved with gearbox setup, and some of the many changes made in the gearbox for various reasons. If you were installing a lightened flywheel, you should consider the kit.
Be sure, in your assembly of shift kit parts, that the arm is doglegged, that is, off-set.
The shift kit is made up of the following still available parts:
23-31-1-231-578 segment shaft (offset link)
23-31-1-231-611 shifting cam (for 1-2, 5)
23-31-1-242-892 pawl
23-31-1-242-910 spring
23-31-1-451-563 shifting cam (for 3-4)
Using pawl 23-31-1-242-892; & segment 23-31-1-231-578, supposedly will 'cure' broken pawl spring problems ....but modifications to the stock boss (as discussed earlier) and/or use of the upgraded spring work well for that particular problem.
NOTE the following ....Tom Cutter's comments ....and MINE ....on how that boss was ....or was not ....modified by BMW after 1974 or 1975 (We disagree on that point):
|
Tom Cutter posted the following to the Airheads E-mailing LIST in September 2003; it clearly states what the kit also does, & I quote (typos corrected by me; and, comments by me, Snowbum, are clearly marked with asterisks): ***An Airheads LIST inquiry on October 5th, 2011, resulted in Tom Cutter's remarks about the 23-31-1-231-619, the original type of early shift pawl spring, the bent-legged type; replaced by 23-31-1-242-910, with straight legs. Tom noted that you have to use the dog legged shift segment with it, or the spring will bind. Perhaps confusion over this is why Tom & I disagree a bit on the subject?*** |
NOTE: BMW themselves knew they had a problem with pawl spring breakage. There was a SI from BMW on this many many years ago. The old pawl spring, as you can see from all the above chit chat here, was 23-31-1-231-619. The segment for the spring was a nominal 16 mm in diameter (0.630"). BMW made the boss smaller, and then changed the segment, etc. But, you can change the boss diameter that the spring fits around, and I suggest it be a bit less than in the above chit chat. I go along with what BMW said in its old bulletin, which was to make the boss 15.5 mm, which is 0.610". You can always upgrade with the latest parts.
NOTE: If you decide to reduce the boss to 15.5 mm, be sure to use a brand-new spring, because BMW improved the tempering of the spring.
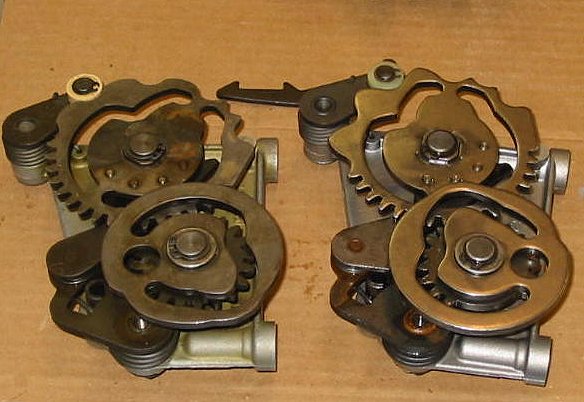
For other views, showing these parts lined up and how the neutral switch works with them, see: http://www.largiader.com/tech/airtrans/. That article also has some photos in it that you may find very useful in understanding the 4 and 5 speed transmissions in a few areas.
Use of the shift kit requires use of the later longer neutral switch, or the neutral switch electrical functions will be in reverse of what they should be. The later switch is 61-31-1-243-097, and a spacer 61-31-1-355-262 is to be used. The 1974-5 neutral switches have a shorter stem. If you install the wrong switch, it does not work correctly, and there may be shifting problems!
There are two sections in the https://bmwmotorcycletech.info/electricalhints.htm article about the neutral switches, neutral lamp, starter circuit, and problems. It is complex!
Here is an article on the transmission-mounted neutral switch that has all the details:
https://bmwmotorcycletech.info/neutralswitch.htm
ALL 5 speed neutral switches are closed in neutral, turning on the green neutral lamp (& enabling the starter to function if the starter button is pressed on 5 speed transmissions). The reason for the shorter & longer neutral switches is that in the early shifting parts, the switch rode on a section of the shifting cam that was a projection; the switch itself helped make the feel for the 'detent'. On the revised parts, neutral is much more positively felt, by the switch being in a 'valley' of the shifting cam, hence the switch needs to be longer and the switch internals are such that the switch is closed when the plunger is out (into the 'valley' of the cam).
There is a diode in the neutral circuit. If that diode shorts, the lamp is on if the lever at the bars is pulled. There is also a peculiarity with some of the 1978-80 models, which have a master cylinder under the fuel tank. These incorporate a float switch, whose purpose is to illuminate the brake failure light if the fluid runs low. The lamp gets tested each time you start the bike, via a diode. If the diode shorts, and you are also low on fluid, the starter could theoretically energize. I suspect this is very rare. The RS and RT rear disc models from that era may have a rear master cylinder float switch.
12. The 4 speed transmission & early 5 speed transmissions can be difficult to find parts for, & difficult to overhaul correctly. I strongly suggest going to one of the experts shown below, in particular Bob Clement, Ted Porter, Tom Cutter and Matt Parkhouse. In fact, those are my recommendations for any BMW transmission. See near the end of this long article a bit on those folks, and how to contact them, and some others.
13. 5 speed transmission gear ratios:
Gear |
Stock | Competition/Race. The gear set is 23-21-1-233-427. I have never seen this gearset, & wonder if any were ever sold? |
| 1st | 4.44 | 3.38 |
| 2nd | 2.86 | 2.43 |
| 3rd | 2.07 | 1.93 |
| 4th | 1.67 | 1.67 |
| 5th | 1.5 | 1.5 |
14. There is an additive that sometimes will help smooth the shifting, particularly with transmissions with the original older style shifting parts. It is Dow Corning M Gear Oil Additive. Comes in quart bottles. Shake well and use up to 2% concentration maximum. Do not use "up to" the 10% that Dow suggests. The amount to use is about 18 cc for the Airhead transmission. This additive is expensive. Do not use with synthetic oil & do not add more than 20 cc! See other articles of mine for a fuller explanation, such as: https://bmwmotorcycletech.info/oilcansimple.htm
15. There is a plastic roller on a shift lever in the transmission, it is 23-31-1-231-572, and tends, over a long period of time, to start to fail; the steel one from the K models is 23-31-1-451-087; I have recommended it in the past. I am not so sure about this, now, as I have heard, ONCE, of the steel K bike roller causing wear on its pin ...and against the lever it touches (perhaps there is some heat treatment variation on that lever ...or?). If the plastic roller fails, the transmission may well exhibit jumping out of gear. This can also happen if the associated spring breaks. If a question comes up on this point, I defer to the transmission experts mentioned. At least one transmission guru, Ted Porter, is now using a bearing, #688-RS, for that roller.
16. In 1977 BMW made changes to the transmission. The slider gears shifting fork grooves were made narrower, now 5.7 mm; previously had been 6.5 mm. The 3rd, 4th, & 5th gears now had square doglegs (undercut). The detent spring was changed...and it has 5 turns. The cam-plate was changed. The casting was changed for better selector fork shaft support for 3rd & 4th, & the shaft which had been 100 mm is now 105 mm long. In 1979 the case was stiffened with ribs for help with shimming changes being needed at high mileages, from case stretching.
17. Earlier transmission shift linkage had a foot shift lever connection with a rubber boot over it; the linkage is not adjustable other than by the foot peg, which is often found at the lowest position for owners with big boots. Some install adjustable linkage, or, horrors!, grind away the foot peg casting. If you install the adjustable linkage from the ST & G/S models, it bolts in place of the bent rod. 23-41-2-301-391. Drill the hole in the shift lever, as it is just a bit too small in diameter. Use 1/4" drill. Add the foam donuts 23-41-7-650-149 over each of the ball joints, or replace your old bad ones. Keep it all oiled.
18. 1981 & later models have a lipped seal at the rear cover for the clutch pushrod, it is not easily replaced; ....the transmission must come apart.
Install the pushrod on these models oiled, from the rear, rotating it a bit to avoid damaging the seal (which you will, if you install from the front, like on earlier transmissions and clutches).4-speed transmission modification that I recommend:
The four speed transmission kickstarter idler gear shaft is press-fitted or cast-shrunk into the rear transmission cover. There is a tendency, particularly when the gearbox is quite hot from a ride (which expands the aluminum rear cover much more than the steel shaft), for the shaft to move inwards into the transmission. Do not allow it to move into the transmission! To do an easy fix is probably best, as the formal fix is removing the rear output flange, heating the rear cover, and ...with some experience knowing what to do next, you remove that rear cover, and modify the shaft. So, the fix is to do the modification without gearbox rear cover removed; that is, it is best done before the shaft moves inwards ...or worse, parts inside fall to the bottom. I recommend that the simple fix be done with the transmission removed from the motorcycle. This enables the transmission to be rotated input side down, and a very squarely done hole drilled into the shaft. The hole is then tapped squarely for a small hex-head bolt which is used with a large flat washer. I suggest you do NOT use a screw.
Re-stating:
The "simple fix" involves drilling & tapping the shaft, adding a small bolt and large washer. In one instance I remember from years ago, the shaft had already started to move. The owner drilled the shaft, added a large flat washer & bolt; heated the rear cover & used the bolt to pull the shaft back into position. I don't necessarily recommend it, but it did work OK.
You must drill the center of that shaft at the back of the transmission and to do it squarely. Thread the hole (use a metric size), add a large flat washer larger than the shaft diameter, & use Loctite blue or red on the steel ONLY bolt you will add to hold the washer to that shaft. That washer prevents the shaft from moving inwards. Use some sort of goop sealant between the washer & shaft/case, to stop any possible oil leakage.
This modification has often been done before there is any or only slight movement, without removing the rear cover. If you have the gearbox rear cover off when doing this modification, then re-assemble the rear cover by first cleaning the shaft & cover mating areas; then applying a drop or two of Loctite to the shaft and cover as you assemble the rear cover (heated, of course). Some other photos of this job; and, a bit more information, will be found in an article by Matt Parkhouse, in the August 2008 BMW Owners News, on page 38+. If the shaft has started to move, you might be able to drill the shaft, install a steel bolt and washer, and I suggest you heat the transmission rear cover, and then pull the shaft into position with the bolt as noted in the earlier paragraph. Don't use too small or two large a bolt size, and use a decent amount of heat. Do not use a weak brass screw, do not use anything but a steel bolt.
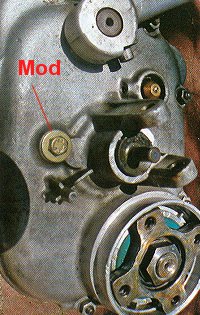
BEARINGS:
4 speed transmission:
Output shaft, drive (rear) end, type 6204C3, 20 x 47 x 14 mm. This was part number 07-11-9-981-219; it was changed to 07-10-1-468-880.
Other (front) end, type 6403C3, 17 x 62 x 17 mm. This was part number 07-11-9-981-505; it was changed to 23-12-1-338-795. Used on both 4 and 5 speed gearboxes. See remarks below for 5 speed transmissions.
Layshaft (also called the cluster shaft or intermediate shaft), cover (rear) end, type 6203-C3, 17 x 40 x 12 mm, the part number is 07-11-9-981-214.
Clutch end double row type 3202 in some books, but is 3203C3 (aka 5203), 17 x 14 x 17.5 mm. This was part number 07-11-9-982-409, and that changed to 07-10-1-468-914.
Input shaft, both (front and rear) are type 6304C3 20 x 52 x 15 mm. Part number 23-12-1-232-695. Used on both 4 and 5 speed gearboxes.
5 speed transmission:
Regarding the 6403-C3 bearing 'where the circlip is' : Be sure to read the notes well up this article on this bearing, and the associated photo of it.
Output shaft, input (front) end, type 6403 (see 4 speed) (see above too!). The output (rear) is 6304 (see 4 speed).
Layshaft (Cluster shaft or intermediate shaft), both are 6304.
Input shaft: Uses special bearing #NU204E at the front, and a 6304 at the rear; and note that the 6304THNC3 bearing is used, part number 23-12-1-233-807.
ADDENDUM:
In 2005, Matt Parkhouse did a quite good series of articles in BMWMOA-ON, on overhauling the 5 speed transmission.
http://www.largiader.com/tech/airtrans/: Listing of parts, photos, shift kit items, etc. Site will further your education on the 4 and 5 speed transmissions. Anton also lists some of the many changes BMW made to these transmissions over the years. Some information on what can & cannot be substituted; what won't fit, etc.
With regards to this article, http://jhau.maliwi.de/mot/gearbox.html, click for gearbox. I have not yet gone over the instructions step by step. While there are plenty of tricks, etc., that are not in the article, it seems to be complete enough that you may be able to do an overhaul. I have also been informed that the nylon roller that someplace in the article is mentioned as being replaceable by a metal one (maybe he means the K bike metal roller??) ....has a wrong part, and the part should be 688, not 628, both being 8 x 18 x 5 mm. https://bmwmotorcycletech.info/SI-00-053-88-new-style-seals.pdf is a file that describes the 'new style' Teflon seal used at the engine output and at the transmission output.
Preloading the Shift Lever, what it does to help make smooth transmission shifts:
I will try to simplify this somewhat. I am also taking some liberties here on the explanations.
Lightly preloading the shift lever can and does work on many (if not most) motorcycles, and it works on the Airheads with the cam plate type of shifting mechanism; and works also on the Classic K bikes, even though the Classic K bikes have a drum type shifting mechanism. A part of the good-effect is due to helping to slow the moving parts just a tiny wee amount during the actual shifting attempt, to help line-up the various parts.
Airhead transmissions, like most older motorcycle transmissions, use dogs (squarish pegs) on the sides, internal and/or external of some gears. When shifting, you are moving gears out of mesh or trying to put them into mesh at the gear's teeth, but you are also sliding some gears along shafts (typically the gear is sliding on a splined section) and the side of a gear is try to mesh with the side of another gear, by means of those side dogs; sometimes both are male types, sometimes there are male and female dogs (that is, the female ones are depressed inside the end of a gear). Thus there are two types of meshing going on, one is the normal gear teeth type of meshing, and the other is the sliding dogs. End dogs are simply squarish sections on the sides of gears. When two such dog sections mesh with each other, the gears are, more or less, locked to each other, with very little play between the dogs being meshed. A good cutaway of a transmission or a good sketch will show all this nicely.
As you try to shift your 4 or 5 speed Airhead transmission, numerous things must happen at the same or approximately the same time. Some parts must speed up, some parts must reduce speed, in order to enable dogs meshing and gear teeth meshing. Gearbox manufacturer's have engineers that get headaches from trying to get gearboxes to shift smoothly, which is compounded by the fact that motorcycle transmissions do not have synchronizers. For motorcycles, all sorts of friction effects from gears and shafts moving, oil viscosity, temperature changes, etc., are involved. This is a complicated subject; one that BMW & its transmission designer-maker (Getrag) have faced, with some strange results now and then ...like adding friction-producing O-rings on shafts. BMW transmissions, properly assembled and shimmed, shift nicely, but other things can work against smooth shifting at times. One of those things is the heavy early model flywheels, as the engine does not like to slow down as quickly between shifts. Engines with the later lighter clutch/flywheel models (1981+ with the new-style clutch carrier) slow down faster (and accelerate faster during shifting). Even the 1981+ lighter clutch carrier assembly has a lot of inertia, compared to most multi-plate type clutches used on, for example, Japanese and British (and American) motorcycles. Thus, slowing the engine for shifting takes a small amount of extra time (typically thousandths of a second), but that is noticeable to you, the rider, in the smoothness of the shift with no clashing of gears or clunking. A lot of things must happen in a tiny fraction of a second, and in the correct order and timing.
In many types of racing, fast shifts are a must. Methods included removing some of the dogs, increasing clearances where the dogs meshed ...and....a "momentary ignition cutout switch" was often installed & was enough to allow the heavily loaded gears to de-mesh & re-mesh with constant foot pressure on gearshift lever.
You can up-shift your Airhead between gears by preloading the shift lever & using the throttle ....and no clutch. I recommend, but not overly strongly, that you not do this, although if you practice, it is not necessarily hard on the transmission once you learn to do it correctly.
If the gears/dogs do not line up closely at the exact instant you want to shift, then it can take additional rider effort to get the parts to mesh quickly. Normally, coming to a stop sign, Airhead riders raise the rpm (typically blipping the throttle) & shift downwards to first gear before quite coming to a complete stop. Otherwise, you may have to slightly engage the clutch or do a 'double clutching', play with rpm, etc. when you want to shift from Neutral to first gear when starting off. In shifting downwards it is normal to blip the throttle slightly. Experienced riders can often shift downwards without the loud clunk often heard from Airhead transmissions. On some transmissions that just can't be done all that well, particularly on pre-1981 motorcycles. Upward shifting may be easier.
It is common for two gears and/or dogs to try to mesh but the teeth (or dogs) are directly opposite each other, that is, it is square end of one tooth or dog against same on the other. Unless you can get one of the two gears to move at least slightly, you will not get meshing. It is not unusual for this to happen; and it can happen at the side dogs teeth, or the outer teeth of the gears. This situation often seems to happen at stop lights, when you did not shift downwards into another gear before fully stopping. This is also exhibited a fair amount of time when you shift to neutral for a stop light, and then try to engage a gear before taking off again...you may have to use the clutch and throttle slightly.
Pre-loading the shift lever helps improve the friction, ease of gear and dogs meshing, and allows closer rpm matching of the internal parts. Overall, shifting is easier and smoother, and often with no clunking. Pre-loading simply means FIRST putting a small amount of pressure on the shift lever, ....and then using the throttle smoothly, and clutch lever smoothly, to enable the shift. Practice this! It is different going up versus down a gear, or even to neutral. Once you master the technique, you will likely use it forever, automatically, the brain learns the routine, and you don't even think about it.
NOTE that BMW transmissions tend to take a lot of miles to fully break-in. The transmissions can also shift differently, giving a different 'feel', if the oil is changed to a different viscosity grade, and sometimes the brand/model of oil has made a difference. Some, such as myself, believe that it is best to break-in a newly overhauled transmission using 80W90 petroleum oil, and after a few thousand miles, switch to a full synthetic, with which many of us believe that the transmission will last a lot longer.
Starting, using the kickstarter:
On kickstarter Airhead models, particularly early ones, if you push the kickstarter down some & it then seems locked with moderate foot pressure, then I suggest you not force the lever downwards. Release the kickstarter lever, then pull-in the clutch lever at the bars, and then move the kickstarter lever downwards a bit to get some engagement, then release the clutch. That usually allows proper meshing. Then use the kickstarter. This technique greatly reduces the strain on the parts from otherwise very excessive foot pressure on the kickstarter lever, all of which is torque-multiplied by the mechanical leverage & applied to, perhaps, not overly strong innards. The 1974 is particularly weak ....so be careful about using the kickstarter!
Many private owners have overhauled their own transmissions, quite a few successfully, some using information, tools & parts from Ed Korn or his successor. Most owners will not want to overhaul a transmission themselves & will entrust it to an expert, as there are a considerable number of 'tricks' & specialty knowledge needed to overhaul a transmission truly properly so it will last a long time, & have smooth operation from cold to hot. NOTE THAT A TRANSMISSION THAT FAILS AND LOCKS-UP, CAN DUMP YOU!
I have put TWO sections, further down this article, for do it yourself-ers (DIY).
A list of specialists for transmission work (not listed in any special order):
Anton Largiader in Charlottesville, Virginia; DBA Virginia Motorrad [email protected] www.largiader.com
http://www.largiader.com/tech/airtrans/
TedPorter's Beemershop on the West Coast of USA. https://beemershop.com 5100 Scotts Valley Drive, Ste 100, Scotts Valley, California (831) 438-1100. Ted has MANY years of experience on overhauling/repairing BMW transmissions. Be sure to ask about his backlog.
Tom Cutter on the East Coast. http://Rubberchickenracinggarage.com. Tom does a very substantial number of Airhead & other BMW transmissions. 215-321-7944. If I, Snowbum, had a transmission needing overhaul, I'd likely ship it to Tom, when considering many things, including turn-around-time.OAK: Orlando Okleshen in the Chicago area did superb work on transmissions, unfortunately he died in early 2017.
Bob Clement, Bob's Motorwerks, [email protected]. Long history of BMW Airhead work; was in on the ground floor with all the circlip problems. 132 Blanchard Butte Rd. Roberts, Montana, USA phone: 1-406-445-2044 Works on BMWs from /2 era to last of Airheads.
Matt Parkhouse in Colorado Springs, Colorado [email protected] or [email protected]
The following are known to me only by hearsay:
Brunos, in Canada, has a very good reputation. No personal knowledge, but trustworthy & competent from what I have heard. I have been told that Bruno Sax is quite ill, and may or may not reopen his shop. I have not been able to provide confirmation at this time.
Charlie Johnson BMW Motorcycle Service (all models) 18145 Hummingbird Road; Wayzata, Minnesota (952) 449-0357. Solid reputation.
Wuma, Inc (Guenther Wuest) [email protected] 6891 W. US Hy 150; Fredericksburg, IN 47120, 812-472-3739. He ALSO does reverse gear conversions (still doing them ??) to the 5 speed transmissions; some information on this particular conversion will be found in https://bmwmotorcycletech.info/sidecarURL.htm on this website. Has a good reputation.
Motorren Israel also does a different type of reverse gear conversion.
Motor Works, Inc. 1490 Island Ave. San Diego, CA 92101 619-233-8875 [email protected] Not enough personal or reported information.
All referenced transmission specialists in this Snowbum article you are reading can probably do some types of conversions, such as changing first &/or fifth gear ratios, in 5 speed transmissions.
DYI (Doing It Yourself) (part 1) :
Of all the things that might need major repairs on your motorcycle, the transmission is the most detailed on what to know & how to go about doing it. This is particularly so because of so many changes over the years. Snowbum no longer has his transmission overhaul tools and jigs, and would not likely overhaul his own transmission now. He'd probably send it out, see the above list of folks and my comments. Do keep in mind that if you do not get things correct, the transmission may not be reliable ....and ....could even lock up on you, a BAD thing to have happen.
If you insist on "overhauling" your own 5 speed transmission, understand that there are many things to know; and I have tried, and perhaps failed, to put all of those things into this very long article, above. Many have successfully done transmission repairs (although usually not a full overhaul); and, even if an overhaul, while the overhaul might not be up to 'Guru' standards, it can be "adequate".
I have greatly resisted pressure to do a step by step transmission overhaul article, because of all the need-to-know-or-consider details, which vary by model, year, and serial number of transmission ...and what you find inside. On the other hand, I do wish to have something for you to look at, so, I offer the following:
>>>>See the links at the very beginning of this long article<<<<
Note....The above articles are possibly not complete, & MAY have errors. They are listed here strictly for the purpose of you getting some ideas about the scope of the work, how things work and are assembled, etc. Read the next section, DYI (Doing It Yourself) (part 2) for more information.
If you are a methodical and careful type of person, and generally do not take shortcuts, and ask questions when you do not know something, YOU PROBABLY CAN overhaul your own gearbox. If you need the special plate for setting up the clearances, you may be able to borrow one, or have someone help you with that.... and, if you need some press or machining work, that can be farmed-out.
1977 R100RS Remove, Disassemble and Inspect Transmission:
http://brook.reams.me/bmw-motorcyle-rebuilds/1977-bmw-r100rs-rebuild-project-index/23-bmw-1977-r100rs-remove-disassemble-and-inspect-transmission
1977 R100RS Transmission Refresh and Assembly:
http://brook.reams.me/bmw-motorcyle-rebuilds/1977-bmw-r100rs-rebuild-project-index/23-bmw-1977-r100rs-transmission-refresh-and-assembly
Tools and video for transmission work, and other work used to be available from Ed Korn, who previously did business as Cycleworks, Inc. in town of Oregon, WI. Ed did some machine work, had lots of tools (and some parts) for everything from the Isetta cars, through the /2 era, up until the Airheads stopped production in the 90's. He had a rather extensive line of tools, some very cleverly designed, and he had instructions, videos, all sorts of stuff. Doing a run-through of his website was informative to many folks. Ed sold the business to Cycle Works LLC, located at 5805 Haskins Street, Shawnee, KS, 66216 (913) 871-6740. Contact the new owner at: [email protected] ((NOT .com!!)). The website address is www.cycleworks.net
Here are some old specifications (there are lots more specifications):
Fork bolts 17 footpounds (& 4 speed)
Output flange nut 160 ftlbs (clean and dry on the tapers! ...absolutely no residual oil!).
End cover nuts 6 ftlbs.
Selector fork/cam bracket: 18 foot-pounds (from 1981, 14 foot-pounds).
Axial float on all shafts: 0-0.1 mm (0-.004 inch).
The original shafts end float was 0.004". From 1981, BMW used 0.002", and I think 0.002" is best for all of the transmissions. Note that this is ~ the same as the 0.05mm in the books.
Allen bolt holding the shift lever into the transmission (5 speed models): approximately 70 INCH-pounds.
This section has been completely revised! The information I wrote for this section has been almost entirely deleted, in favor of a copy of a response that was posted by Tom Cutter to the Airheads LIST on June 10th, 2012; in response to questions. I have not edited Tom's remarks except for adding paragraph separations & to fix a few miss-spellings, grammar corrections, and a note or two from me. I have left in two questions from the original poster, to whom Tom was replying (and, to the entire LIST membership, of course). My purpose in putting this posting here is to give you an idea of what is done by a professional who has done a lot of these transmissions.
"When I do a gearbox job, I heat the box in the oven to 225F, then turn the shafts by hand, shift the gears up and down, and push-pull the input and output shafts to check for grossly excessive free-play. Then I strip the whole gearbox down to the last component, throw everything into the parts washer, turn on the air agitator and go pull the new parts, write the part numbers on the customer bill and on the reorder list, then come back to the clean parts. I rinse the parts, polish the shifter shaft, wire wheel the gasket surfaces, and lay it all on the long table for individual component inspection. That is the most time-consuming part, because each part gets inspected, compared and evaluated for either the "save" or "replace" pile.
I replace all the seals and bearings, so I don't waste any time inspecting those. I clean and sort the shims, and put them into my shim assortment based on size. At this point, all inspection decisions are made, all replacement parts are accumulated and laid out in assembly order, and I'm ready for clean final assembly.
Reassembly takes a very short time, usually less than 10 minutes. I first install all the new seals, then stick the gearbox housing in the oven at 275F for 25 minutes. That gives me enough time to replace all the bearings on the shafts, assemble the output shaft and install the little end input seal in the 81-on models. By that time the housing is fully heated, I pull it from the oven, immediately install in this order: Input roller bearing outer race with cage, oil baffles in the cluster and output shaft recesses, the 3-4 shift fork on the stub shaft. Then I engage the cluster gear onto the shift fork, swing it out of the way and lower the output shaft into place. Swing the cluster shaft into engagement with the output shaft and drop both into the bearing bores. Then I engage the two shift forks onto the output shaft, lubricate & slip the shift shaft into the forks & the housing bore.
The shift cam-plate assembly goes in next. I use my gloved hand to reach down and lift each shift fork into engagement to the selector plates. While the case is still piping hot, the selector assembly retaining bolts are installed from the outside of the case and torqued.
Now it sits to cool down to room temperature. While the parts are cooling off, I complete the repair order paperwork, call or email the client, get a coffee, & then pull out the measuring tool set for shimming. I sit down to the now-cool gearbox and take all of the shaft and bearing bore measurements, which I record on a small pad of graph paper. (I could use a custom-made form for shimming calculations, but I've been using these little pads for 40 years, and the collection of many hundreds of calculation sheets is kind of satisfying.) This is another "look and think" time. I expect the clearances to measure within a very narrow range. If they do not, I know that there is an anomaly of some kind, possibly a stuck shaft, and assembly error or a flawed replacement part.
Once I am satisfied that all of my measurements are correct, I select the correct shims to get my favorite clearance, and I stick the shims into the cover bores with a dollop of grease. I clean the output shaft taper with some tri-chlor solvent, visually inspect the inside of the gearbox and say good-bye to all those gears, confident that I will never see them again. I set the cover in place on the top of the shafts, and heat using two MAPP-gas torches onto the cover (and until the cover) falls into place, assisted with a couple light taps to align everything. Before the cover cools, I install and tighten the nine cover bolts, turn the gearbox over and give a couple light taps on the exposed input shaft. (That seats the bearing in the hot cover better.)
When the cover has fully cooled off, I install the neutral switch & test it for continuity, I run the shifter through all the gears, install the drain plug with a new gasket & the fill plug is lightly screwed on with a large bold tag that says "add oil!" along with recommendations for oil type & quantity for the particular gearbox. I install & grease the clutch throwout bearing & piston assembly, the clutch pushrod & actuating lever assembly. Everything gets wrapped in a clean plastic bag, swaddled in protective bubble wrap & returned to the customer's shipping container to await completion of payment arrangements prior to shipment, or for customer pickup.
<<I'm wondering if maybe you, Oak, and Snowbum think we shouldn't have gone to 'Cuda's transmission school, but it was really fantastic.>>
I have no idea what Oak or Snowbum think. I know that I think it is great that Joe and other guys like him are dedicated to accumulating this knowledge, sharing it and carrying it into the future. That is the only way the knowledge base will continue to grow and survive. It is inevitable that some mistakes in information transmittal will occur, but that does not invalidate the process. Learning is a living, breathing process.
<<I learned so much. I also learned that like you said, this kind of work is way over my pay grade. >>
And it is those guys who learn that who will seek out the assistance of paid professionals. There are plenty of those to go around.
..........Snowbum snipped some things here, as not pertinent..........
Tom closed with this:
One thing I ask of all of you: This post is not intended as an instruction set on transmission rebuilding. Please don't post questions on list or privately asking for explanations of each specific detail. I simply do not have time for it.
Closing notes:
The transmission input splines must be lubricated regularly. Nickel-plated ones supposedly became standard on 1984 Monolever bikes, that let you go considerably further between cleaning & lubrication intervals. I am not much of a believer about shafts being plated from then. Transmission spline lubrication is covered in article #43: https://bmwmotorcycletech.info/inputsplinesthrowout.htm
Establish the proper spline lubrication interval for your bike, your riding habits, your atmospheric conditions, and how your shaft looks after a good guess interval. You will thus likely avoid $$$ repairs.
Revisions: (updates for bike serial numbers, transmission ID & VIN are not usually listed here as a Revision)
07/07/2008: Prior updates incorporated & minor editing for clarity including groove depth; add hyperlink to Anton's site.
08/29/2008: Re-arrange order of some items, change some emphasis, explain a few things more clearly.
10/01/2008: Relatively major revisions. Few if any specific technical parts descriptions & details were changed, but wording & emphasis was changed in numerous areas, & information on the more accepted type of circlip caused problems was expanded-upon, primarily as the result of someone contacting me who gave input on things that were not clear enough, or really required better explanations.
12/17/2008: Add photo and description of 4-speed kickstarter idler gear shaft modification.
01/17/2009: Add reference (2) in the addendum section.
08/06/2009: Some modest updates for clarity, & some URL references recommendations, particularly for the 1974 year.
08/09/2009: Updated information in several places, including item #14.
10/10/2009: Go through entire article; try to clarify as many details as I could.
11/01/2009: Update URL's and recommended repair specialist list.
12/27/2010: Minor update for 1995 models.
01/28/2011: Clean up some repetitive stuff.
02/03/2011: Add 16.
06/13/2011: Add more links.
08/01/2011: Add section on preloading & smooth shifting and theory behind it; fix Cycleworks information.
08/04/2011: Re-arrange article a bit, edit out some superfluous repetitive things.
10/05/2011: A bit of additional commentary about the shift pawl springs.
12/24/2011: Add two hyperlinks.
04/28/2012: Begin revising article for clarity, particularly the pawl spring & shift kit information, which had been scattered in the article.
06/10/2012: Add DIY part 2.
06/17/2012: Update information on serial numbers & years, and add comments.
07/15/2012: Change this article from 59 to 59A. Split #9 into 3 sections, add link to a new article of mine which is 59B.
10/15/2012: Add QR code, add language button (deleted in 2013 due to problems), update Google Ad-Sense code.
11/15/2012: Re-arrange article. Clarifications. Better section divisions. Make width shorter, so might display better on smaller screens. Fix many html closing tags.
12/13/2012: Fix poor wording for description of the two types of throwout bearings, when installed, etc. Original wording could be misinterpreted.
01/03/2013: Add photos of 6404C3 special bearing, late type, and the 5 speed gears/shafts.
03/30/2013: Add a bit more information to Transmission Problems, Checks, and Testing.
05/04/2013: Add transmission rattling noises section, near top of this article.
sometime in 2013: remove language button.
06/21/2013: Add hyperlink #3, minor other changes.
07/26/2013: Add more on substitutions.
11/18/2013: Minor changes for clarity & transmission reporting, including wording & an internal hyperlink for ease in readers jumping to another area in this article.
04/07/2014: Major changes, but strictly for clarity and eliminating some redundancies.
09/27/2014: Clean up, including changes for better utilization on smaller screens.
11/06/2014: Minor changes, plus add considerably to 9B.
08/05/2015: Clear up typos and missing words in section 9A.
08/25/2015: Fix unclear statement early in the article about circlip not being a 100% fix all the time.
10/03/2015: A few minor changes for clarity; plus, updated serial/groove/circlip information.
10/11/2015: Clean up article some. Fix things for more clarity. Fix a few bugs.
12/01/2015: Fix meta-coding, re-arrange article considerably; cleaning things up as I did so. Article is still messy, needs more cleanup & combining, re-arranging.
12/23/2015: Finish meta-code updating & narrowing. Consolidated sections, greatly reducing scattered information, etc.
01/10/2016: Conclusions about circlips versus years, etc.
04/22/2016: Major update to metacode, layout, colors, fonts, separations, reduce redundancies. Move certain items to other sections. Re-number some sections. Add .pdf for factory gearbox and clutch.
12/08/2016: Improved shift kit explanations.
From 12/23/2016, and finishing 01/02/2016: Line by line go through entire article HTML code. Reduce excessive code, improve clarity, clean up fonts, horizontal lines, colors, metas, scripts, etc. Article being revised for clarity, excessive HTML, improper H.L., fonts, colors, metas, scripts, etc.
05/25/2017: Additional dimensions added to the circlip position and cut.
06/21/2017: Add Airheads list exchange between Brook Reams and Tom Cutter, regarding "6304" "6403" bearings....
07/23/2017: Removed a red separation line in the section about the confusing bearings, otherwise readers might miss the last part of it. Moved things about a bit, for additional clarity. Added to DIY and to recommended Servicers.
07/24/2017: Fix two typos: (1) date was 07/23/6017. (2) One place, 6403 was 6404, in area "Regarding the various 6403-C3...."
08/12/2017: Go through entire article. Reduce font changes, colors, and bolds. Use mostly underlines for emphasis. Clean up messy html code. Add some clarifications.
11/06/2017: Add more info to the long section about the pawl spring, etc. Make sure it was clear that I use 15.5 mm diameter.
12/20/2017: Add two links to Brook's articles.
05/02/2018: Add transmission ratios table.
05/17/2018: Fix Duane's link.
05/17/2018: Reduce HTML, colors, fonts. Improve layout. Add 10pxl margins. Modest tech updating.
06/29/2018: Update links. Improve commentary. Fix wrong references to numbered items. Cleanup HTML.
04/06/2019: Add links to service bulletin, jpg and pdf
04/09/2019: Update seal replacement information.
09/24/2023: Add note near top of article about The Airhead issue (magazine)
05/15/2024: Add a couple of hyperlinks. Correct a spelling.
� Copyright 2024, R. Fleischer
Return to Technical Articles LIST Page
Last check/edit: Wednesday, May 15, 2024