
|
|
The ads above are Google-sponsored.
Clicking on them at every visit helps support this website!
Clicking on something inside an advertisement helps even more!
Modifications For Performance.
BMW Airhead Boxer Engines, Electricals, Suspension, Frame, brakes, etc.
Suggestions & information for improving performance ...
keeping reliability and longevity. Fuel and mileage.
� Copyright 2024, R. Fleischer
https://bmwmotorcycletech.info/mod4performance.htm
77A
This is NOT the only place on this website that information on modifications are listed! Find those things by topic, and use the Search function: SEARCH
The author is not "promoting" anything in this article. The author is not guaranteeing safety, longevity, nor anything else. Every sort of legal disclaimer applies! In some instances, both pros and cons THAT I KNOW OF are detailed. Note also that some of the information in this article is referring back to early days of improving performance of these Airheads; and, as such, there may be newer parts available....or, a wider (or narrower!) selection of old and new parts.
I am not interested in having long multiple E-mails, nor telephone conversations, etc., with those intending to modify their bikes. If you want to make inquiries on the Airheads LIST I MAY respond; & others might also. What is in the article that follows is strictly information for which YOU are responsible. What YOU DO IS NOT MY responsibility.
Some people modify Airheads using parts from other makes of motorcycles. I am not about to get into the "Franken-Beemer, ruining a good Airhead", or any other arguments here. I am simply listing information. I am also not going to get into styling changes, particularly not Caf� bike modifications.
In this article I try to keep away from pushing limits, so as to leave you with a reliable bike, that can be driven on the street for many happy miles; not one that needs rebuilding often; nor constant attention, etc.
Many may be looking at this article for engine performance increases, although that is hardly the only thing here. Before you decide to spend a lot of money; and, really, any money at all, DO understand that increasing the torque/horsepower can possibly reduce reliability or create a more peaky engine. A quite peaky engine is fun in aggressive riding, but constant shifting and throttle work is NOT what BMW is about.... for cruising, touring, etc. However, BMW's older Airheads did have considerably more power, and were reliable. This means that going too far beyond those stages of tuning can be detrimental to long engine, etc., life. However, increases of 20-30% are very doable and can be quite reliable. In some instances, an improvement of 40% is rather easily obtainable, with excellent reliability!
Faster acceleration CAN mean that the moving parts, in particular the flywheel and clutch assembly, have been made lighter. That leads to more vibration from a variety of other effects that are masked by heavier components. This is noticeable with the STOCK 1981+ bikes from the factory change to a lighter flywheel/clutch in 1981. That can make carburetion synchronization a bit more critical for smooth balance; but this is quite minimal. One advantage that is quite noticeable is the ability to make smoother ...and faster....shifts.
If you increase compression ratio, you may have problems with the octane rating of gasoline. BMW reduced the CR in the 1980's because of a lack of 98 or 100+ octane fuel; although BMW was able to increase the CR a half point or so in the later 1980's. If you change camshafts to produce more power, you will find that the lower and midrange rpm areas are reduced in power, and you must do something else to improve the lost lower and midrange power. Typically, after a change to a 'more sporty' camshaft, the idle is no longer as smooth (it may be irregular). You may find you need to use higher rpm more of the time, because that is where the engine performance comes back up, due to the camshaft change...unless you modify the mid-range too. Fuel economy will likely decrease, even substantially in some instances. This can be from many causes, including that the camshaft will likely allow considerably more intake mixture to go through to the exhaust system, some will even be UNburnt; but may provide some cooling. However, raising the compression ratio may IMPROVE mileage, as can dual-plugging, if you have not modified other engine components (very specifically the camshaft). https://bmwmotorcycletech.info/cams.htm
The flame propagation is greatly enhanced by turbulence in the fuel-air mixture. If a squish band is used, reducing its height is advantageous as it gives increased turbulence. Going below 0.635 mm of squish is to be done only with great care. Since the gaseous mixture in the squish band is usually NOT burned, squish bands have tended to be engineered-out by factories, due to the increase in smog from the engine.
Fuel mileage can improve with a flatter rear drive ratio, with some decrease in acceleration and possibly top speed (maybe). If you increase the power considerably, a flatter rear drive ratio is often needed for very high speed capability, but sometimes fuel economy is improved.
As you 'hop up' the motorcycle more and more you will find that you have placed more stress on some components, such as the exhaust valves, and top end in general. If you go too far, you may find that the engine needs more maintenance, and even may be so unreliable as to be a really expensive headache. Going way far, your engine may be close to disaster. The last thing you would ever want to see, besides the stealing of your bike, is a valve or piston breakup failure.
Two photos of what can happen with valve/piston breakup are in this article: https://bmwmotorcycletech.info/valves.htm
As a general rule in 'hot-rodding' engines, when you modify one thing, you will need to modify something else in compensation. There is a limit to what modifications can be reasonably safely and reliably done to the Airhead engine. After a certain point is reached, problems begin. Engine casting parts can move slightly in relationship to each other, and there can be other effects, which can even result in valves & pistons failures. This phenomena of movement of bolted-together parts, which may seem impossible to you, is called 'walking'. It occurs on the stock engine, but is mostly tiny and unnoticed. It also can occur at the junction of rear drives & driveshaft housings. Even well before the cylinder/case walking point, once you exceed a certain point in hop-up, you will usually be faced with a far less tractable engine, one that you must pay a lot more attention to, as far as rpm, gear selection, fuel grade, and increased maintenance ...to mention only a few things. If you increase camshaft lift or rocker arm ratio, you put more stress on the top end parts, including the camshaft and lifter, etc. Bearings get more pressure. Oil control becomes more important. As RPM rises above the original BMW redline, all sorts of things are required, depending on just how high you wish to allow the RPM to go to, to keep the engine together, particularly so for the longer term.
Be cautious about modifications. Some modifications, such as dual-plugging & slight to moderate CR increase, and careful attention to basic tuning ....almost always will be excellent; others possibly not. If you are after a motorcycle that will run away from other Airheads, and maybe even Oilheads; or, are considering racing an Airhead; remember that the bike world is full of even smaller displacement bikes that will RELIABLY outperform ANY hopped-up Airhead.
I. Electrical System:
https://bmwmotorcycletech.info/dualplugging.htm
https://bmwmotorcycletech.info/altcapability.htm
https://bmwmotorcycletech.info/AftrMrktAlt.htm
https://bmwmotorcycletech.info/Ignition.htm
https://bmwmotorcycletech.info/ignitiontheory.htm
https://bmwmotorcycletech.info/ignitionsingleplug.htm
Ignition system:
On this website are several articles on the ignition system, the automatic advance, etc. See above links, and there are more. I will say a bit about changes for increased power and acceleration. Firstly, if you have close to 100 octane fuel available, you will obtain slightly better low end acceleration by using a faster advance. In the earliest /5 bikes, BMW used an automatic advance that started advancing at 800 rpm, which was ~ idle RPM then ....and peaked at about 2000 rpm. That would be better. If you have a pre-1979 airhead, you can fit the early /5 automatic advance, or simply use one or two lighter strength springs from a later version; or, simply remove some metal from both automatic advance weights, until you obtain the advance you want. You could even tailor your own advance curve by re-shaping the advance weights and even changing the mechanical stops for those weights. It is a lot more work to do this sort of thing on a 1979 and later, as the canister has to be disassembled, and unless you fashion a jig of some sort, you will be assembling and disassembling a considerable amount. The gain from any of these ATU modifications is SMALL.
There are aftermarket ignitions available, from the Dyna type to the Boyer to the Alpha (aka Red Centre) ....to several crankshaft driven types. For top notch performance, a crankshaft triggered electronic ignition is...or can be... very nice. Properly done you can gain a small amount of performance.
For those 1981+ bikes that came with a single dual output coil, use of TWO of the 6 volt Bosch coils that have a lightning bolt on the side of them, in series connection on the primaries, instead of a stock single coil with dual outputs, may be advisable IF your bike has a hopped-up engine, particularly with a high CR. If you are replacing an often troublesome early gray-bodied single coil (dual output type), you can use the later type; OR, those two mentioned 6v coils. For use with pump grades of gasoline, on a somewhat hotted-up engine, it will be best, especially if the compression ratio is 8.8 or higher, to use a dual-plug conversion. In fact, to obtain the full advantage of a dual-plugged Airhead, one of the things to always consider is raising the compression ratio, IF PRACTICAL. Dual-plugging has almost no drawbacks, and many advantages. One of the better solutions is the Alpha ignition; or, the exact parts used in the very last Airheads, which have a changed module to match low primary ohm coils. You can use TWO high performance low primary resistance coils with that module.
If you decide to stay with points ignition:
Points bikes can have a points-amplifier, also called a points-booster, added to the points to reduce electrical wear on the points. Accel and Dyna makes those and there are Velleman kits sold too. Pay attention to coil primary resistances when using points, particularly if not using an amplifier-booster. Typically you do not change the coil(s) when using an amplifier-booster. If the primary resistance is too low, such as from the wrong type of coil, points can burn up rapidly, or if using a booster it might not handle the current. See
https://store.qkits.com/ and maybe others. I think any of these KITS can have the 'output transistor' changed, or heat-sinking changed, so the units can handle ANY coil. Velleman is probably the actual maker of a number of these kits sold by others, using the same or similar model number K2543. It is rated at 4 amperes, but with the heat sink that comes with it, I think it will handle MORE, if placed in a relatively cool place on the motorcycle.
Also, Arcade electronics; and maybe others.
http://www.vellemanusa.com A better URL to use is probably https://www.vellemanstore.com/. Do an internet search for Velleman if the links are not working. A problem can occur if you have coils that draw more amperes than the points boosters/amplifiers are rated for. Many have used them in this somewhat overloaded condition, if they are kept reasonably cool. Keep in mind that the current flow is not continuous, so the average amperes is lower, when the engine is running. Don't turn on the ignition switch unless for only a very a short time, without starting the engine. The Velleman seems to hold up.
Although I have made several mentions of various ignitions, ....for all but the VERY hopped-up Airhead, I recommend the stock system, modified for dual-plugging (and, of course, modified heads for dual-plugging), AND, use of the later 3,000 rpm ATU's. In fact, I recommend lightening the weights a bit, to raise the ~3,000 rpm max advance point to 3500 or 3600 RPM. For the 1981 and later BMW electronic ignition, modify the ATU weights slightly; use Accel coils (see my ignition article) with twin tower outputs. Use the last version of the ignition module. For all POINTS models, use a modified booster, and two-each 1-1/4 to 1.7 primary ohms dual tower coils. Modify the ATU for the same RPM maximum advance.
II. Clutch and Flywheel (called Clutch Carrier from 1981):
Airheads clutches before 1981 required a fairly heavy amount of hand pressure, sometimes complained about, particularly by those with less muscular hands, or those doing a lot of in-city stop and go. There were two types of these clutches before 1981, one had a stiffer diaphragm spring that was called the Sport Clutch in the literature. A pulley/small chain affair, an EZ-clutch conversion, is available from such as Craig Vechorik; Benchmark Works, 662-325-2103. This is a very simple device that fits at the rear of the transmission, easy to install. It roughly halves the effort at the bar lever. There are others, see
https://bmwmotorcycletech.info/clutch.htm.
CC products may still be selling a heavy duty clutch that is quite different, as far as the friction disc goes, than the stock item. CC Products may still have various types of lightened flywheels and heavy-duty clutch parts available. Luftmeister, now long gone, used to have such clutch parts, and others. It is possible that Matt Capri at South Bay Triumph still has some of those items for sale. Much more recently, Southland Clutch in National City, California, should be able to fix you up. Southland Clutch advertises in Airmail....101 E. 18th St., National City, CA 91950 (619) 477-2105. [email protected] They can machine your plate, etc., and provide a stronger clutch if you need it. They can also modify your worn clutch, so you do not have to purchase all new parts from BMW. You can get a clutch from them that considerably outperforms the BMW clutch.
The 1981 and later clutch and flywheel (clutch carrier) are quite a bit lighter than earlier models.
Proper lightening of early flywheels will help acceleration considerably. https://bmwmotorcycletech.info/lightened-flywheel.htm
HINT!....Early models had the clutch actuating lever at the rear of the transmission held to the two bosses of the transmission cover by a PIN, that used a single C clip for retainment. That C-clip fit on the pin at the inside of the lower boss. If the clip came loose, the pin could come upwards & out of the lower boss, and the next clutch application could, and often did, break off a transmission boss ear ...necessitating a transmission overhaul ....or some inert gas welding at a minimum. A fix is to remove the old pin and clip and install these parts: #23-13-1-241-484 pin, that has a flange, and won't fly out & is used with a clip that is part 51-23-1-864-963. For full details see https://bmwmotorcycletech.info/clutch.htm.
HINT:....At the rear, inside, of the transmission is the throwout bearing. Be SURE that it is not overly large, otherwise it can seize when hot. See my clutch article: https://bmwmotorcycletech.info/clutch.htm
HINT!....BMW switched to non-asbestos friction disc material. Even after break-in, I do not think it grips as well.
The early clutches can use beefing-up if a large increase in horsepower is going to be had. Hard surfacing of the early parts is a good idea. Generally the later parts already are hardened. The later clutch parts will fit (including the carrier) but you have to change the input shaft of the transmission (or, shorten its spline length). The lighter the flywheel/carrier/clutch assembly, the more vibration the engine will produce, but the faster you can increase rpm, and the better the shifting of the gearbox. As the assembly gets lighter, the carburetors become a bit more critical to adjust for engine smoothness. The big advantages of a lighter assembly are more rapid acceleration and faster and easier shifting. As noted above, some various types of special clutch discs were once available from Luftmeister. Also note that those clutches tended to be rather grabby, and a finer touch with throttle and clutch hands is necessary for a smooth take-off, especially when the clutch is cold. Those pulling trailers or sidecars may well be advised to beef up their clutches some ....although most get along with the stock parts OK.
For the more technically inclined DIY types, here is some old information on how things were done long ago:
Pressure can be increased in various ways to handle increased power or heavy slipping clutch use. The following paragraph on increasing effective clutch pressure was taken from a posting by Jim Roche, somewhat edited by me here.
1970-1980: THREE methods. In all cases I recommend hard surfacing:
1. Bring spring closer to the pressure plate. Place a .035"-.065" hard steel donut ring shim between the flywheel and the spring base. Such large transmission and differential 'shims' are available from such as RingPower heavy equipment shops; or, see any competent local mechanic's junk box of old shimming items. For this modification, the flywheel need not be removed, and the weight added is. NO, I do not have recommendations on what part from where for the shims.
2. Bring pressure ring and pressure plate closer to the spring. Remove the flywheel (you were going to lighten it anyway, right??) and machine off .040"to .085" of its face surface. This is the face area where the 6 clutch bolts hold the clutch assembly to the flywheel.
3. Bring the pressure plate alone closer to the spring by installing a thicker driven disc between pressure plate & pressure ring. Install a 3 or 4 'wing' metallic 'competition' type clutch disc, which is thicker than the original. Its extra thickness means that washers, about .040" thick, must be placed between the pressure ring and the flywheel face. Some very slight interference with the transmission case might be seen for a short while, or you can relieve it. You may want to just contact Southland Clutch, see link above.
1981+ clutches:
These later parts are already hardened. Some improvement can be had by machining the fulcrum ring contact point .030"- .050" to the outside ...which increases spring pressure considerably. Hard surfacing is a good idea for modified parts.
III. Carburetion, cylinders, valve gear, cylinder heads, pistons and camshaft:
https://bmwmotorcycletech.info/valves.htm
https://bmwmotorcycletech.info/cams.htm Note that companies like Motoren Israel, etc., have a wide selection of camshafts for your Airhead. Selection of a "moderately" hotter camshaft can be beneficial, without excessive drawbacks.
https://bmwmotorcycletech.info/Krauser.JPG
https://bmwmotorcycletech.info/pistons.htm
Every BMW Airhead engine can gain power by installing different pistons, or pistons and cylinders, and sometimes different carburetors, valves, adaptors, etc. There are WAY too many types of changes available to get into them in detail here. The old hot-rodder saying that "there is no substitute for cubic inches", is still very true! In some instances a change of camshaft would be a nice addition to these things...but, in many instances, the stock cam will result in a nicer bike, over-all. Use of dual-plugging is almost always of advantage, particularly if using a high CR.
Earliest Airhead engines do not have counter-boring at the top two cylinder studs for small rubber O-rings, because these O-rings were not used. Next came the counter-boring in the CASES, for those O-rings. Slightly later the cylinders themselves received a machined groove for a large O-ring. Machining is possible, for cylinders and if warranted, the cases, for whatever combination of cylinders and cases you want to use. The later cylinders not only have that machined groove, and a slightly different shape (a 'step') near that groove which affects sealing if the case does not match, but the LENGTH is also different, which causes a difference in Compression Ratio, by about half a point. You can install ANY cylinder that fits the case hole, with or without the large O-ring, with minor cylinder machining if and as required. If the cylinder spigot is too large, the case needs to be machined ...or, you can machine the cylinder. In every combination of cases and cylinders, you should use a sealant, even on those cases and cylinders that use the small and large O-rings. The 'step' came in 1981+, and is easily machined off the cylinder to allow fitment to earlier cases.
See both of these articles:
https://bmwmotorcycletech.info/cylinders.htm
https://bmwmotorcycletech.info/break-in.htm.
If you are trying to get better fuel mileage, and perhaps only that, I suggest a very carefully done tuneup (valve adjustment, ignition timing, carburetor synchronization after checking all adjustments including fuel level, needle and jets, etc). Worn needles and needle jets (especially from 1985) will cause poor fuel mileage. I do not suggest hopping up the engine much. It can take a lot of miles to pay for changing heads or modifying them, etc. One thing you should look at is the rear drive ratio. This can affect fuel mileage by 5 mpg, and in some instances nearly 10 mpg. If you had an R80 engine, you might consider changing to a lower ratio. Some R80 bikes had a quite high numerical ratio of 3.36:1 on the rear drive. Going to 3.09 will help mileage, as will, moreso, 3.00, and 2.91. Think this through carefully, as to cost, and effect. If you lower the ratio too much, you may find 5th gear is not all that usable. HOWEVER ....the engine will withstand lower cruising rpm to a fair extent ....and use of light throttle at, say, 3000-3500 rpm is completely OK. Seldom does one talk about changes to a R65, but those with 3.44 might consider 3.2 or 3.36; and those with 3.36, might consider 3.2. There are two other articles on this website regarding fuel mileage, and if you have an R80 engine, there is a specific article, and there are several others. See, at least, my articles #9A, #9B, #9C, #9D.
You can also change 5th gear, and in combination with a changed rear drive ratio, perhaps obtain something closer to what you might want, not necessarily for anything to do with fuel mileage; although properly used, it can help, at a cost for the parts and labor.
If you go to dual-plugging (no matter the method), and raise the compression ratio to 9.0:1 (approximately) (if on a bike with a low compression to start with), and in some instances to 9.2:1, you can use 87 or 89 octane fuel if the combustion chamber is smooth and clean, and if carburetion, ignition, etc., are all in good condition. This WILL increase fuel mileage a few mpg. You may be able to use 89-93 octane with 9.5 or even 9.8 compression ratio and dual-plugging.
For high rpm operation ....well into and even above normal redline rpm, you want to rework the valve gear, including using the later pushrods, polishing the rocker arms for strength, and the usual careful valves, springs, etc. work. There is NO reason to use RPM as high as redline with a stock engine and typical riding.
Going further:
You can start by using the '336' type camshaft if you are going to be using rpm consistently above 5500 or so. This is a GOOD camshaft for sporty to racing performance. That camshaft has both increased duration, and increased lift, the emphasis is on duration. The combination of the 336 camshaft and a lightened clutch will give you less grunt coming off the line, and some of the usual hopping-up feeling & problems. That is helped considerably by a higher compression ratio. I do NOT recommend that cam ...or any cam other than the stock one ...unless you have at least 9.2, and preferably higher. Going to high ratio rockers is risky, you MUST know what you are doing. You can lighten the valve system by using later pushrods (or even aftermarket ones), and elongating the slit in the followers. For street use, use somewhat bigger intake valves that you can fit PROPERLY ...probably 45 mm is the limit on the R100, and that may be too big. Grind the inside of the seat. Remove the unused unneeded area of threads on the valve adjusters. Clean up & polish the rocker arms, or leave them stock. Use the later needle bearing rocker arms, etc. Use the narrower 1985+ type parts, and modify them slightly. Other lightening techniques can be utilized, just be careful. For a true racing engine, very modified, you will want to go to more exotic valve gear parts ...spring buckets to keep the spring cool, lightweight spring retainers and keepers, etc. Note that if you modify to a different camshaft from stock, use different pistons or heads, or any modifications of these types at all, YOU are responsible to ensure that there is no interference between the various parts during engine operation. I recommend you do NOT grind the valve stem keepers to keep them from rotating. My valves article has my recommendations for seats, valves, and guides. Note that there are aftermarket camshaft makers that have a wide variety of cams available, and they have cams that don't have the problems with fitting to the oil pump, and front of cam fitment problems (the "336" may not be available in the style you want, from BMW). Many years ago, the "336" type cam as well as a camshaft known as the "904" were made by Sig Erson. the "904" had increased lift and duration, and any engine with it will be noticeably rough idling, etc...but the power output will be very much higher, if used with HC pistons, etc. There are several sources for Airhead performance camshafts now.
With premium octane gasoline, over 10:1 CR with dual ignition is quite usable on an Airhead.
If you modify an airhead engine, particularly if with an aftermarket camshaft, modifying the oil breather to the latest reed type is possibly to be considered a must. See this article: https://bmwmotorcycletech.info/oilsketch.htm
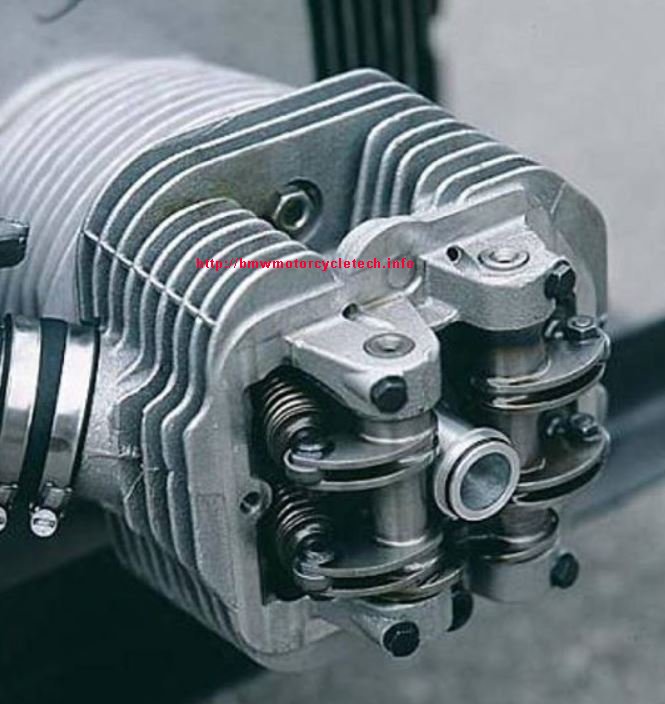
The 4 valve Krauser heads are a PIA! to get working correctly, mostly they require considerable hand-work, but it can be worth the effort, and they will perform well, with a fairly large increase in power. I have the original Krauser installation guide. https://bmwmotorcycletech.info/Krauser-Heads.htm
Use the 40 mm exhaust system, dual crossover, and if for the street, modify the mufflers slightly by drilling a 3/4 inch hole from the outlet end with a LONG extended drill, through the way-inside baffle. Drill two each 3/8" angular holes, one on each side of the muffler OUTlet, about 3/4 inch or 1 inch forward of the outlet tip. For a race machine, the exhaust system should NOT be those stock heavy, even if modified, mufflers. Some would recommend a traditional taper megaphone, with a reverse taper cone. Use a 2 into 2 system. Consider the old Axtell system ....6� taper megaphones, ending in 45� reverse taper cone, the hole of which is half again as large as the entrance. This is not at all a bad idea for a 8000 rpm engine with a fair amount of modifications. As always, the top end is the secret to power, and a dyno is recommended.
Note that 'the books' are not all that accurate for 1977-1980 (general range, not dependable for some models/years) exhaust systems. BMW made two sizes of pipes/headers/crossovers.
The RS and RT models could have 40 mm pipes and crossovers on early models. Later was generally 38 mm. Original clamps by BMW were stamped with sizes (2 mm larger than the pipe). The R100S may have 40 mm items too.
Probably the 1977 40 mm exhaust heads and pistons would be a good starting place ...but you CAN use any of the heads ...and modify them if/as desired. For the larger engines like the 800, 900, or 1000 cc engines, you need appropriate carburetors and the proper INternal size of intake adapter (that's the screw-in metal adapter, often called The Stub, that screws into the intake port of the head). Add the larger exhaust system, preferably the S model 40 mm pipes, or even the early eighties dual crossover 40 mm setup, and stock or slightly modified BMW mufflers. You can get higher compression ratio pistons for some models from BMW, or get them aftermarket. If you decide to add or modify an existing squish area, I suggest you do not go less than about 0.085" clearance.
The R100 engines that have 32 mm carburetors can gain a considerable amount of power by using the Euro intake stubs and 40 mm carburetors, and some hand work on the heads, and I suggest the larger valves too. These changes, together with increased compression ratio, will deliver a nice smooth engine, with very considerable power increase, yet be very tractable over the entire rpm range. Reliability is not really affected. With dual plugging added, you may be able to use mid-grade fuel (or even Regular at higher altitudes). If you add a moderately hotter camshaft, and use 9.5 pistons, and a tad of skimming for ~9.8:1 compression, you can come up with a bike that still can idle OK, and has a large increase in power. One easy change is to go to 9.5 pistons, and fit early 80's heads from a R100 engine. Use 40 mm carburetors and change the throttle assembly (or parts inside) to be equivalent to the EUROPEAN 1991-1995 R100GS. DO NOT change the camshaft unless you understand the over-all effects. I highly recommend dual-plugging, as it will reduce the necessity for premium fuels. If you do use the 9.5 pistons, Nikasil cylinders, large valve heads and big stub, and perhaps skim the cylinder base a bit for cleanup, convert to dual-plugging, etc....you should have a very reliable high output engine and no problems....and may well be able to be run on less than superpremium gasoline's. This makes for a powerful Airhead, with pleasant characteristics, even in mountain twisties.
I suggest you do NOT use lightened piston pins, unless part of a known good package from a major Airhead modification manufacturer. Motoren Israel, some German companies, etc. Otherwise, I prefer heavy, strong wrist pins.
In the petcocks, the actual length of the two stock petcock 'straws' themselves is not the same between all models. The dimensions I show here are proud of the surface the straw is pressed into. The straws can be metal or plastic. The diameter of the straws is approximately 0.215" (5.46 mm), but that varies a bit. You can usually use 7/32" copper tubing available at hobby shops. If you need to, sand the end area diameter of the metal straw you purchased, and slightly chamfer the down side very end ...both for ease in assembly and proper fit. The stock length (proud of the surface) of the short straw, is 0.935" (23.75 mm); and 3.27" (83 mm) for the tall straw. Yes, you can shorten the short straw and gain a small amount of usable fuel. My advice is to NOT eliminate that short straw, certainly not below 3/8" proud of the metal. You will need to add a small amount to these various lengths for the straw itself, as they are pressed-into the petcock. I modified my petcocks and straws to allow a bit more fuel flow. It takes very little inside diameter change to allow a very considerably higher fuel flow. That is due to a math formula you all learned in grammar school: A = π r� ........As you can see, the area increases as the square of the radius, thus a very small radius increase, such as a small drilling-out, will increase flow quite a bit. For a modified engine, if you have a single outlet port fuel tank, you should change to a dual-port tank or seriously modify the petcock on the single outlet tank. The stock single petcock will NOT flow enough fuel at extended W.O.T. Careful drilling and modification of the petcock will work well. You CAN retain the in-tank tubes (straws) leading upwards from the petcock, by drilling them out a wee bit, not at all easy; but does work. The best, and probably much less frustrating thing to do is to remove them, drill the petcock a fair amount larger, all the way through, and fit larger inside and outside diameter tubes to the petcock.
https://bmwmotorcycletech.info/fuelfltrs&petcocks.htm
You will want to perform a fuel tank flap-ectomy (if you have that type of tank), and modify the fumes and overflow system, if you have a later model. Be absolutely certain that the fuel cap works properly, if it is the sealing type with internal valves. Typically it is best to drill a hole and make sure.
IV: Transmission:
Modifications can be made to ensure a faster shifting transmission. I've already mentioned a lighter clutch and flywheel assembly. Removal of any kickstart mechanism is a good idea. Modification to prevent pawl spring breakage is simple, and should be done. The 4 speed transmission is not a good idea. Neither is the 1974 5 speed transmission. 1981+ transmissions will fit earlier clutches if the input shaft of the transmission is changed. The reverse is also true. Modifications for racing can include using the later stronger transmission case, ensuring you have the shift kit parts
(https://bmwmotorcycletech.info/transmission.htm) & undercutting & possibly other modifications to the gears & gear dogs. Special gear ratios are available for the transmission if absolutely needed (?). Think carefully before going these routes.
The so-called Shift Kit is fully explained in a section of my above transmission article. At the rear, inside, of the transmission is the throwout bearing. Be SURE that it is not overly large, otherwise it can seize when hot. See my clutch article: https://bmwmotorcycletech.info/clutch.htm
V. Rear drive: Select the ratio to match your engine and your expected speeds and rpm. I've already mentioned changing ratios if your goal is fuel mileage. It is beyond the scope of this article to go into the various case styles, splines, mountings, etc. You may want to review the information here: https://bmwmotorcycletech.info/ringgears.htm
VI. Driveshaft:
From 1979, BMW installed a cushioned driveshaft. This amounted to spring loaded male and female cams, located at the aft end of the driveshaft. The 1979 and 1980 swing arms are smaller on the inside, so a 1981-1984 driveshaft MIGHT not fit into a 1979-1980 driveshaft housing. The first two years (1979-1980) of the 'cush shaft' have two flats machined into the spring base unit, that allow the shaft to fit into the smaller housing. The 1981-1984 shafts don't have those flats ....but they could be machined, and possibly just with some handwork. There WAS a retrofit cush drive kit, that fits the smaller swingarms used between 1973-1/2 and 1980: 26-11-9-055-059; but it is NLA. NOTE that you COULD install a NON-cush driveshaft from a 1973-1/2 and later (to 1978), into any 1979-1984 model. The R80ST and R80G/S use the same cush drive driveshaft as the 1981-1984 models. The use of the cush drive probably improves shifting some, but adds some lash in the drive system. None of these comments apply exactly to the R65 and R45.
VII. Front and rear suspension:
The first of the Airheads, the early /5 models, had a shorter wheelbase than the later /5 and later models. The /5 was modified for a longer driveshaft housing in mid-1973. Thus, it may be known as a LWB, or a 1973-1/2. The swap is simple. There are reasons to change, or not. The SWB handles a bit 'quicker'. I believe it is better on the race track than the LWB. The SWB won't accommodate a larger physical size battery; but you may not need one; and, if making a Caf� bike, you might even want a smaller physical size lithium battery. The SWB has a more prominent torque feeling if the throttle is suddenly snapped off, and this is more noticeable in turns, some of this is due to the rear drive trying to climb, a property of no-chain bikes like these. The SWB is considerably more susceptible to high speed wobbles from installation of FORKS MOUNTED windscreens or fairings; and, more susceptible than the LWB if the rear tire is worn to squared-off condition. The installation of windscreens on the LWB is less noticeable, and hardly noticeable as far as instabilities if they are FRAME mounted.
A properly set up front fork (with a few simple modifications), together with good quality rear shock absorber units, will help handling considerably. Quite a number of other brands of forks are adaptable to the Airhead. This has been done for accidents reasons; has been done to get a higher performance front end (stiffer, better brakes, or other reasons), etc. KTM forks have been adapted. Suzuki DR650 forks will probably match up to the BMW bearings with few problems. It is possible to adapt much later BMW forks, particularly K bike forks. You usually get the added advantage of much better brakes using other forks, without having to modify the original forks. It is also easily possible to use the better brakes fork from the last of the Airheads. Strangely, there is an anomaly....if trying to improve the handling of a late GS, you may want to consider using an earlier fork. I'm not going to make this article super long by getting into fork conversions, so will stop here, except for some things that are generally applicable to all.
Doing a carefully done fork brace or modified fender mounting, which is a sort-of fork brace (some are better than others) can help handling ....but installing a billet top triple clamp is usually much more effective. I like to have both a sturdy top triple and a sturdy fender brace set up to be a sturdy fork brace. Be SURE you get a billet top triple clamp that is properly made; like Toaster Tan's. Modify the front forks for improved valving. If you use the original old used piston rings in the forks they will nearly always work better than new ones. You can go much further than just using aftermarket springs. NOTE that TRUE progressive springs, which are nice to have, do not necessarily come from the company by that name. The old method of installing anti-dive lower small springs does work reasonably well, but may not be what you want ...easy to try though. Use of larger diameter fork tubes and the items associated, can often make a big difference in handling....this is especially so if you are riding dirt aggressively.
Most of you will not want to modify the BMW heavy duty springs. I used to have the information on cutting the springs and installing a spacer or spacer washer, but the information was not understood, misused, etc. I decided that just having folks select aftermarket springs was enough (plus proper viscosity of oil, changing valving a bit....). I suggest you use TRUE progressive springs, of proper rate, setting the sag properly, and you will be fine. Use the "MORE STRINGENT" BMW valve ring (ONE per fork tube) ....see the BMW parts lists.
If a /5 bike, braze up two of the center rod holes for race, but only one for street.
Go to a REAL 10 weight suspension or fork fluid. Select from https://bmwmotorcycletech.info/viscosity.htm. Be SURE you spend a LOT of time on stiction and alignment, see Randy Glass' article and https://bmwmotorcycletech.info/frontforks.htm.
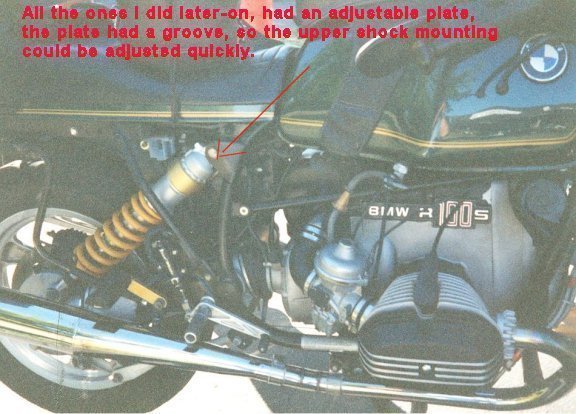
Rear suspension: Twin shock Airheads can be modified for MONOSHOCK, RATHER EASILY. The Monoshock rear end can rather easily be made to fit to the earlier swing arm fitment in the frame. I suggest you modify the frame and make a curved plate with a slot, so that the single spring/shock unit is adjustable; which, with the usual adjustments of the spring perch and shock valving on most units, will offer you much improved performance. If keeping the twin-shock rear end; OR, going to a Monoshock, DO invest in QUALITY shock(s). The below photo shows a fairly simply conversion. I did them this way early-on, but I prefer to make the top mounting more sturdy, and, as mentioned, with an adjustment: a curved slotted plate. I have photos of some of those conversions I did, and will post it here if I find it. A QUALITY shock absorber unit should be installed if the budget allows, and careful attention to springing in particular ...do NOT get an overly stiff spring. Some shelf-stock shock units, like many Ohlins', are too stiff as sold.
Potentially it is possible to install a R100GS setup, with its transmission, Paralever, rear end, etc. I suggest you do not ....unless you really want to, and have a large budget. Yes, it is possible to change the transmission cover, etc.
Many seem to want to 'beef-up' the stock monoshock swing arm or the stock twinshock swing arm. I do not recommend these modifications for street-riding, as they don't do all that much for even fairly aggressive street riding.
HINT!... Whether or not one is caf�-ing an Airhead, you may want to improve the handling; you might want to install a modified Monoshock BMW rear end; ETC. This modification I describe here will enable various other modifications to be made, including a short single seat; tighter rear suspension, excellent handling, etc. It also eliminates a possible problem, the breakage of the lower shock mounting stud, which is a very special type of bolt, that screws into the right side of the rear drive. This bolt is a critical item, and the factory Loctite's them in place. It is NOT A REGULAR BOLT. It is of hard material, two threads, a place for the lower shock absorber mounting, etc. Under extreme conditions, it can break. That is very rare, however, for street riding. My modification is to remove the lower shock mounting from the rear drive. Weld a stiff bracket onto the top of the steel driveshaft housing, and modify for a lower shock mounting at that bracket. For the upper mounting, I use either an angled groove bracket for adjustability, or, a non-adjustable mounting point. such as in the photo, above. BOTH methods are affixed by welding to the right side frame downtube. The strength can be such that JUMPS are not going to damage anything. Again...note that the lower mount is welded to the top of the steel driveshaft tube. See my hardware article for a full description of this very special bolt that you can either use for the lower shock mounting, as stock, or, not use.
https://bmwmotorcycletech.info/hardware.htm. Scan down that article to the section, approximately middle of the article, titled Threaded lengths, studs:
continue to scan down a short ways to the paragraph starting with: 07-11-9-908-391
READ all the info on that special bolt.
If you wish for a quite substantial increase in suspension performance, then you really do need to have a specialist modify the BMW front forks. Selecting the rear shocks parts is also important. Modifications of the front fork internals can improve handling in a huge way. I am talking about truly great performance, way beyond what you might consider from things I have mentioned in this article, such as going further, with such as Emulators, and parts that match YOU and YOUR bike and YOUR riding. If you really want your forks to handle superbly in such conditions as bumpy turns, or just straightaway repetitive bumps, etc., you need to go to a specialist. Your bike will truly 'stick to the road'. One such modifier, on the West Coast, is Ted Porter's Beemershop. They know a lot more about what works and what does not, and how to modify and install what really works well, than I do. I have ridden bikes that had Ted's full "treatment", and it is night and day different. Your bike will feel like a very much more modern high performance bike than you can imagine. I spent most of one day riding one of Ted's customer's bikes, that had a rather full set of front end and rear end modifications. Excellent rear shocks tailored to the bike. The front end had emulators, I think, with one fork doing rebound duty and the other doing compression duty. The feel of the forks was truly way better than the bike when it came from the factory. I pushed this bike pretty hard that day, and was most pleased. AND...the bike handled better than my own! Interestingly, perhaps mostly to me, is that I also took a passenger on one of that day's variety of rides, and the ride-ability was still excellent. I think that bike would definitely out-perform my heavily modified R75/, on the street, and on the racetrack. It was an eye-opener.
This information is not complete. Information is scattered in this website. Basically, except for some early models where the fork tube spacing is different, all the Airhead, and even some other BMW models forks will interchange. Some other makes models can be fitted. What will and what won't, is way beyond what I want to do right here. ATE SWINGING type brakes don't fit much of anything except the fork lowers that they were used on. Wheels mostly will too, some require a bit of work. The REAR wheels have some anomalies, particularly with conventional drum versus disc brakes, but can be made to interchange. SOME conversions are a PIA to do. For instance, putting a snowflake wheel on a 1974 /6. A R90S front end with dual discs is a big PIA….tube spacing is different, so the triple clamps are a problem. ….tubes work though. That setup uses 75-80 dual disk ATE lowers, 17mm axle holes ...so uses the 17 mm axle. ATE calipers do work though. Typical problems with early Airheads is the need for the wider 1977-1980 /7 fork brace, 46-61-1-234-907. Particularly to accommodate a 100 section tire installation. Another situation is to convert a single disc ATE, such as a standard 1978 to dual disc, you best use 1979 parts ...such as the right slider, caliper, and disc. Some items should be avoided, such as the 1974-75 R90 rear rims, they crack at the spoke holes. PRE-1981 final drives use wider shoes and narrower pins, but one can use proper shoes on old drives, but later drums MAY need the ridge machined-off due to narrower shoe wear. There is hardly any end to a list that could be made of interchangeabilities. For more info on the ATE swinging brakes conversion, see the next section, VIII Brakes. Some sections following that will also be of interest.
There is an article on brakes on this website:
https://bmwmotorcycletech.info/brakes.htm
Use it WITH the below information. Upgrading a front drum brake is possible, by careful assembly and use of appropriate friction materials. It is possible to install discs ....with wheel changes usually needed (but not always). There are innumerable possibilities. You CAN make a drum brake work fine. Some seemingly simple conversions can be complex and expense.
Example: You might be thinking of grafting on a R90S dual disc brake setup; ....let us say you have a 1974 /6 you want to do that to. You will find the TUBES spacing to be different! That means you need triple clamps, although using the old tubes are OK if in good condition. You will need 1975-1980 dual disc ATE Lowers, the 17 mm axle, etc. You CAN use the ATE calipers. Finding an entire R90S front end, complete, is not likely. This can be an expensive over-all conversion, and there are many possible cheaper...and better...ways.
Another example: You can convert a single disc ATE system to dual disc by using 1979 parts ...a right slider lower, the caliper, the disc. You probably can use the existing MC.
Quite a number of Airhead owners have 'upgraded' their brake systems in various ways:
1. An additional disc where only one was stock on that year and model. This will improve braking SOME.
2. Modified disc(s), such as some other than stock type of metal, perhaps floating type of disc/carrier, and other changes. NOTE that drilled or slotted discs are not drilled or slotted primarily for sweeping off rain water, as is commonly thought. The real purpose is to reduce the gas that is produced from the resin binders in older (especially) pads being heated. The gas goes to the pad surface, and thereby makes a 'hydroplaning' type of layer. There are two other purposes. Drilled discs help INcrease the coefficient of friction. The holes' edges provide those edges to promote 'bite'. The latest high friction pads minimize the effect somewhat. The other purpose of drilling (or slots or even shallow grooves) is to help remove brake disc debris ...they have little to do with cooling.
3. Different master cylinder piston size, 1 or 2 mm smaller than stock for the same number of discs.
4. Different pad material. HH+ pads work very well on most discs. If using cast iron aftermarket discs, consult the maker.
5. Different caliper(s), such as more pistons, or staggered size pistons, particularly calipers with more over-all piston area. I have heard of confusion over why an 'upgrade' brake caliper ...to one with more than one piston ...where approximately the same total pistons area as the stock one, or even more ...has not improved braking. Sometimes these modified systems have the unequal piston size calipers mounted to their Airhead such that the larger piston, normally being the exit section (tire rotating normal direction) is mounted backwards from what the manufacturer intended. This, with the gassing, see item (2), results in less braking. This type of problem can be somewhat minimized by being sure you are using drilled discs. Staggered size pistons calipers are staggered in size specifically to help with this gas problem. Very modern motorcycles with the latest type of discs and calipers and especially pad compounds, are much less susceptible to this problem of gas-hydroplaning, and may not even have drilled discs. Beware of using the wrong pads!
6. Some unexpected things you might run into include the rear drum brake fitment. Pre-1981 rear drives with drum brakes used wider shoes and narrower pivot pin; so the later shoes won't fit. A late model brake drum might need a ridge machined off due to wear from narrower shoes.
7. Installation of 4 spot calipers from such as an Oilhead or K-bike is usually fairly simple, and results in vastly improved braking. If done in a dual-disc setup, you can have truly modern performing brakes. You often can continue to use the stock size master cylinder. The installation of dual discs and 4 spot calipers is my favorite method of upgrading brakes ...as it gives a quite substantial increase in braking power, typically for the least amount of money. If done correctly, the brakes still have very nice feel, and are not overly sensitive. Of course, there are always those that go way overboard on a modification.
8. You can adapt various types of brakes, such as Brembo, ATE, Grimeca, and Lockheed.
See IX, below.1. A front wire wheel can be put into an early 80's airhead (that came with snowflake wheels). Use an R80ST front wheel; or use a front hub from a R65 or R80ST and lace to a 19" rim. You could also machine a hub from a 1975-1980 spoke wheel bike, which is narrower, as the 1975 to 1980 hub is too wide and spokes will contact the Brembo calipers. Use R65, not R65LS, discs, or make spacers.
2. As above, but for the rear wheel, use any 1970-1980 spoke wheel.
3. A snowflake front wheel can be put on a very early bike, let us say a 1974 /6. You need a 1974 R90S front end, with dual disc. This is a hassle, but can be done. The tube spacing is different, you need the triple clamps. You need a 1975-1980 dual disk ATE lowers, with 17 mm axle holes, and you need the 17 mm axle of course. You CAN use the ATE calipers.
4. Early airheads had a narrower fork brace (fender mount). If needed for your tire size, you can use a 1977-1980 brace from a /7. Or, buy one: 46-61-1-234-907.
5. If converting single disc ATE to dual-disc, ATE, let us say a 1978, use the 1979 parts: new right slider, caliper, disc.
6. Watch out for cracking rear rims on 1974-1975 bikes, these cracks develop at the spoke hole area; the fix is to use later heat-treated rims. TAP the spokes on the proposed 74-75 rim, I use a plastic handle of a screwdriver, and if any are quite dull sounding, there may be a hidden problem at the nipple/rim; or, just a loose spoke.
7A. Early snowflake rear disc brake wheels on later airheads:
There are only modest problems, and all are fixable with some modest labor. The earliest snowflake rear disc brake model wheels had prominent casting nubs in the big dished area of the wheel. These nubs will interfere with the bolts holding the cardan plate of the later rear drives. Simply grind off the nubs, do it very neatly, and clean up your work with sandpaper when done with the grinding. A minor problem is the offset of the wheel (yes, on a cast wheel!) is very slightly different, and you may need very minor machining if so inclined, or, just use a large diameter flat washer. There is also the difference between disc brake and drum brake rim width. The disc brake wheels are 2.75" official width, and the drum brake wheels are 2.50" official width. This has not proven to be a problem with even 120 width tires, although you might be able to notice.
7B. Other BMW Airhead wheels:
It is possible to use many of BMW's other Airhead wheels by various modifications and adaptions. This is a big subject and is not going to be treated here, so I suggest you ask about specific combinations on the Airheads List. Yes, it IS possible to adapt such as the later, non-snowflake tubeless rated wheels; and, GS outside wire wheels, ETC. One can even affix K bike wheels.
7C. Snowflake wheels have been used as tubeless, and I have an article that, in depth, discusses this, and other similar uses: https://bmwmotorcycletech.info/section6.htm
7D. Other wheels, non-BMW:
Morris Industries and Lester Wheels made cast wheels for Airheads. The wheels have more stability than wire wheels. Some may argue that the deeper dish makes for a safer wheel in case of a serious impact, etc. Use the Lester wheel if keeping the stock brake, and use the Morris if using a rear disc brake.
8. In 1975, BMW changed to 17 mm front axles on the R90S. BMW then continued with 17 mm front axles. There are minor internal differences on those front wheels. Swapping wheels from one year to another, can sometimes be slightly complicated. The 14 mm axle wheels can be modified to fit a 17 mm axle bike. This can get more complicated if you try to swap into a much later bike, but for the /6, for example, it is not all that bad. Remove the size reducing sleeve in the wheel and install the larger inside diameter wedding band spacer (that sets the preload, so DO THAT) used on any later model up to and including 1984. There is a cast-in web on the old wheels that held the smaller spacer captive. Drill it out, to a bit larger diameter than the later wedding band spacer's O.D. To install the wheel you will need the top-hat spacers . You may have to fiddle with things a wee bit. As noted, do the usual preload work before installing the wheel.
9. TIRES:
Tires have greatly improved since the early Airhead days. You have a considerable choice now. I recommend not going larger than one oversize width step, if increasing the size. Read: https://bmwmotorcycletech.info/section5.htm
Slide carburetors will give improved (snappier) throttle feel, and sometimes actual over-all better acceleration ...than CV carburetors. Be very careful about going overboard on throat size. As a general rule, increased throat size tends to DEcrease lower RPM torque and response.
If you use the Bing CV carbs, you CAN make them work very well. Some have even gone so far as to thin the butterflies, and many parts are available for the Bings for modifications, including various slides. Experience is needed ...lots of it, for any carburetor. Fuel injection conversions tend to be far trickier than you might think....and often do not help, but hinder performance.Definitely give a lot of thought to additional air, COLDER air, to the intake system. A very significant power boost can be had. Insulating the intake system can be very helpful, if you are using, more or less, the standard rectangular airbox and snorkels. Help for the clam shell type is also had. This type has far too much heat given to the intake air. If you use the rectangular airbox system with its snorkels, vast tuning possibilities exist, for both street and mild to moderate racing. With some insulation, performance is quite enhanced, with proper jetting, etc. By modifying the snorkels, you can move the torque peak all over the place!
Questions often arise as to whether or not RAM AIR would be helpful, as 'free' boost, or free supercharging. This is not easy to accomplish on our Airheads, but can be done. It seems relatively effective, IF it gives COLD air at any speed. The improvement is almost always REALLY due to the colder intake air. But, for a TRUE "RAM" AIR improvement, it is UNLikely to do anything, except at VERY high speeds, hardly attainable by an Airhead bike unless prepared for top speed runs at such, say, Bonneville. Cold air GOOD; ram air not, unless VERY HIGH speed; and, here is why:Dynamic air pressure on a vehicle (officially described for calculations as a flat plate moving object, motorcycles are certainly like that for measurements) is relatively small at slow speeds, and has no real effect of any consequence. At 68 mph, for instance ...let us say 100 feet per second ...there is 12 pounds of pressure on a SQUARE FOOT OF AREA. A square foot is 144 square inches, thus the pressure is 12 divided by 144, or under a tenth of a pound. Pressure is proportional to the SQUARE of speed. So, at 136 mph, one has about 1/3 of a pound of pressure per square inch. This gives only some barely, possibly noticeable, 'boost'. Another thing to keep in mind is that the horsepower required to attain some higher speed, goes up approximately as the cube. What all this means is that if you are not doing over ~120 mph, forget trying to get RAM pressure, but it is always worthwhile to go for cold air ...which has a MUCH bigger effect, until speeds generally unattainable by a modestly modified Airhead motorcycle are reached. Generally try to AVOID increasing the intake path enclosed length in order to get your colder air ....as it moves the torque peak, and can move it very considerably. The amount of dyno work done by BMW for the various snorkels, etc., for the rectangular airbox, must have been VERY considerable.
https://bmwmotorcycletech.info/InExTuning.htm
XIII. Swapping parts such as heads, cylinders, etc:
Various articles are on this website dealing with engine parts.
2. Install the later reed breather valve.
NOTE!
There is a difference between the amount of oil 'used', between the later reed type breather valve, and the older round disc type breather valve. While the reed valve may last forever, and the disc valve need replacing at rare intervals, the disc valve, IMO, can lower the oil usage, particularly the first pint or so. For information on the breather valves, extensive information is in article 50B.
3. For extremely high rpm, modify the oil pump, etc., to prevent cavitation problems.
4. Consider modifying the engine in many ways for better breathing and cooling, including the factory type oil cooler.
5. Install a deeper oil pan with extended pickup, and be sure the oil pan has surge baffles. For street or mild racing, just use the later baffled type of oil pan from the eighties, although a later GS pan can also be used.
6. Depending on how far you want to go, you can modify all sorts of things for lightness. You can go crazy and even drill and polish the holes in the cam chain sprocket (yes, race folks go to that extent). Looks racy, if not much improvement. In many instances, smoothing and polishing parts WILL increase strength.
7. Use a light weight but adequate battery. For higher performance bikes, and caf� or race bikes, use a Lithium battery, but be aware of limitations. https://bmwmotorcycletech.info/newbattery.htm
8. Use a later driveshaft housing, but install the earlier non-cush shaft. This will be controversial.
9. Look at other bikes & their modifications. Do a LOT of this, with a critical eye!
� Copyright 2024, R. Fleischer
Return to Technical Articles List
Last check/edit: Friday, June 14, 2024