
|
|
The ads above are Google-sponsored.
Clicking on them at every visit helps support this website and my testing work!
Clicking on something inside an advertisement helps even more!
The donating article explains, in-depth, this website's history, philosophy, and operation.
Exhaust Pipe Finned Nuts....
...called "spider nuts" per BMW.
Exhaust system installation & replacements
� 2024, R. Fleischer
https://bmwmotorcycletech.info/exhaustnuts.htm
article #46
There are at least three styles of finned spider nuts (all except the earliest are called finned nuts) that have been used on Airheads...and pre-Airheads. Early models had some deep dimples or holes (not through the metal entirely) in the flat area of these finned nuts closest to the head that was for use with a tool-kit lug wrench (spanner). Later models do not have those holes. There are at least two sizes of fins. The official BMW wrench was a 18-600. Other finned wrenches may be used, if they fit the fins properly. Many versions of fin wrenches have been made. I recommend wrenches that engage (and truly contact) a goodly number of the fins. In an emergency, you can use some sort of 'strap-wrench', but that needs to be done very carefully, usually with a piece of tin can surrounding the fins first. It is altogether too easy to break fins using a strap wrench ....but certainly OK if the nut is not to be reused.
The exhaust nuts tend to seize-up strongly if not fully unscrewed fairly regularly (a year or two maximum) & the threads cleaned & recoated with an antiseize compound. I recommend this be done on a scheduled yearly basis. Failure to do this has resulted in a lot of woes! ...some of these woes can be $$$. The servicing should take about 5 or 10 minutes for each finned nut if the nut removes easily.
To remove the exhaust pipe, should you want to do that for some purpose (which is not necessary for just the yearly finned nut cleaning & antiseize coating work) ....it is not necessary to remove the nut from the pipe, just loosen it so it can be moved away from the head some.
TOOLS: https://bmwmotorcycletech.info/tools.htm
Servicing the finned nuts:
It is necessary to unscrew the finned nut to clean the internal steel locking rings (one or two rings depending on motorcycle model). After you clean the threads and rings, then you coat the threads (I do the rings too) with anti-seize compound. You need not remove the pipes, nor do you need to remove the nut from the pipe. Removing from the pipe does make it a lot easier to clean the nut's own thread. I made up a cleaning brush that made it a lot easier to do the nut cleaning if the pipe was not removed...in which case you need only to slide it down the pipe some. You can make one from a wooden brush with 90� steel or brass bristles, the bristles well cut down, and the wood modified as required, so the brush will fit between the pipe and the nut threads. BUT.... if doing a really good job, DO remove the pipes, clean the fitment ends, and replace with finger-applied antiseize put on the pipe. Fresh antiseize compound on cleaned threads is always a good idea. I like to clean pipe ends (both ends of the header pipe), and use a bit of antiseize compound there, too.
If you fail to service the nuts regularly, you may eventually be sawing off & replacing nuts ...or, worse, repairing cylinder head threads (which can be an expensive repair job). The nuts are not cheap; but, it is vastly better to CAREFULLY saw one & replace it rather than ruin the port threads by forcing a nut off & then having to repair the port threads. Do not fail to clean all threads and then coat with anti-seize compound! This is one of the few places over-gooping is not a problem, just messy.
When getting ready to tighten the finned nut, tap the header pipe at the curve, with a large-headed soft-blow plastic (or rubber or large wood mallet/hammer ....to be sure the pipe is fully into the cylinder head.
Do NOT over-tighten the finned nuts! I believe BMW's torque specification is much too high! The finned nuts do have official BMW specifications on tightening. For the models before 1981, the value in some literature is 101-130 foot pounds. From 1981 it is 145-159 foot pounds in some literature. Some literature says 160 Nm (118 +- 15 ftlbs). I recommend you do not tighten them so tight ....I simply use a reasonable 'grunt' on my finned wrench tool. I don't personally know anyone who actually measures the exhaust nut torque; although I have done it, in doing some experimentation, decades ago.
If you do decide to measure the applied torque, some confusion can be seen in the various literature due to BMW ...and others ...in wrongly converting Nm to foot-pounds, & compounding the error backwards. The Nm figures are correct, when the conversion, by BMW, to ftlbs is incorrect.... but even in Nm, it is too high ...in my opinion. It is not necessary to use a hammer on the wrench when tightening; just a good tightening but not at all your full weight or strength, assuming a reasonably long wrench (mine is ~ 12"). The internal split ring(s) do a fine job of tightening on the pipe, especially if you clean the ring(s) gap (I use feeler gauge blades) of deposits. Excessive tightness will make it easier for the finned-nut to gall-in-place. BTW...if you really wanted to check the torque on the nuts during tightening, you need a finned nut tool with a square hole drive for your torque wrench, and then either using it at 90� (no correction needed), or, straight-out with the torque wrench, in which case you must calculate the wrench setting for the torque you want. One of my foot-long finned nut wrenches had this modification, done during my experimentation. My guess is that I tighten the finned nuts to about 80 foot-pounds, without any torque wrench. Someday, maybe I will measure the actual torque I use....but, unlikely.
I like the parts cleaned of deposits & other crud before I use fresh anti-seize compound. That means I actually clean the threads, ring(s), etc. I use a medium-fine-small wire brush for that purpose. You could use an old stiff toothbrush on the threads, but it may not be stiff enough to clean well. I use an old feeler gauge to clean the ring gaps. Failure to clean the ring gaps means that you could get a build-up of hard carbon in the ring gap and that will prevent the rings from clamping well on the pipe (without excessive torque). I do not use any liquids, including solvents, in preparing the threads.
One of the best anti-seizes I know of is the "Pure Nickel Special" which is a Never-Seez brand. Was rated to 2600 degrees, now 2400. Our exhaust ports do not get anywhere's near that hot, so the compound's carrier holds up well. The standard Never-Seez nickel is also excellent and likely the better buy. The Permatex brand commonly seen (1600 degrees rated) is adequate. Copper-containing antiseize compounds, if the high temperature type, are usually OK to use. Many anti-seize compounds contain copper, whether or not they say so on the container, ...and copper is actually not needed ...but not deleterious, and a small amount in the applied compound may be helpful, but I have not appreciated the appearance after years of such as application to such as studs into aluminum. An infamous profanity-spewing guy who does Internet videos on BMW repairs, insists on "copper" antiseize. I believe he has no idea of the composition of various anti-seize compounds ....silvery-looking or not! For various reasons, I recommend against high copper percentage anti-seize compounds, and I absolutely recommend AGAINST graphite types. DO NOT use graphite goops on these finned nuts. DO NOT use plumber's black goops!
BMW actually specified Never-Seez, in a Service Information Bulletin (SI), misspelling it Never-Seize in that bulletin:
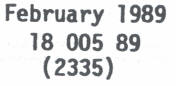
So, just what are those numbers? BMW issues Service Information Bulletins to BMW dealerships, which are usually entitled Service Information. Note the S, and the I. We BMW Wrenches call these bulletins "SI's". In February of 1989, BMW issued the SI, under dating order 18 005 89, and the SI had a sequence number of 2335.
What you must not do ... is to lubricate those threads with WD40 or any common oil ...do not do that, because most oils carbonize over time and miles at the exhaust port area due to heat, corrosive fumes, etc. My advice does NOT prevent you from using an oil-in-solvent penetrant for helping to remove a stuck/frozen finned nut ...but all the remaining oil must then be removed, before the threads, etc., are coated with anti-seize compound & assembled & tightened. Re-stating: It is completely appropriate & acceptable to lubricate the nut threads with anything if you are having problems getting one unscrewed ...but do thoroughly clean off such before proper brush cleaning, anti-seize coating, & tightening.
What causes seizing over time & miles is the galling from dissimilar metals contact, plus the slow evaporation & conversion of the binder (carrier) oil of the antiseize compound mixture ....., plus some carbon & corrosive products from combustion byproducts .....& some changes from other smaller effects. It is possible that an electrolytic action is also at work, from dissimilar metals.
What is important for our Airheads for the type of anti-seize:
Except for specialty types that are for very specific metals and conditions, the main material should not be corrosive or electrically reactive (dissimilar metals); and, the carrier medium is compatible with the type of heat we get at these nuts. You remove them, & use a mild wire brush (brass brushes my favorite here) on the threads & the one or two rings, then a feeler gauge in the ring gap, but clean/brush especially to get rid of carbon & other hard deposits. Brush on some anti-seize compound, & assemble without over-torquing. Doing this yearly is my recommendation. The carrier, particularly in some cheaper anti-seize compounds (but that is only a generality) tends to burn-away, or carbon up. For our Airheads, having some copper in the anti-seize formula might be slightly helpful ....but you MAY NOT visually see that color, and I have no proof that any copper will help, no matter the hype about copper.
The reason the nuts have been such a PIA, is not totally the lack of cleaning & re-gooping regularly! While it is true that failure to service the nuts and ring(s) IS likely the biggest cause for seizing. It is NOT unheard-of for someone with reasonably OK goop on the threads to find the nuts pretty well frozen after a reasonable period of time. There are things going on, besides the goop carrier & the goop's other ingredients; ...and besides dissimilar metal reactions. One such 'thing' is over-torquing. Another 'thing' is that the exhaust port & the threads is a place where nasty stuff accumulates. Some of this stuff is carbon with 'sulfur stuff' (or other compounds or additives in the gasoline), and they react with moisture, yes I know the moisture is supposed to be instantly driven off my exhaust heat ...it is not ...before very slight but accumulative damage is done. The sulfur compounds, with moisture, create acids. Acids have fun with the carbon, etc, from the combustion process and heat accelerates the effects, and the compounds may almost turn into cement sometimes...a good reason to use a high quality antiseize paste. The atmosphere also enters the threaded area from outside the nut, from the exhaust header side. Atmospheric air has moisture, and 'other stuff'. This especially happens as the engine cools down. If you do very short trips, the effects may be harsher on the threads. Note also that the threads do wear a bit each time the nuts are removed and returned and retightened, and excessive torque also wears the threads faster, ....all these things leaving more room for more deposits!
There are often small exhaust gas leakages into the exhaust port pipe taper ring(s). The ring gaps fill up & combustion products act like cement. The threads also gather combustion products. All threaded things must have at least a slight gap or they won't be tightenable from the pressure applied by the nut. BMW specifies a torque, which they have changed several times, but which I think has always been too high. Too little & problems increase, way too little & the pipe moves. That is why I do not torque the finned nuts with a torque wrench & adaptor; another reason is that the wear on the nut threads & port threads varies considerably. The final reason is that if the ring(s) gap is not cleaned of hard carbon material, it prevents the ring from clamping on the pipe properly without excessive torque. I use a good grunt, but not one that hurts my hand, & this is on a 12" finned wrench. If you are a beefy guy, I am not, be extra cautious. There is no reason to over-tighten these nuts! Avoid having to do that, by cleaning the threads and cleaning the ring gaps with old feeler gauge material; assemble with plenty of antiseize on everything; do not overtighten! I have never seen an instance where regular and proper servicing of the exhaust nuts has failed to protect against seizure. In some instances, it is every 6 months. In most, it is one to two years. Never let it go further! Yes, it is true that high moisture areas such as seacoasts, tend to be extra bad for the threads.
I like to use anti-seize compound when assembling any parts of the muffler system, even the pipe joints, clamping screw threads, etc. I tend to install all studs and bolts that screw into aluminum (or magnesium), with anti-seize compound. In some situations, I apply anti-seize to other screw/bolt/nuts situations. It is particularly important with steel into aluminum, and especially so with steel studs and bolts that do not have such as cadmium plating on them. One of the worst instances is with stainless steel parts, which are exceedingly rare on stock BMW's, mostly stainless steel items are aftermarket items. SS can be awful, over time, in corrosion areas, particularly if screwed into aluminum. Do not use graphite compounds! Graphite will enable corrosion in contact with aluminum. There is a black-appearing anti-seize compound used by plumbers. DO NOT USE IT. AVOID using SS parts that screw into aluminum engine cases, ETC!
Problems, and dealing with them:
The biggest problem (and usually the only problem) is trying to remove or fully unscrew the finned nuts. Sometimes those nuts have been over-tightened, and/or have self-tightened due to the various already described effects. Most often the problem is simply that the nuts have not been unscrewed, cleaned (male and female threads) and coated with fresh antiseize, in a long time.
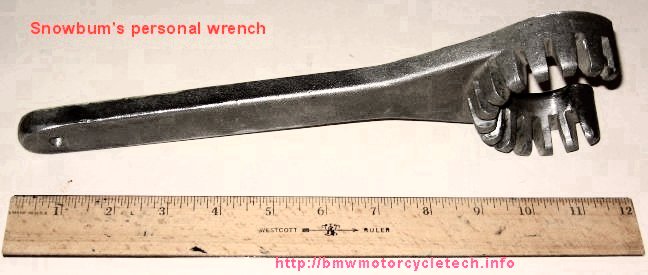
Method #1 (or #2): Try loosening the finned-nut with a special finned wrench like mine or equivalent (see photo below), and hand pressure. If the nut does not loosen, you must use another method. Some folks just start with Method #2 ...and I am OK with that.
Method #2: Use an old piece of 2 x 4, or 7 or 8 pound sledge hammer, or very large brass hammer, on the wrench handle. The loosening direction is counter-clockwise as you face either finned nut from the front, in other words, to the left, counter-clockwise ...just like most standard fasteners. There is seldom a problem in giving the finned-nut wrench quite a loosening whack. The nut will almost always loosen some. Use hand pressure after that loosening. If your nut seizes-up after modest loosening ...then see the instructions below the photo. What is often not understood, is that loosening the finned nut by a suddenly applied sharp force can usually work much better than just a heavy force on the long wrench from your hand. It is not just the amount of force applied ...but the contact speed and weight of the sudden shock-force application. That is why an impact wrench, suitably adjusted for MODEST torque, can be effective.
Unfortunately, the nut might, after less than maybe a half-turn, tighten-up. If the nut loosens a small amount, AND then seizes; STOP!!!!.....>>>it is time for method #3:
Photo of my personal wrench. I had several of these in my shop, one had the 3/8" square hole I've mentioned. My tools article has photos, sources, etc., for a number of versions:
https://bmwmotorcycletech.info/tools.htm
Method #3: Use a large flame torch on the nut, getting the nut quickly fairly hot all-around, then try loosening again. Sometimes that works; often it does not, because you are also heating the threaded port threaded area, which expands fairly fast. You can also just ride the bike a few miles, then immediately try loosening. Do not put large amounts of force on the nut after the first loosening-up.
If the finned nut does not continue to loosen easily or not loosen much, or not at all, then use the following oily penetrant method. Run the engine (maybe 2 minutes of running the engine at a bit above idle, perhaps 1500 rpm), then turn off the engine. Multiple times squirt a very thin penetrating oil onto the exposed threads as the engine is cooling. Squirt a number of times as it cools. The idea is that maybe the cooling-down will 'suck' some penetrant into the threads & into accumulated carbon and other deposits which sometimes are mildly porous. There are many penetrant oils on the market...but, read on!
Let the motorcycle sit overnight, squirt the mixture onto the exposed threads once more, then try loosening & tightening back & forth just a little ...not too much, and not too many times ...do not force the nut! If you do not have to ride the bike soon, do soaking of penetrant over & over for a week. You can try heating then squirting during cooling. Try loosening the finned nut. Be careful! It is OK to use a big torch and not start the engine, to heat the exhaust port area.
It is now well known that an especially good penetrating oil mixture (that very likely beats all others at any price) is a mixture of ATF (automatic transmission) oil with added acetone. One part ATF oil to one or two parts acetone is the standard recommended mixture. I suggest you slow down the evaporation of the acetone ....for the purposes of the exhaust finned nut problem ....by adding some slower evaporating solvent, such as paint thinner or kerosene (called parafina in some countries) to the already made acetone and ATF mixture. This will make the mixture stay wet for a longer period of time. It works better that way. I soak a strip of cotton cloth with the mixture, and wrap it around the threads area of the frozen finned nut. I use a piece of solid copper or iron wire to keep the wet cotton rag in place. You can also just tie the rag piece.. Once temperature is down enough, I tie a plastic baggy around the whole finned nut assembly, to try to keep the threaded area quite wet. I have had good results with ATF oil mixed with such as acetone, mek, lacquer thinner......and with kerosene (or paint thinner). I may keep things wet for a day or two.
If, after trying the above method(s), the finned nut loosens a bit, & then, using your hand on the wrench (with only quite moderate pressure), suddenly gets quite stiff again, you are hereby warned not to go farther at this point with trying to loosen the nut. Some insist on trying favorite mixtures, often commercial products such as Kroil or other products. There is NO indication, nor tests, that show that such products work as good as, nor better than, the homemade mixture of ATF and Acetone.
DO NOT force the nut if it re-seizes!!!
Try the penetrant mixture a number of times and if you find that the finned nut will not loosen without seizing, you MUST cut the nut! The slow method is to use a single ended hacksaw blade holder (see hardware store) that holds a short piece of 32 pitch hardened hacksaw blade. A faster method is to use a common electric motor powered (small versions of which are brand Dremel and others) tool with appropriate cutting disc, but be careful! No matter what tool, avoid damaging the port's threads by holding the tool cutting surface angled somewhat towards the exhaust pipe. This lets you make a cut that will go through the nut & stop the cutting on the very hard steel rings inside. If you do not know where these parts are located, inside the nut, find out. I like to cut on a slight side angle, and do it very neatly, so as to save the nut for use as a thread chaser.
You need only make one cut, front to rear. Take your time! Avoid damaging the threads ..... Do not cut into the port threads. When you are nearly to the port threads, try using a pry bar or very broad angled chisel & hammer, to split the finned nut at the cut area. Do not overdo this. Do not injure the port threads! The purpose of the cut slot is to weaken the nut so you can force the nut to widen ...or break ...at the cut slot, then the nut will be easily un-screwable. Flood the threads again with your solvent/oil mixture, or favorite 'stuff', before unscrewing the finned nut. Some cut two slots, ~180 degrees apart to weaken the nut more, or to allow the nut to come off in halves, more on this below.
Nuts are not expensive compared to repairing port threads! If you accidentally make a minor cut into the port threads, you can repair them with a thread chaser, or possibly the old nut! You could, of course, spend the money for a real 52 mm die to clean up and fix the threads. Yes! ...there is actually a die available, pricey too, for the 52 mm port threads. They are available at such as metric supply companies such as MSC.
You have choices ...make a second cut at roughly 180�, and the nut comes off the pipe in halves ....or, avoid the second cut by removing the header pipe, so the old nut slips off. In some instances, you might not want to throw the old nut away...you can possibly modify it to be a thread chaser, the metal is hard enough for mild thread chasing.
When installing the nut, whether a new one or old one, the threads must be cleaned on the male & female portions. I use a BRASS brush. Stiff shortened bristle toothbrushes can be used, as can soft/fine steel brushes. Clean the gap in the ring(s); I use an old thinnish feeler gauge.
Amply apply anti-seize compound to the threads and to the outside of the rings ....perfectly OK to do that after the nut & rings are on the pipe.
If you have any other parts of the exhaust system ever apart, clean them with a fine grade of steel wool or mild metal brush or even fine abrasive cloth, & apply anti-seize. I do this to the pipe junctions & small screws in the clamps threads, etc. Anti-seize compound really helps with nuts, screws, the pipes, spark plugs etc., where they get hot ...but, since it is a mild lubricant, you do NOT want to over-tighten things.
If you do not over-tighten, & if you remove the finned nut, clean the items & apply fresh anti-seize once a year, you will never have a problem, assuming reasonable to even somewhat poor threads condition in the first place.
Hints:
(1) The exhaust system should be installed with anti-seize compound at each & every joining point, & on any threads of joining items, such as the small screws used at the exhaust system clamps.(2) For many Airheads there is both a split ring & a solid collar inside the finned nut. To avoid you having to "figure out" how to assemble them, the split ring flat end goes next to the head. The solid collar flat end faces the nut. This puts the two slanted surfaces together. As you can see, this creates a clamping force onto the pipe, as the finned nut is tightened. This is one of the reasons I like to clean the split ring slot, so that clamping force is applied without excessive finned nut torque.
(3) If you used a penetrant for loosening the nut, etc. ...be sure to use a brush and a good fast evaporating solvent and wash away all of the oily penetrant before applying the anti-seize compound. You certainly do not want to leave anything that will, over time, carbonize!
(4) If you had the exhaust system apart, do not mix up left & right side finned nuts, as they may have differing threads wear. You won't have this problem unless you remove the pipes, as the nut is captive without the pipes being removed.
(5) There are various methods in use to repair extremely bad exhaust port threads. For instance, special bracketry and clamps. Reforming the threads if not extremely bad by using a metric thread-chaser, or a proper 52 mm die, work well many times. For quite bad threads, I am not in favor of any method except by welding & forming new threads, but some types of sleeves have worked OK, even though the heat trapped is a lot, theoretically. Some of the methods used are done to avoid removing the head. I prefer a nice clean job, that is done with head removal if needed. I have also used old finned nuts where the nuts 'cutting' place was fairly sharp, as a thread-chaser.
Exhaust system parts replacements:
To remove the exhaust pipe, should you want to do that for some purpose (never necessary for just the yearly finned nut anti-seize coating work) ...it is not necessary to remove the finned nut, only loosen it ~1/2 turn. There are various brands of exhaust systems and parts available: Epco; Keihan; Sito; whatever JC Whitney is selling; etc. Few purchase headers or mufflers from BMW due to the very high cost; and, they may not be available.
For quiet sound, a good fit, made of stainless steel, etc, I suggest Keihan, from England. Those of you in the USA can get these from Tom Cutter's Rubber Chicken Racing Garage (BMW specialist), etc. More extensive listings for exhaust system items & for repairing the threads in the head port, are under E, here:
https://bmwmotorcycletech.info/references.htm
Pipes and headers were made in 38 and 40 mm sizes. Some replacement X-over pipes are simply flaired to fit a 40 mm system. For real 40 mm pipes, try Siebenrock...or, BMW.
� 2024, R. Fleischer
Return to Technical Articles LIST Page
Last check/edit: Friday, April 05, 2024