
|
|
The ads above are Google-sponsored.
Clicking on them at every visit helps support this
website!
Clicking on something INSIDE the
advertisements helps even more!!
The donating article explains, in-depth,
this website's history, philosophy, and operation.
EML tops
https://bmwmotorcycletech.info/emltops.htm
sidecar section #SC9
� Copyright 2020, R. Fleischer
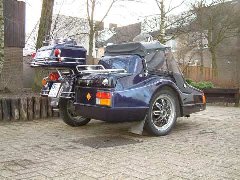
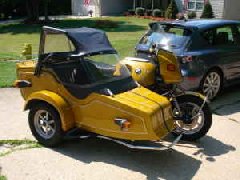
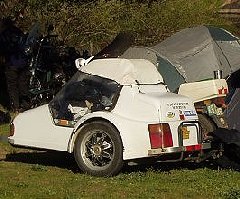
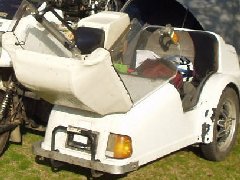
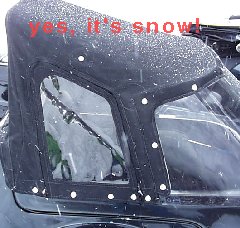
First: Photos of various EML tops I have seen; or otherwise gathered photos on. I may add more from time to time. Following these photos will be found a section with photos of my own K1100LT-EML & its custom-made top, & some details of its construction. A considerable amount of effort was put into weatherproofing it.
Snowbum's K1100LT-EML GT-2:
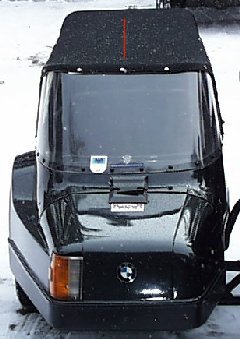
The highest grade of boat topping material, thread, etc., was used in this top's construction.
See https://bmwmotorcycletech.info/EMLsidecar8.htm for the technical details page for my EML sidecar.
https://bmwmotorcycletech.info/ has a clickable place at the bottom area for the Technical Articles LIST. Scan the list to near its bottom, where there is an extensive sidecar section. Those articles have additional photos of the rig without the top on, so you can see the support tube/bar, etc. LOTS of sidecar tech in that area of the website .....quite a few articles.
In designing and making the top for the EML sidecar, quite a lot of thought went into it. Even after it was done, I could make improvements if I ever made another one. I did make some small changes later on to mine.
Standard easy-to-obtain snap fittings were utilized, which have very little of them sticking up into the air & provide a nice appearance. The rear downwards-most part of the top, as it comes back down to the rear portion of the lift/tilt top section of the EML body (usually called 'the hatch') has both a forward & a rearward flap. The forward flap, see the photo, uses snap fittings, hidden under the flap as pictured/noted. I was concerned about oncoming wind & any 'lifting', trying to tear the new canvas top off the sidecar. I design-in a second flap so the rear area of the top was a dual-flap. The second flap, which is the rear-most flap, folds around the lift/tilt section rear area ....with full-width Velcro on both of the surfaces it wraps around on. I probably should have 'tufted' the top of the windshield, as is done in wind-tunnel testing, because I found my concerns were totally unfounded, so this top fits the rear in an considerably over-designed manner. At this point, you might be thinking that if I ever built another top, I'd not use just one strip of velcro, under the hatch, completely. Why? Because doing it the way I originally designed it nicely hides the velcro, makes for smooth rounded-edges, and just looks very much nicer and more professional. So, no change if I ever built another!
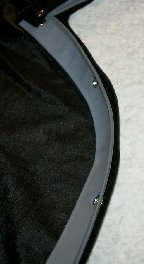
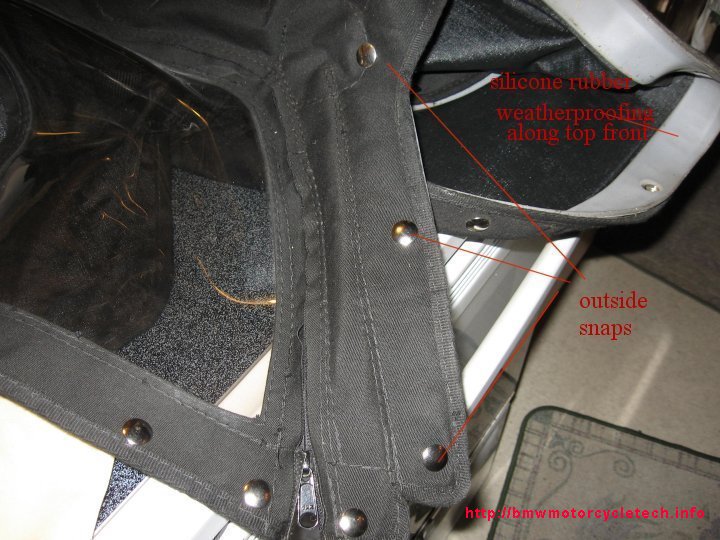
The part of the top that goes over the top-front (and down the sides) of the windshield was lined with a silicon-rubber material (that has a LIP for best sealing), with small round cutouts for the snaps. This made the windshield where it meets the canvas top essentially waterproof. The two side-curtain windows use #5 COIL plastic YKK zippers, so that the zippers have no problem going around the curves of the windows. The zipper pulls, two on each window, are all double types, so the windows can be unzipped from inside or outside the sidecar. The windows were specifically designed to not be accidentally removable in normal use. When the two zipper pulls of each window are pulled to the top, & inwards a bit towards each other, the windows can be rolled-up & a hangar made of top material, and with a snap place, is there to keep them rolled up when desired.
Stress & strain reliefs were installed at all major (and some minor) attachment points for everything. Sewing was with a special thread & was at a minimum doubled ...numerous places have more stitching. The stitching pitch was a consideration. The top center seam has been sealed to avoid water leaks.
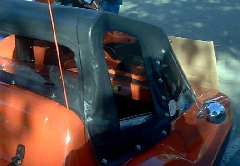
After this top was completed, installed & tested, as mentioned earlier, I found that the expected upwards (vacuum) movement of the major portion of the top area did not happen. I had assumed that airflow from the front would flow up the windshield & produce a slight vacuum on the canvas top. This was not so; and, in fact, the top would dish downwards a bit as speed increased, & my passenger-wife was having the top canvas flapping against her helmet. That was unexpected & unacceptable, so I made a double seamed flapped opening, a pocket really, located inside the top roof area, going fore & aft at the very center, just behind (but inside-underneath) that center snap you see in the photos. I have identified the area, with a red line in the first photo. A stainless steel flat strap, with a slight upwards bow, was installed in that flap, & it was 'just' stiff enough & springy enough, to keep the top slightly bowed upwards. It worked perfectly at any speed. The strap is not very wide. It runs fully from front to rear along the top portion.
The canvas part that comes over the windshield and down the sides has special silicone rubber with lip material as a weather seal. The windows have #5 YKK coil zippers & dual-pulls. The windows can be ROLLED UP; there is a hangar/snap unit to keep them up when desired.
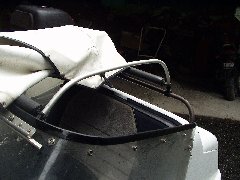
Above is an upside-down view of part of the front that snaps over the windshield. Note the snapbuttons, & particularly note that the snaps fit in holes made in the silicon-rubber strip-molding material....& that molding has a LIP, seen at right side appearing, falsely, to be almost touching the snap buttons, due to the camera angle. When this molding is against the front of the windshield, the lip on it acts as a water (as in RAIN!) barrier, sealing the top to the windshield. This sealing strip molding is fitted all the way across the windshield & down the sides too....all the way to the bottom of the windows.
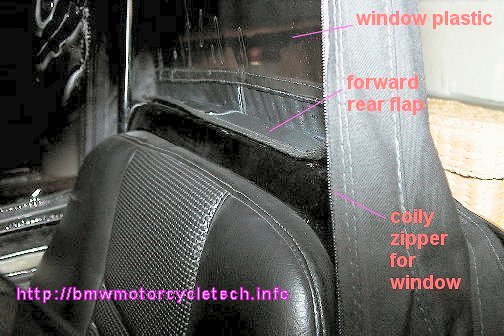
Above: The rear 'flaps' are really two sections/flaps. One is snap-mounted inside, not seen in this photo, but located under the photo-noted "forward rear flap". These snap onto the EML lift/tilt (hatch). Another flap, with Velcro in two long strips, is to the rear of the photo 'forward rear flap'. The second flap fits into the lipped section of the EML lift/tilt section rear area, going around & underneath that rearmost section lip. The two long strips of Velcro thusly fit at 90� to each other are hidden, & provide a strong fastening of the top to the lift/tilt section. This was done to ensure that the top cannot fly off in the worst possible conditions of high speeds & winds ....a worry that proved to be unfounded, & the second flap has proved to be mostly unneeded, besides it giving an over-all very nicely finished appearance.
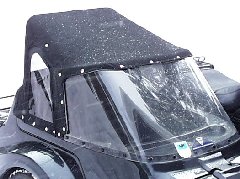
The above photo shows the top laying on top of the stove in my kitchen for photos, with the vertical three snaps that fit up & down at the rear of the windshield. To left is one of the two removable windows, that either roll up & are kept up by a loop & snap at the top; or, can be totally unzipped & removed.

Above photo shows some details of the vertical flap that wraps around the rear of the windshield, next to the removable or roll-up windows. It also shows a closeup of the windshield silicon rubber material with its lip.
Above: Of the three side snaps, each has a snap both inside and outside the windshield.
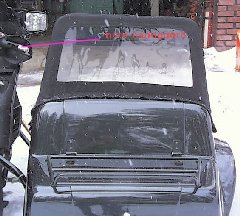
Above, the small red lettering points to the R1100S accessory handguard at the tug's handlebars. For an article on them, click on https://bmwmotorcycletech.info/kguards.htm
The top was made of the highest quality black boat topping material and highest quality special twisted thread was used, as was the backing material, type of seams, multiple sewing, snaps, etc. Stress areas are backed and most are multiple-sewn.
rev:
01/31/2008: Add my EML top photos and text.
02/05/2008: Update, add photos of more top details.
10/06/2008: Minor updates.
01/26/2010: Add information about the stainless steel strap added.
05/26/2011: Remove link to for sale top; clean up article a bit for clarity.
06/27/2011: Add more photos of details of the top I made.
09/27/2012: Add QR code; add language button; update Google code.
2013 : Language button and code removed.
02/18/2016: Increase font size. Update Metacodes. Justify everything to left. Clarifications. Wrap text around photos.
06/11/2016: Final updating of metacodes, H.L., layout, clarifications, spacing, scripts, etc.
11/04/2017: Rework article for cleaner HTML, better layout, eliminate text wrapping at photos, add borders 1 on photos, big reduction in fonts/colors.
� Copyright 2020, R. Fleischer
Return to Technical Articles LIST Page
Last check/edit: Monday, December 07, 2020