
|
|
Chemicals. Oils (not for engine, driveshaft, gearbox & rear drive).
Assembly Lubes, Additives, Greases (including spline greases).
Loctite, Sealants, Adhesives. Anti-seize Compounds.
Electrical Contact Treatments, Waxes. Wheel paint. Tank Coatings.
Windshield and visor maintenance. Removing sticky labels and residues.
Cleaners (for your hands & for engine parts, etc.).
Freeing up rusty fittings (nuts, bolts, etc).
Also see article #70 regarding paint codes: https://bmwmotorcycletech.info/pcodes.htm
� Copyright 2023, R. FleischerBrake fluids are discussed in-depth in my brakes article: https://bmwmotorcycletech.info/brakes.htm
1A. A possibly must-have item:
Purchase a squeezable tube or small tub of some sort of hand protection. Will definitely will protect your hands +. Put a bit on your hands, work it into & under your fingernails & all parts of your hands, sometimes arm surfaces, before you start work. This is not some common skin lotion! Get it at any auto-parts store. Lots of brands. After working in dirty greasy areas, you will appreciate the ease of cleaning your greasy-dirty hands with a waterless cleaner (see 1B), and then, finally, washing your hands with soap and water.
1B. A must-have item if you do not use plastic gloves, ....otherwise, ....depends on if your hands/arms get dirty/greasy:
Waterless hand cleaner, available at every auto-parts store. Small tubs/containers. If you do a considerable amount of work on dirty/greasy engines, etc., you probably will want to invest a bit more, perhaps an additional $20, & get a dispenser & cartridge. Waterless hand cleaner cleans the messiest greasiest hands ever, & it is especially effective if you first use the hand protection stuff noted above in 1A. When you are done wrenching, you clean up with waterless hand cleaner, rub in it well, including at fingernails, then wipe it all off using an old rag. Follow this by cleaning with common soap or detergent & water, ....and you will find that your hands ...and fingernails!... do not look like those of a typical old-time mechanic's!
Proper use & you will have clean hands for dinner-time! ....even black stains from moly grease will usually clean off!
1C. Some, or many folks, wear surgical or other plastic gloves:
Even after 70+ years of wrenching, I have never gotten completely used to the feel of any type of protective glove, but I do use them now & then. I often do coat my hands with protective stuff as in 1A, I sometimes do use gloves for certain jobs, especially to keep engine oil, gasoline, etc., off my hands (to avoid absorbing bad things, and, keep my hands cleaner). Used engine oils contain bad things, although not nearly as bad as in the old days of leaded fuels. Many types of plastic gloves are available, from boxes of hundreds of "throw them away every 1/4 hour", to longer lasting Nitrile rubber types of various thicknesses. Try Harbor Freight Company for the various types, get a selection of them and see which you like best for which type of jobs. I personally use both the super-cheap type, & the several hours Nitrile type. I have both nice Nitrile gloves of the thick heavy duty type (50 or 100 per small box), these fit my hands tightly, and are quite good even when working with small nuts and screws ...and I also use the very thin types of gloves of cheap plastic, which don't fit very well, but are very useful, and come 500 to a tissues-size box. Many get used to wearing protective gloves while working on cars & bikes (most professionals do wear gloves), & it certainly is better for your hands & health; avoiding skin absorption of nasty stuff ...not to mention making it vastly easier to have nice-looking hands after your work day.
I don't generally use the pre-job hand protection coating stuff if I am exclusively using rubber or plastic gloves.
2. Start collecting old rags (and, a bit of information about cleaning up spills, Portland Cement, Cat Litter, whatever...):
Those who like things neatly stacked, can purchase bundles of clean thin modest sized towel-like rags relatively cheap from big box stores ...you may even want to cut them into numerous smaller pieces for special jobs ....I DO! I have a box of cut pieces that I use with forceps; but, I also have another rather big box with odd ball old rags. I use old rags such as wash cloths, towels, jeans, shirts, etc. I am particularly fond of old cotton socks, which are very nice for polishing and cleaning things due to them fitting over your hand, and the softness (white cotton athletics types are my favorite).
Sooner or later you will have a large spill of some sort of liquid. I do save & use old rags, and I even do have a large box of blue service station thin towels. I do use driveway cleaner (available in 5 gallon buckets). I collect old used solvents and fuel from emptying carburetor bowls, even dirty liquid solvents of various types...all are collected in a 5 gallon container, the dirt tends to settle at the bottom and when I need a cleaning solvent that need not be pure, that is what I use. I also have cat litter available for spills.
Caution: One of items often recommended for use in cleaning-up oil spills is Portland Cement, which comes as a fine powder. I strongly disagree. It is lousy in windy areas It is also VERY messy, and the grit can get into everything ...just a few of several reasons I don't use it. While some swear by it for concrete garage floor spills ....I have tried it for such, and I do not like it! You can purchase other cement floor cleanup chemical powders. You can use kitty litter which is absorbent clay. You can even use some of your old solvents, or even water, it all depends on the spill. Solvents for cleanup, depending on the spill, can be water (not for oil or gas spills), kerosene, paint thinner, Stoddard solvent, etc. Stoddard solvent has many names, including mineral spirits and paint thinner. Avoid using something overly volatile, such as gasoline. Static electricity, friction, electrical contact arcing, anything in the vicinity that can ignite gasoline, etc. ...can cause flames, even an explosion!3A. Waxes, polishes, etc:
Everyone has their favorites. Often, unfortunately, the choice is usually, unfortunately, heavily influenced by advertising. Available are very pricey super-premium products, usually not worth the cost. Below is a list of some products that are not pricey, that do a very good job, having been thoroughly tested by one or more consumer publications & tested by me too! I do not keep this list always up-to-date, & some may no longer be available. If your paint is badly oxidized, you may have to start with common "white polishing compound"...or even, horrors, "rubbing compound". You must finish with finer cutting products. The final operation is to wax.
a. For paint in excellent condition: NuFinish NFP80 paste.
b. Very long lasting: ArmorAll Car Wax liquid.
c. Weathered paint: 3M #39006 One Step Cleaner Wax, liquid.
d. Spray type: Turtle Wax Express Shine.
e. Generally good all around: Prestone Bullet Wax.
f. Turtle Wax Carnauba Soft T225.
g. Very high gloss for already excellent paint: Meguiar's cleaner Wax and Liquid A-1216.
h. Pure Carnauba: very long lasting, for those who like this exceptionally good type, but requires more labor in polishing (with turkish towels being best) after drying. Do not apply on hot surfaces in the sun! Recommended is Eagle One Carnauba Pure Paste Wax #2040612. I prefer this type of wax, particularly if I ever plan on touching-up the paint, as it contains no silicones. In case you did not know, silicones are the devil to completely remove from surfaces, and they can go through the paint and contaminate the underlying metal or plastic, etc. This will result in problems if you ever contemplate re-painting! The problems include poor adhesion and fish eyes in the new fresh paint job.
3B. Cleaners/polishes for bare aluminum:
Clean first with Autosol Aluminum Power Cleaner; follow with Autosol #1824 Aluminum Polish.
You can also try a chemical cleaner like Nice 'N Easy (Ace Hardware), product 901, made by Alumin-Nu. Keep the parts wet, and don't let the parts get hot in the sun. You do not want this stuff to dry before you flush it away. Repeated applications may be needed. Very serious aluminum problems will need abrasive techniques, such as vapor honing, or, blasting with stronger things.
4A. Removing old labels:
The effect of sunlight on/through labels & the label adhesive, combined with the type of material the label was applied-to, makes this subject complicated, and the process can vary between easy with good results, all the way to disaster. For metal surfaces, particularly unpainted surfaces, the problems are few, the removal relatively easy, mainly because strong chemicals, and even high heat, can both be used, even mild to moderate abrasives, ....and the results can be perfect. NOT SO on plastic surfaces, particularly the windshield, which is acrylic of some sort, or polycarbonate of some sort, and may or may not have an invisible coating/treatment. Many painted surfaces are also easily damaged.
The adhesives on labels you may have applied to your windscreen varies considerably, and most labels are not designed to come off easily, so the adhesives are strong, tenacious, and hard to remove without damaging the surface underneath, and those are hardly the only problems. These adhesives, over time, can bleed into, or modify the surface of the windscreen. I advise that if you are going to apply labels to windscreens & windshields, that you do so only in an area that you are not going to want to remove such labels, later, if wanting a clear unchanged surface; or, you will be accepting that the particular area will not be easily repaired back to original, if that is even possible.
Carefully applied heat is my initial recommended method for removal. A heat gun, or hair dryer, can work fine. I prefer a heat source that is more or less concentrated, a smaller outlet. I am not speaking of a flame. Pull off the label slowly as you move-about the heat source some. I start at one small place, usually a corner, heat that place some (do not go overboard on the use of heat nor cover a wide area at first). Use a quite small knife, often a sharp Xacto type, on quite an angle, so as to not scratch the windscreen, ...to just barely allow lifting a heated edge or corner. You may want to use tweezers on that corner, rather than your fingers, to avoid heating fingers. Apply heat & move the heat as you slowly peel off the label. Labels are made of plastic or paper, sometimes metal layers too, or combinations of these, so the amount of heat needed will vary.
If label residue is left behind, & it almost always is ....especially if the label had been there a good while, ...start trying to remove the residue with the mildest stuff. Kerosene, paint thinner, or WD40...or, mildest: ...vegetable oil ....are all often first choices. Some adhesives respond well to real tire lubricant which is vegetable and water based. I strongly suggest you start with the mildest product, such as veggie oil or real water-based tire lube.
If no luck, do NOT move onwards to hydrocarbon, alcohol, and other solvents yet. Here is something to try on your label residue, that is very little known. Put a drop or two of any common liquid concentrated dishwashing detergent on a fingertip, and rub gently into the label residue. Then try a slightly water-dampened rag, and gentle rubbing.
Still no luck? Next to try are mild solvents such as paint thinner, WD40, etc. Before trying anything stronger, you can try household isopropyl alcohol, vodka, etc. Do not overdue it. It is often the amount of time the chemical is in contact that does the worst damage. Thus, try multiple applications, quickly done, waiting several minutes between applications (especially if trying a different solvent). If the chemical does leave some damage, you can often polish it off, using a succession of two or three faster-cutting cleaners, then polishes/waxes. Beware of damaging any surface coating on a windshield. Be very careful using strong solvents! The really strong ones like acetone & MEK can quickly damage SOME windshields, so don't use them unless forced-to. Note that "cast acrylic" windshields, for very short term as you work with it, can be rather unaffected by acetone, & thus you can possibly try acetone, Goof-Off, or MEK, but be very cautious!
4B. Scratches, blemishes, polishing, etc. ....windscreens, windshields, helmet visors, faceshields:
These are often made of some type of Polycarbonate (Lexan?), but there are other names. Another type is acrylic, often called Lucite, a form of which may also be called cast acrylic, but also has brand names. Each has advantages & disadvantages. Lucite (and cast acrylic) is a tiny amount clearer; which is not likely important for you; no matter what the companies that sell those windscreens say. Same for its non-yellowing. lt is much more difficult to drill holes into; it is easy to crack, it is not nearly as impact protective as polycarbonate. It IS easier to polish to optical clarity. I think acrylic is used on motorcycle windscreens because it is vastly cheaper to buy the sheeting and to deal with, over-all. It may be more sensitive to chemicals. Polycarbonate is regarded as much tougher and much easier to work with. I am absolutely certain that the makers of either type of windshields will disagree with me. You have my opinion.
A special surface treatment, or coating, depending on the type of material & company, is often applied. This is particularly so for polycarbonates. When this coating start to deteriorate it looks like you can peel off sections of coating, but you generally can not, & normal polishes do not eliminate the annoying edge effects. You need super-fine rubbing materials. Even that does will likely not work well with the coatings. Once the coating or treatment of the surface begins to really deteriorate, you either must live with it, or try to reduce the effects, or refinish the windscreen, a really awful time-consuming job ...so most simply replace the $$$ windscreen. Be exceedingly careful in your normal cleaning of these coated windshields. Use really good cleaning products. Try to never use strong solvents; similarly try not to use cleaning products containing hydrocarbons, they can injure the coating. Unfortunately, that advice conflicts with the fact that some cleaners containing mild hydrocarbons are actually quite good for cleaning windshields and face shields, and I will name them in this article. As with all windshields & windscreens, the safest cleaner is a water-dampened clean rag placed over the surface for awhile, then cleaning with a bit of real car-washing soap mixed into a reasonable volume of plain water. Only if presented with such as pine tree sap, tar, etc., where soap and water does not work, should you use something stronger. For pine tree sap and tar, try common TURPENTINE ....and if that does not work well, try mineral spirits (or paint thinner). On some deposits, WD40 works OK!
Various cleaners, polishes & scratch removers (available in many grades of grit) can be used to reduce both the coating and not-coating potential problems of windshields. The problems come about almost entirely from using the wrong products to clean and polish the windshield. The damage is accumulative over time. Do not use Windex or other similar products containing alcohols and/or ammonia. For insect remains & deposits, leave a water-wet rag on the windshield or visor for awhile; it can be a slightly soapy water. Car washing soap is much safer than hand or dish washing detergent. Do not use dirty or otherwise contaminated cloths as they can injure the windshield surface. That damage is particularly noticeable when riding into a setting sun.
When you clean your windshield or helmet visor, it is best to use a soft clean cloth, or your ring-less palm, & common soap & water. Common soap is no longer so common. For the concentrated liquid soap used (dilute in water) for washing cars (without additives), see your auto-parts store, this is almost always the proper mild soap. It is non-detergent....this is the type that you want for a windshield or helmet visor. I will have more to say later in this article, about what to carry on your motorcycle for cleaning visors and windscreens/windshields.
HINT! Never ever clean or polish a windshield or visor using swirling (circular) motions. Always clean by first deciding on a direction for the outside, vertical or horizontal, & then do the opposite direction for the inside. Stay with that forever in your motorcycling life. This will avoid visual problems when you are riding into a setting sun, or have to hunker down in a driving rainstorm, etc. It also makes it easier to see if the polish streaks you did not remove are on the inside or outside.
HINT! Some face-shields & sunshields have different surface treatments on the inside versus the outside. Schuberth's are like that. Read the small manual that came with the helmet!
HINT! Do not ever, unless you have no water available, use plastic polishes on dirty plastic, always wash the plastic first. Always use a clean non-abrasive rag or your ring-less hand & palm. Use a mild soap, not household detergent. More to say a bit below. Mild soap is useful, so purchase a half-gallon or gallon of it at your auto-parts store. It is sold as a car washing soap product. A little bit, thinned, is perfect for plastics, besides being the soap in your bucket when washing your bike or car. The car washing liquid concentrated soap sold at autoparts stores is not a detergent, and will not remove your wax!...or, at least, very little.
HINT! If having problems with insect remains, use common household white (it is clear color) distilled vinegar, on a wet rag or sponge, let stay in contact with the insect remains for awhile, then clean off.
There are safe products for normal cleaning (after cleaning with mild soap & water) such as Meguiar's products (available in many grades, some suitable for fine scratch removal). My favorite for windshields and helmet visors is Duragloss #681, and this is the one I take along on the bike; usable without first washing, unless bug deposits, etc., are quite bad. See d., below
Meguire's #10 and #17 do a good job, but are somewhat slow; not as good as my recommendations. Meguire's does make faster cutting products, but they are not easily available when on the road. I do have a selection of them in my shop, and I do use them, as needed. Meguire's makes so many products it can be difficult to find out which does the faster or slower cutting & how to compare various ones. I think Meguire's confuses on purpose, to gain more sales.
For quite serious scratches I have used an expensive aircraft window restoration product kit, although I advise against you purchasing such a $$$ kit. Very time consuming, but they do work, especially on really badly damaged plastic items.
Below are what I consider top tier items. Be sure to read "d."
a. For light scratches, oxidation removal, etc:
3M Plastic Cleaner #39017.
Max Polishing Systems all metals #1.
Very good: Novus #2 fine scratch remover.
Some Meguire's products that are heavier-duty than #10 and #17.
b. For heavy scratches:
Novus #3...follow with Novus #2, then a good polish.
Some Meguire's products are even faster cutting.
c. Polish:
Plexus Plastic Cleaner Protectant and Polish.
Kleenmaster Brillianize cleaner and protectant.
Can-Do multi-purpose cleaner/protectant/polish.
Novus Plastic Polish #1.
Meguire's.
d. If you want just one product for cleaning & polishing your visor or windshield, the following polish & light scratch remover works quite well, & is my favorite for general purposes & not expensive:
I especially like this product for for removing very fine scratches, & some slightly deeper ones too, in all types of windshields; including Lexan, Lucite, Acrylic, cast acrylic, polycarbonate, etc.. Also for face shields, instrument lenses ....just about anything plastic. It seems to have just the right amount & specifications of various ingredients. While it does contain petroleum distillates, I have seen no problems! Use soap & water to clean the plastic first (if you can). The product is Part No. 681 DuraGloss Plastic Polish. That is an 8 ounce plastic container with flip nozzle top. Car Care Products Company, which is actually Brothers Research Corp, in Burlington, NC.
www.duragloss.com. Use this DuraGloss product nearly as-stated on the container. I use a small turkish towel rag, rub until nearly dry, then polish with a clean dry cloth. I sometimes follow it by an application of Johnson's Pledge or other semi-protectant ....helps make bugs removal later on, easier. I like the DuraGloss 681 so much that I carry it with me on rides (with a piece of clean turkish towel).
I have personally extensively tested the above and many other products. My testing included, besides many years of use of various products, actually doing side-by-side testing on Acrylic & Polycarbonate windscreens that were rather deteriorated. I used a couple dozen products in these tests. I also tested most of these products on aircraft windshields & on car headlight covers ....and on several types of helmet shields (over long periods of time).
4C. Drilling plastics:
If you drill correctly and with the proper drill bit, you won't have the bad situation of a crack in the material leading away from the hole. A 60� drill bit, 0� rake grind is appropriate. You can use drill bits up to 90�, but it is safer with 60�. It is very much worthwhile to purchase brand-new specially-made drill bits, designed and ground FOR PLASTICS. I HIGHLY suggest you do not try to grind your own drills for plastics work, unless you truly know what you are doing. Acrylic materials and polycarbonate materials do NOT drill the same. Be very particularly cautious about drilling acrylic. Pay attention to my advice about drill bits, pressures, etc.
Drilling plastics can be tricky. You may want to read up about it on the Internet (and, opinions on the internet, even from plastics sellers and manufacturers, do vary. I am still, even after decades of occasionally having to work with plastics, and then practicing, every time before such a plastics job, still quite apprehensive, but I know what to do. If you follow my advice you are not likely to have problems. If you have little real experience, please follow my advice, and avoid gaining new cuss words!
Even the seemingly perfect hole you drill will have visible or invisible near microscopic edge irregularities. These are places of potential problems and must be dealt with. If you have practiced, you can use a torch flame on them, to smooth them. That is particularly tricky. If the teensy edge irregularities are not fixed, your hole will be much more likely to eventually seriously crack .....from vibration, bending during cleaning and polishing, other stresses & strain, etc. The flame method is something that must be practiced (preferably on an old piece). It is safer, if you do not have flame experience, to just polish the holes with some sort of grinding compound, of fine grit, doing it first, to learn, by hand, with a cone-shaped or pointy shaped object, such as a thin wooden dowel that you have ground/sanded to be pointy. I've even used tapered tip tools from the shop with sanding compounds. You can also use very fine grit and flexible sandpaper or other abrasive papers, even, depending on hole size, rolling a tiny bit of the paper and inserting it into the hole, and then rotating that piece in the tightening direction. If replacing a windshield, or in any circumstance where you have some old material, I suggest you practice drilling, cleaning-up, etc. I suggest that for most plastic work you obtain an old throwaway piece, and practice drilling, sanding, etc.
It isn't difficult to do it right, and have no problems. Being in a hurry, or ham-fisted, leads to disaster.
HINT! Don't drill plastics when it is quite cold. DO NOT use common drill bits, not even in progressively increasing sizes. If you do intend to use progressively increasing sizes (which I recommend against), have ALL the drill bits of angles between 60 and 90. Don't use much force in holding the plastic item, avoid bending the plastic. Drill with a slow rpm, appropriate to the size of the drill bit, never thousands of RPM, but hundreds. Use proper and sharp drill bits, and use very little pressure with the drill, easing-up as the drill bit begins to come through the other side. The proper drill bit, such as the 60� type specially made for plastics, will come through the far side slowly, and will not be at all grabby during any of the drilling.
If you develop a visible crack (this usually happens at the drilled holes where the windscreen is mounted),...you can use the conventional stop-crack method, of carefully drilling a tiny hole centered at the end of the crack. The hole must to end up completely smooth and round (use a pointy dowel and sanding compound). I prefer to treat the crack, if appropriate, using a proper cement. Acetone works perfectly on Lucite/acrylic, but for CAST acrylic you need a special cement into the crack. If the crack goes to the edge of the item, you may be able to place a modest amount of twisting torque on the two parts, and thereby open up the area to better insert the liquid 'glue/solvent/cement'. Treat the place the crack starts & ends very carefully. In some instances pin point flame heat, carefully done, may melt the plastic back together, but this must be done very carefully indeed.
Suppose you have a crack, to the edge of the whole piece. This usually happens using the wrong saw, or using the saw wrongly, or the wrong drill bit (using bits that are sharp, and ground on flatter angles in ever larger sizes is one recommended technique). If you do not want to purchase another whole windshield, etc., you may, or not, use a tiny smooth hole at the inner area where the crack probably started. That needs to be small, centered, and very smoothly finished where the drill was used. What about the edge where the crack meets? While unsightly, the best fix is to cut up a tiny bit of the old throw-away windscreen, or, a bit of compatible plastic. Make two rather small pieces, perhaps 3/16" wide, maybe a 3/4" or tad longer (?). Glue with proper thin watery solvent the pieces to the windscreen, one on front side, one opposite on the backside. I set the pieces a wee bit proud of the edge, so can be sanded to conform to the edge, later. The solvent will flow into the crack if not done to excess, and travel down the crack. I twist, slightly, the windshield, apply the solvent thinly, no drips, and let the windshield go back into shape. Use a simple clamp for pressure setting during drying! When totally dry...& I let it dry a day or three!... you can use a sanding block, etc., to shape the blocks to the shape of the windshield edge. If worried about the strength, add a drop or so of the solvent glue, at the junctions, and again wait for a day or three before riding. I always check strength of a repair by twisting a bit.
5. For the oil in your spout oiler:
... for use at cable pivots, levers (but not bars clutch lever pivot, it has a replaceable do-not-oil nylon bushing), center stand metal pivots, etc. Do not oil control cable innards....this includes speedometer cables and mechanical tachometer cables. Only the very earliest /5 bikes (with original cables) had no cable linings. Do lubricate the end of cable barrels, and be sure that no hand-work is needed to be sure the cable is not fouling, and that the barrel does rotate. Many clutch cables do not fit correct at both ends, and need a bit of rework. At the transmission lever, many levers need the barrel place opened slightly to be a slightly larger diameter, so the barrel rotates OK.
You probably should use either a molybdenum-containing oil in your spout oiler, often just called 'moly' & pronounced 'mah-lee'; or, a plain 20 or 30 weight non-detergent motor oil ...sometimes hard to find, but try your auto-parts store. Use motor oil if you have to. I prefer to have both a moly & a plain oil on hand, in separate oilers. The reason for the non-detergent formulation (I am being nerdy here) is to keep the dirt & wear products forced out, & not suspended. That is not at all widely known. It is not critical. Use such oil (not moly) for zero to moderate speed bushings, like those your starter motor uses, other bushings, etc. Use oil with moly for pivots, etc. I like to cover them afterwards with moly grease
Common '3-in-One' brand oil is far too light and a wrong formulation (wrong oil base) for almost anything on your Airhead. I do not like 3-In-One on tiny shafts & bearings in the instruments, as this oil WILL gum-up eventually.
WD40 has no place on your airhead for true lubrication purposes ....although it is good for removing some types of labels & hardened bug remains. I suggest you do not use WD40 for lubrication of parts.
For plastics, where a lubricant is sometimes required, often silicon oil or grease is OK.
I have information on penetrating oils later in this article. Penetrating oils are often used to try to free up frozen parts, rusted parts, etc.
6A. Greases for rotating ignition parts, wheel bearings, and certain splines:
Due to specific testings... & what is now available, ...I am showing little about mixing of greases, such as mixing moly grease with other types of greases. That is not only no longer necessary; but, can create problems if you mix greases with incompatible bases. Some did not follow my previous specific advice in that regards, so I have removed nearly all of the previous information. I have also removed much of the massive testing (in favor of much easier to understand mini-summaries, and de-listing of many non-performers or weak performers) that I did for spline greases for Airheads over a number of years on the same motorcycles under the same conditions.
I think you should have a few specific greases as appropriate to your model & year motorcycle.
If you have an early Airhead with points ignition (non-canister), use the appropriate Bosch greases for the ATU unit. FT1V4 (5 700 002 005) just for the cam and cam felt (no felt on 1979-1980 canister ignitions) and FT1V26 (5 700 005 005) just for the automatic advance guide shaft. If you decide to purchase these, the medium-sized tubes will last you the rest of your life. The original specifications were Ft 1 v4 for the felt; Ft 1 v22 (or 26) for the ATU. Ford also made a distributor cam grease (for felts too) number C4A2-19xxxx, but I am not happy with that one. I have not tested many greases for this application. It is likely that any soft non-fibrous wheel bearing grease will also work, as such a grease should have a high melting point & thus not be thrown off easily. Silicon greases are likely not a great substitute. The Bosch greases have high melting points and special characteristics.
For steering head tapered roller bearings, wheel bearings, & swing arm bearings, you can use a single grease. I recommend Chevron NLG1 (or NLG2, which is slightly thicker & better for wheel & other roller or ball bearings) Ultra Duty EP red grease, either the red or the DELO, which is blue colored (and has exceptionally good characteristics for the wheel and swing arm bearings). These greases are also excellent for general purpose lubrication & for use at U-joints & places that have fittings for lubrication. These Chevron grease are particularly good for water resistance; and, if you live in snow country, is excellent for those easy-to-wear-out universal joints on your 4 wheel drive truck. It is excellent for the BMW clutch throwout bearing during re-assembly (yes, I know that transmission oil will eventually get to the area & then lubricate as intended), & good for some places on your bike that need grease, such as the tapered bearings used at the steering head, wheel bearings, and swing arm bearings. It comes in standard grease gun tubes. You'll probably have to go to a "Chevron distributor", not a Chevron gas station, to purchase it, but you can ask at your Chevron service station. I prefer the NLG1 viscosity. You may have to purchase a box of tubes...so share with your Airhead friends...or, car/truck friends. While the Chevron NLG1 or NLG2 red or blue (Delo) grease is quite usable for wheel bearings, I slightly prefer a different grease for them. None of these is for splines lubrication. On an Airhead or Classic K-bike, there are one to three splines that require special moly lubricants.
For wheel bearings, here is another grease, a quite different type, but that works quite well: Quaker State Multipurpose Grease & Wheel Bearing Lubricant. This grease is a NLG1 type of grease, with different characteristics for these purposes. It is not a must ....but is what I personally use most of the time for wheel bearings, otherwise I use the Chevron.
Here is information from my wheels article:
For the rear wheels on twin-shock models, and all pre-1985 front wheels, wheel seals are damaged during normal removal for servicing of bearings for greasing, preload work, etc. DON'T even think about trying to reuse a seal! Keep some new wheel seals on hand. Greasable bearings (pre-1985) should be re-greased at each tire change, and the preload should be checked every few tire changes. Any modern thin feeling NON-FIBROUS grease is likely OK. I suggest you select grease specified for disk brake wheel bearings if you are not sure about the grease characteristics. Modern greases have high melting-flowing temperature characteristics, and high resistance to water wash-out. Use of these modern 'thin' greases CAN allow for fairly close preload adjustment withOUT the need for cleaning, oiling, checking preload, then cleaning again and greasing. BUT, some experience in this regard is a good idea. Chevron UltraDuty EP in NLG1 or NLG2 (both very good), StaLube SL3161 (excellent), BMW Red #10, Quaker State, etc.
You only typically need a few greases for the entire motorcycle; either of the above Chevron, & a good moly grease, and greases for the ignition moving parts...and, if you want to call it a grease, for the ignition module for use as a heat-transfer medium.
If you have any left-over Staburags NBU30PTM or Optimol paste PL (greases BMW previously recommended for splines), they are probably OK for general use for wherever a moly grease is called-for, and 'can be used for' the splines. Moly greases should not generally be used in ball or tapered roller or any other roller bearings on your motorcycle. There are special exceptions, but if you follow my advice, you will not have problems. Those old greases just mentioned can also be used to make up a moly-oil mixture, and for other purposes.
I do not believe there is any-even-near-perfect-grease for BMW motorcycle spline applications. That includes for the input splines of the transmission, and the twin shock models rear wheel splines.
W�rth SIG 3000 is "sort-of-OK" at the transmission input shaftsplines , but it does not contain moly. Mixing ~ 70% of that grease with ~30% of a good high content moly grease was, some time ago, a bit better than sort-of-OK for BMW splines, but you needed to know details about the BASE lubricant/carrier of the moly grease. Because that involves a bit of investigation, and was not worth it, and some made errors, I have removed all specific recommendations, because the wrong mixture would be thrown off, or otherwise disappear and then rusting began...which means spline wear. Guard Dog GD 525 was considerably better just by itself (NO mixing with anything); and I have also used GD 570 similarly, with good results. Honda M60 ...and newer M77 ...is nearly the same in performance and longevity between re-lubrication ....but not always. I will get into a bit more depth on other greases and my recommendations in this long section 6A. Guard Dog is no longer in business, but some is likely still available on dealer shelves, maybe even the Honda M60...but the Honda M77 or Dow Corning M77, is fine. More on those in the next paragraph. BMW plated (Nickle) the input shaft splines on the transmissions from ~1993 or 1994. They require cleaning and regreasing at about 30,000 miles (MY recommendation); and the earlier models at half that many miles (MY recommendation).
The Honda 60 grease is/was sold by Honda car & motorcycle dealers as SKU08734-001, & you may find that the parts person will have to look it up, as he/she may not know about it ...& there is a new number now anyway. That old part number is for the smaller 3 ounce tube. It is cheaper to purchase M77 and prices vary greatly. There was also a larger Honda size available, often the Honda car dealership parts departments knew of the larger size. It seems true that the new Honda M77 grease (The Honda M77 lubricant from Honda dealerships is #08798-900...and is actually Dow Corning Molykote M77). You can get a 14 ounce tube from www.mscdirect.com. That's what I would recommend if you like the Honda grease, and it IS good. That will probably last for many years for only $15 the last time I checked.
You may be interested in Loctite 234227. This is 8 ounces (yes, EIGHT) of a high percentage moly grease, and it is fairly cheap! I am looking forward to long term testing done by YOU, so please REPORT all details, including climate, short or long rides, everything, in depth ......to me!
Guard Dog GD525 & GD570: I think you would like these; but Guard Dog is out of business as of the middle of 2016, the owner wanted to sell and retire, but no good buyers for the business. Both of those greases are fine with the Airheads & Classic K bikes for the clutch splines ...that is, the transmission input splines, ...as you do not really grease the friction disc splines ....unless super careful for only the faintest slightest trace. Guard Dog Moly grease GD525, a synthetic base grease, is for splines & for general use where a moly component is OK. It is not ok in ball nor needle bearings, same warning for any moly grease. GD525 is a 30% moly in a special synthetic base carrier. GD525 should not be used unless you thoroughly clean off whatever old grease you have been using, or the GD525 might not stick well enough. GD525 is a soft light grease, easy to apply. First clean the spline surfaces with a good evaporating solvent using a brush. You have to slightly work the grease into the surfaces with a stiff small brush, such as a shorter (cut) bristled 'acid brush'. I think that GD525 may be one of the best greases I have ever tried for the input splines. It is also good as a general-purpose moly grease. I had "slight" reservations about using the higher percentage moly & different base formula of GD570. Guard Dog GD570 was sold for the additional purpose of being an antiseize compound. Guard Dog products were fairly expensive, not at all sure they were worth the money; especially considering the Loctite grease mentioned above ....but a little GD grease goes a long way. I think you will no longer be able to find Guard Dog lubricants.
I can recommend the Honda grease (M60 or M77), or the Molykote M77 grease, or the Guard Dog greases or the Loctite 234227 (which is a high temperature high % moly product). BMW actually used a high quality moly grease in the early Airheads. It is still my belief that this particular grease may be one of the best, over-all. It was then called Molykote U, the present name is Molykote U-N. It is not cheap. It is over 60% moly disulfide, in a Polyalkylene glycol base that is designed to slowly evaporate at elevated temperatures so that a mostly dry-paste is left. Because of its formulation, I recommend cleaning and refreshening it (for transmission input splines) every 15,000 to 20,000 miles. I'd recommend the same for most molygreases used for these splines; nothing tested should be let go for longer than 25,000. For the more nerdy, the thickener for that U-N grease is a "lithium soap". I can also recommend a military moly grease, pound cans, probably very cheap, probably at some 'war surplus' type stores. Details are a few paragraphs below.
If you change type of grease, be SURE to thoroughly clean off the old grease, using a strong solvent! If you do not, the new grease may slip on the old grease, and lubrication can be poor (yes, grease can slip on another grease).
When you clean the clutch & transmission input splines prior to re-greasing, take care that you do not drip solvents into/through the clutch disc area. I use a cut-down toothbrush, & begin, on the friction disc center splined hub, to put the toothbrush into the hub (& through the center of all the splines, so am not pushing old grease forwards), & then push slightly into the splines & pull the toothbrush rearwards, cleaning the splines. Clean the brush & repeat until you have removed all of what old grease is in the disc splines that you can. After that work, I use a smallish piece of cloth with a few drops of a solvent (& wrapped around the toothbrush, OR, use forceps to hold the cloth piece), & I finish cleaning off whatever grease might be left in the clutch disc splines. What I am after is to minimize old grease in the disc splines, so the transmission input splines, during re-assembly, do not force old grease forward into the clutch hub. This method also prepares the splines for new types of grease, so there are no compatibility issues. The transmission input splines are thoroughly cleaned. I again use a toothbrush, and I use kerosene or Stoddard solvent or paint thinner, as these do not damage the transmission input seal. I brush from transmission face to splines tip. This method avoids brushing anything into the seal. I may finish-up by spraying a good fast evaporating cleaner onto the transmission input splines. The cleaner and drier those splines, the better the new grease will adhere. This goes for whether or not you are using the same grease as before.
If you are only moving the transmission backwards slightly, you cannot do as good of a job of cleaning but it can be adequate. You will be unable to clean the disc splines. This is generally OK, just not as nice for residual grease, and inability to fully inspect the area. Theoretically, you can push grease into the splines and onto the friction disc, if not removing the transmission for reasonably thorough DISC splines cleaning. I've done clean/lube jobs without removing the transmission, but I recommend doing it properly by transmission removal.
It is important to use a somewhat stiffened acid brush & brush/rub the moly grease into the metal of the input shaft splines. Some light pressure, work it into the metal. Do not overgrease. Only a small amount, a moderately thin layer of grease, is advisable.
I put a very tiny amount of grease into the cleaned clutch splines in the clutch disc if I have the transmission out of the bike. In the past I did not tell folks I did this, even advised them not to do it, because some folks just cannot seem to keep themselves from slathering on grease. Only the tiniest bit of grease is safe to put onto the clutch hub splines, as you do not want it moving forward (as the transmission is installed), moving grease into the clutch. I use a very small stiff brush that is usually a modified toothbrush, with very short bristles & modified size. I rub a very tiny bit of grease into the hub splines, beginning inwards and pressing the brush into the splines and drawing backwards. Only the faintest layer is left. If you do this, be careful! If you do not grease the disc splines at all, I am fine with that. I sometimes do not use a grease on the disc splines, but a dry moly product, that comes as an evaporating liquid, the one I am usually using is MolyKote M-88. It is very likely no longer available, but there are similar products available.
Older or other recommendations for spline lubricants:
These are listed here because you may want to try them, or, other recommended lubricants may not be easily available, or you simply already have some.
Firstly, is the special BMW grease, available from a dealership: 99-99-0-000-601.
Mercury Marine outboard grease works fairly well (Napa 18-9200). You can substitute Texaco Starplex 2 'with moly' which should be purchasable both with moly and without. You can try Caterpillar spline lube, "Desert Gold Grease 129-1939, NLG1-2, with 5% moly." Autozone sold a molygraph grease that has had good results reported (But I haven't personally tested it). BelRay has an Assembly Lube....which is also marketed by their industrial division as Molylube Antiseize 15; There is one report that this stuff did well at the splines. Has an aluminum complex base, 15% moly solids, supposedly good at preventing corrosion & fretting; lots of water resistance. No personal experience.
Moly grease may be still available cheaply in "military olive drab dark-colored 1 pound cans", at military surplus dealers or on Ebay. I am now using my last can of two I purchased a long time ago, manufactured 1966 (but purchased much later). Here are the main items printed on the can & the name & number is: G353, GMD, Grease, Molybdenum Disulfide, MIL-G-21164B. MIL-G-21164B has later versions, it is at least to D now.
Some folks have good results using anti-seize compounds on the transmission input splines. Guard Dog 570, a moly grease, is sold for that additional purpose. I did some testing on the input splines. Since common Permatex and other antiseize compounds that we use on Airhead's finned exhaust nuts may be on your shelf, and such anti-seize also has anti-corrosion properties, they may, in fact, work OK ...but I personally have not yet tested the Permatex for this purpose. My suspicions are that the nickel-based antiseize's would be good! If you try an antiseize product, please report to me all the necessary detailed information. I have had only one report.
NOTE: There are two places on the Airheads where the bearings are hardly rotated much, and certainly not rotated round'n'round, as do wheel bearings. These two places are the swing arm bearings, and the steering head bearings. While you CAN use the soft red type of wheel bearing greases I described above, those are higher temperature greases, and NOT as protective for short movements as using a soft moly-added grease for them. For my own bikes I sometimes use a soft grease with a bit of added moly grease, and any old Staburags you have, etc., works well for these two places. DO NOT use a moly grease for wheel bearings! My preference for steering head and swing arm bearings is a mixture of a small amount of moly grease into a soft wheel bearing grease. That provides proper lubrication for the conditions, without excessive moly which might clump-out.
Note regarding BMW's red grease (grease #10):
I refuse to use it on splines, and am not happy about it at wheel bearings...but is OK at the swing arm bearings and steering head bearings.
6B. HINT:
The upper right stud where the transmission fits can be replaced with a bolt. This lessens the over-all amount of labor in the future when doing a spline or other job when the transmission is to be removed. It is a good idea to coat the threads of the bolt with an antiseize compound before installation. With a bolt being used, be extra careful about guiding the transmission in straight.
6C. Silicone and other greases, and silicone oil sprays:
Silicone grease, light to medium thickness. Your auto-parts store usually names common versions as 'dielectric grease'. Useful because of its wide temperature range, very long life, compatibility with most plastics & rubber (not compatible with silicone rubber, or silicone rubber O-rings), and many other things. This is the stuff to use ...very sparingly ...on the stock O-rings you are installing in your carburetor, choke parts, petcock innards. Preserves, but also eases assembly, and helps avoid threads of jets, etc., cutting the rubber O-ring. You can use it on electrical connection plugs after assembly, for atmospheric protection. See Caig products and description in 9, below. Lots of uses for silicone dielectric grease. Even at the starter motor Bendix drive (some 'dry' moly's are fine there too on those weird splines). Good for preserving non-silicone rubber parts, where the greasiness is OK.
Silicon oil, in spray cans, is available for preservative uses & for spraying into/onto clean and shiny and assembled electrical connections. Can be used as a substitute for silicone grease at the same places noted above, in the carburetors.
When installing rubber covers (boots) over the spark plug wires that fit into the ignition coil, very lightly coat the inside of the rubber cover boot with silicone dielectric grease. Application will make removing the boots later easier and prevent tearing them, & help prevent the electrical connection from corrosion from the elements, etc. Some types of rubber boots used at the spark plugs can stick mightily after many miles. You can coat the spark plug white ceramic outer area just a tiny bit.
I am intrigued by KRYTOX grease, but have not done enough tests yet. I will test it unmixed with anything else. Someone else is testing a version of Krytox. I will report when I get the results from any testing ...this will take awhile.
A grease that may be useful for the transmission input shaft splines intrigues me, but I have not tested it, is Ford's Silicone+Teflon based grease, Ford part number is D2AZ-19590-A. That is now replaced by Motorcraft XG-8-A; a small but adequate tube, not expensive. I think it may have interesting qualities for transmission input (clutch disc) splines and driveshaft parts. There is also a military part number for the XG-8, it is: MIL1167/31508-4207.
7. Assembly lube, for such as engine bearings:
Royal Purple www.royalpurple.com, Max-Tuff assembly lube. Good stuff.
A product I used a lot in the past for pre-lubrication during assembly of camshaft lobes, etc, was from the racing division of Chrysler Corp. which is known as Direct Connection. The product number was K3512626, which probably was made by Lubrizol, & the only other information I have is that it was recommended for coating camshafts & tappets, & was also called "Elco". The Chrysler product or the Royal Purple product, and likely some others, which have extreme pressure protection ingredients (ZDDP? ZDTP?) should prevent problems during initial startup in crankshaft & rod bearings and camshaft areas, etc. DO NOT use when assembling rings/pistons and do NOT use on cylinder walls. On engines that have been sitting and not run in some years, the oil that remains on the surface of things for shorter terms may have dripped off leaving the parts essentially dry. I have used extreme pressure assembly lubricants on the already assembled engine. Mainly on camshafts and lifters, by drizzling some down the pushrods, and rotating the engine by hand at the same time. A tablespoon's worth onto each pushrod is enough (the bike must be laid over for this to work best). If not laying the engine over, I still may use the stuff.
Do not use anything but brake fluid as help in assembling a brake system.
8. Heat sink compound:
Likely the very best is the white colored one, type 340, made by Dow Corning. It is better than clear greases of any type that I know of. You would be using this stuff for improved heat transfer. You can use Radio Shack heat sink compound. You can also use common "dielectric grease" from your nearby auto-parts store, although it is not quite as good. The Dow 340 transmits heat very well. Silicone heat sink compound/grease is always to be used, smoothly, thinly, evenly, under the electronic black box ignition module (clean off old stuff first), located under the gas tank. Clean & re-grease every two years to avoid problems. If the grease dries out, the black box module will overheat, causing ignition problems. An exception is supposedly the later riveted ones. The riveted modules supposedly 'never' require re-coating. It remains to be seen how long 'never' is. Loctite is supposed to also have a white type of heat sink compound now. It is not the color itself that I think important, but the use of zinc compound in the product, which improves heat transfer.
If you are lucky, application of heat sink compound will revive proper module operation; or, prevent problems. Some silicone dielectric heat sink compounds are clear, as noted the white Dow Corning stuff is better, supposedly containing a zinc compound, which is sort-of similar to what we oldsters used to put on our noses at the beach, and their white stuff conducts heat very well. If you don't want to purchase some, try begging a teaspoonful from the local electronics repair shop. Silicone grease does work, the stuff may be called Silicone Dielectric Grease at the autoparts store, & the reason it works adequately, is that it is used in a very thin layer, whose purpose is to fill in microscopic irregularities in the surface of the mating parts; as air is a poor heat conductor. In a pinch, say in a touring situation, use any sort of grease, temporarily.
9. If you want some of the best products for electrical connections, use CAIG Laboratories products:
The best easily-found(?) products that I know of to spray or otherwise apply, in/on most electrical connections, are certain Caig products. For those of you with K bikes, you should, in your yearly go-through of your electrical connections, use the proper Caig products at the computer brain connections, ...and, every other electrical connection you can get at (remove fuel tank for access to a LOT of connectors). Some of us anal Wrenches use Caig products on most Airheads connections, plugs, etc. Caig invented the base De-OxIT a very long time ago. It contains a chemical that bonds molecularly with the outer surface of metals. For Airhead owners, the Caig products work really well on electrical connections, that you have first cleaned to shiny. It is not always possible to mechanically clean them to shiny, and there are stronger chemical cleaners from such as Caig. Every few years, do this job; more often if you live near the seacoast or in very smoggy areas. Treatment should include all plug-in relay connections. Yearly maintenance of your electrical system is a very good idea. You should first disconnect electrical plugs, then clean the contacts. Use a contact cleaner and protectant, such as Caig DeoxIT, perhaps after mild abrasive techniques (very fine sandpaper or use a pencil eraser). To protect against atmospheric damage, consider covering, after the treatment and assembly, with a thin layer of Petroleum Jelly (aka Vaseline) or a Caig anti-corrosive grease product. Caig's products are highly recommended by me; particularly for sensitive areas, such as K bike computer pins. They are excellent for any electrical connection that might corrode or tarnish from atmospheric effects. Caig makes a lot of chemical sprays, etc. MANY have the name DeoxIT in them. They may have differing solvents. The Caig product used for volume controls (slider or potentiometers, etc.) may not be the correct product for your vehicle electrical connections. Be very careful if your contacts are part of an assembly that uses plastics (that are affected by such as acetone...so, test the plastic). Electrical Connections include male and female spade connectors, relays, ETC ETC. Please use only Caig type D5 DeoxIT (after light abrasive cleaning of the parts...if you can). When using the Caig product D5 DeoxIT, use a short poof of its spray. Let items sit for a few minutes. Operate the switch, relay, connections, whatever. THEN re-apply the Caig product, and do the final assembly. For severe conditions, such as operating near the seacoast, etc., follow up your original final spray, after a few minutes, with DoOxIT GOLD.There are other protective products available. The BMW factory used a contacts/connections protective liquid before shipping the bikes. The substance used was CRC 5-56 (don't ask me how I found this out). I have no problem if you want to coat connections (after cleaning them to shiny, then re-assembling them), with that product.
One of the places for using a grease, after cleaning to shiny and re-assembling, is at the + terminal at the battery. All connections and the + post must be clean & shiny, then assemble and tighten, then grease the assembly to greatly reduce bad atmospheric effects. The reason the grease helps so much is that the lead posts on many batteries is slightly porous, and a wee bit of acid appears on the post, attacking everything attached. I suggest you also force a bit of the grease/etc., into the junction of the bare wires and its plastic or rubber covering.
I suggest a full electrical's check every year or two. Include inspecting the diode board factory solder points, alternator connections for overheating & tightness, brush lengths, 1981+ models have heat sink paste/grease to change on the ignition module (except last versions that use riveted assemblies), etc. Pay particular attention to the male prongs and mating female connections of the starter relay. Two hours of time well spent, every other year.
Common oil/solvent base type contact cleaners (includes oil products, even if made for Radio Radio Shack by Caig, or even Caig's oil products sold elsewhere's, even from Caig) are not nearly as good, nor as long lasting, as the chemical treatment DeoxIT product from Caig. Anti-corrosive oil products will work adequately, if you abrasively (lightly, use a pencil eraser for sensitive connections) clean the connections first.
If you properly use Caig products, a one-time application may be all that is ever needed. Caig sells its products through distributors of electronics items, but you can find them at Caig Laboratories, 12200 Thatcher Court, Poway, California. http://www.caig.com/ 855-486 8388. NOTE that there are a number of different Caig products, & some are simply a solvent mixture, with or without an oil. Radio Shack sells, or did sell, Caig DeOxit. I HIGHLY recommend you use only the Caig products I recommend.
Consider, if you can gain access, cleaning contacts with a very mild abrasive, such as shaping a pencil eraser that is the type on a common pencil. I am spelling that out, because larger erasers with high abrasive qualities are also sold, & are not to be used on thinly clad gold-flashed computer brain and other connectors/pins. Be extra careful with any abrasives if the contact is gold-flashed. Once cleaned with the pencil eraser, then apply Caig DeoxIT as the cleaner. Then lightly wipe off any excess & then apply Caig DeoxIT GOLD. As noted earlier, I do not recommend solvent based oils for contact cleaners for motorcycles, that includes the Caig versions. In some instances, the contacts/connections are quite poor, perhaps not poor enough or are inconvenient to replace. These may need additional abrasive techniques before being treated and then assembled.
What about silicone dielectric grease, versus the Caig liquids/sprays?? I have used both, at times. I don't use silicone grease on silicone insulation. Silicone grease can be used on most connections prior to assembly, if the metal parts fit quite tightly. Use it afterwards for long term protection. The Caig products I noted above, are generally used on computer pins & connections that are not generally exposed to quite bad weather or smog. For large electrical power connections I prefer to coat in a grease after assembly to its mating plug. Grease is messier. Grease, if used in moderate amounts, prevents ingress of moisture/smog. Vaseline is cheap, and can be used, but the Caig grease is better. You can use a spray anti-corrosive and a grease. You can use common plain petroleum jelly, known as Vaseline, etc., on large electrical connections; it performs especially well at the battery + terminal. BMW used to ship its bikes so-protected, at the battery + terminal. If the junction of the plastic and wires is exposed, even slightly, coat there, so corrosion is less likely to travel up the copper wires.
There are pros & cons about silicone dielectric greases for electrical connections. If want a more premium protectant, Nye 761G or 760 will do very well. Check the Internet for sources. I am not sure how much you would have to purchase. It is possible that you can obtain the same product in small tubes from Ford or GM. I suggest you AVOID treating contacts with silicone products before assembly (unless metal parts fit quite tightly), but coating them after cleaning or burnishing or sanding & tightening works OK. Vaseline works OK, and Caig's grease works nicely. There are other greases with anti-corrosive chemicals added to them, specifically for atmospheric protection for electrical connections. Check the Nye products. In general, if you try using WD40, you are on your own...it may work OK with the internals of the handlebars switches.
10. Sealants:
Sealants are not required nor should be used on BMW Airhead motorcycles, except at a few very specific places. The best known place is at the interface between the cylinders and the engine case. There are other places for use of sealants, but they are few. Most are mentioned in this section 10. A soft-setting, non-hardening sealant of most any type, is advisable on both sides of the washer, and the underside of the hex head, at the vertical 13 mm hex bolt going into the transmission from the transmission top, because in rare instances oil was being sucked out of the transmission. Some late model Airheads use a sealant at the junction of the driveshaft housing and the rear drive, instead of the earlier paper gasket. The sealant to be used was a Loctite anaerobic type!.....you can use almost any mild Loctite product OK at that point. The Loctite acts as both a sealant and an 'anti-walking' compound. Do not eliminate the paper gasket there... if your model was designed to use that paper gasket.
Hylomar: There are several types of Hylomar. For Airhead purposes, it is common to just use the word Hylomar to means one or three versions of a certain Hylomar brand of a sealing compound that was supposedly developed for Rolls Royce turbine engines. The one used on Airhead motorcycles comes in squeeze tubes & was originally used on our Airheads to seal the cylinders to the engine block & was also used at the input threaded ring in the rear drive nose. "Hylomar", as we Airhead Wrenches use the word, is different from common silicon rubber sealants, of which there are many types. Hylomar seems to work, although perhaps not as well at the cylinder bases as some other sealants ....but Hylomar is supposedly exceptionally safe if a tiny bit gets into the oiling system; but I would not count on that! The tube of Hylomar will usually list a solvent for cleanup ...I use acetone. When applying Hylomar I sometimes thin it a very small amount of acetone, as only a very thin layer is needed ...a thick layer is not desirable! You can use a brush, & if needed, acetone as thinner, ...to ensure thinness of application, but do not leave brush bristles at the cylinder base area. Keep Hylomar, or any other sealant, out of the oil passageways at the cylinder top studs case area. Use it quite sparingly and thinly around the outside of those top stud areas, not towards the piston side. This prevents leaks at the oil gallery output to those top studs. Coat the rest of the case, very sparingly and thinly, all around the outer area, to prevent engine crankcase oily pressurized air from leaking or weeping at the cylinder to case junction. Hylomar can be applied, allowed to dry, & then you can wait as long as you want before assembly.
Places that Hylomar, etc., were used include the mentioned threaded ring threads inside the nose of the rear drive & fork top & bottom caps threads. Those are still good places for Hylomar.
Hylomar was the sealant to be used a long time ago for the cylinder bases, FOR ME IT STILL IS 'MY' SEALANT ......but my viewpoint has SOMEWHAT changed after seeing and hearing about weeping, sometimes after some years, and other times much sooner. I can not recommend Hylomar
only now for that purpose; although if you have some left, you can use it, just apply extra-carefully. I think the problem has been less careful application of the Hylomar, while more modern sealants are, MAYBE, more tolerant to technique; however NO sealant is all that tolerant to sloppy application! I recommend that you use Hylomar or most any modern silicon or other modern sealants, but very sparingly. Thicker is not better. I use Hylomar at the cylinder bases and will also continue to use it for the threaded ring in the nose of the rear drives & sometimes at fork top and bottom caps. There are other places you can use it, for sealing drain & fill plugs. You can see Hylomar information at:
http://www.hylomar-usa.com
In my opinion, Hylomar, if applied carefully, is still, perhaps, THE sealant of choice at the cylinder-to-case junction. I think recommendations of other products as being vastly better is not true, and some are simply interested in selling you something.
Hylomar is a polyester-urethane product, not a silicone sealant. Hylomar doesn't set up hard & can be applied considerably in advance of when you need to assemble the parts, as I noted above.
Some have had problems finding Hylomar. You can try at NAPA, the autoparts store. The package has both the NAPA & Permatex logos and is called Hylomar HPF. The item number is 765-2682. It is expensive. HPF is the same as the latest Hylomar brand version called "Advanced"...it has no solvents, is very thin (which is OK for cylinder bases). There is also a race formula, that adheres better. The more common Hylomar is now called Universal Blue. It originally was called PL32M or SQ32M when I first used it on /5 bikes. The M stands for MEDIUM thickness. There was also a L for LIGHT and H for Heavy. M worked OK on Airheads. I seldom use it anymore for cylinder bases. The type of Hylomar I am still using, since I have a lot of it left, is the above old SQ32M, also under the Permatex brand as 25349. It is basically the same as Permatex HPF. NOTE that Hylomar problems often come from failing to let the finger-applied very thin layer DRY for awhile. My advice still remains: Apply very thinly and carefully, watch the fingertip pattern you use around the two top cylinder studs at the case, and let it set for an hour or three before assembly. Done properly, the sealing will last until you next need to remove the cylinders.....which can be many years and miles.
I get into cylinder base sealants in more depth, somewhat further down this article.
RTV:
RTV is shorthand for Room Temperature Vulcanizing (& usually BUT NOT ALWAYS means a SILICONE product; many 'cure' from moisture in the air, etc.). Most people simply regard them as very thick liquids that harden from exposure to air (even through the edge exposure of parts assembled together), and they 'turn into silicone rubber'. While that is not actually absolutely correct, it is good enough.
a. There are probably hundreds of variations of RTV formulations. They also come in various colors. Black is very common, so is white. Versions for building & construction sealants come in shades of white, brown, clear, etc.
b. Some types of RTV compounds are used for gasket-making; other types are not truly silicones.
c. RTV's come in a variety of viscosities before they cure, and a variety of hardness's after they cure.
d. For use on vehicles, in general, you purchase RTV in small to large tubes. Like toothpaste tubes, they are folded-up as you use them. Industrially & for building construction/etc., they come in large round caulking-type tubes that are applied using a metal holder that has a hand-grip & a plunger piston going into the tube. An applicator tip is often supplied or the tip of the tube itself is used by cutting it, often on an angle, so you can 'lay a nice bead'. You probably have used such for making smoothly curved sealing for sealing windows, bathtubs, etc. One's fingertip usually makes the smoothest concave bead, rather than the plain cut, or the applicator tip, or any cheap smoothing or shaping tool that is available. In many instances, wetting your fingertip allows an exceptionally nice smoothing/shaping application.
e. RTV curing generally starts as soon as you apply it from the tube; but there are some types that cure very slowly, being humidity activated, & there are some peculiar types that cure from application of a strong source of ultra-violet light.
f. RTV comes in two sort-of basic types (that you will use on vehicles, etc.). One type smells like vinegar (it actually has acetic acid in it) & thus it is corrosive to some materials until fully cured. I suggest never using those in small enclosed engine areas ...the acid could cause rusting, etc. as it cures. The other, now more common type, has no appreciable smell, and does not usually cause corrosion, rust, etc.
g. RTV is extremely useful for making gaskets. Many engines, transmissions, etc., in modern vehicles have no paper or other types of gaskets, just a small bead or layer of some sort of RTV or other gasket-maker or sealing compound, typically applied by a robotic machine during manufacturing.
h. It is extremely important, when using RTV products, that every last bit of any old material be removed, & that the surface be completely clean when new RTV is applied. You can remove the old material by chemical means and/or scraping, wire brush, etc, as appropriate. Use of gasoline, kerosene, etc., may do a fairly good job of dissolving residue, but will leave a petroleum-based residue that keeps new sealant from sealing really well. I usually use acetone or MEK. Scraping should be done with plastic or other material that is less likely to leave nicks, scratches, gouges. If you have to pry things to get them apart, make sure that there is no damage done.
i. If fasteners are over-tightened, gaskets ...and even metal ...may mushroom-up, & prevent proper sealing. Bunching-up problems are relatively common for those doing poor quality work at the pan gasket area. This is being mentioned here even though NO sealant is to be applied at the pan gasket; or, in place of it. Over-tightening must also not be done with use of RTV. See m., downwards some.
j. RTV & most any chemical sealant ("'goo"), is good for only about 0.015" gaps, maybe 0.020" at most. Sometimes it is used, wrongly, IMO, in thicker sections. That is why you want the mating surfaces to be in such good, flat, clean condition.
k. Less is better than more ...you do not want excess sealant getting into places it should not be, including as the assembly is tightened.
l. When assembling the mating parts, be cautious about tightening more than a minor amount until the sealant is in place for awhile. In particular, avoid torquing to final values before 24 hours have gone by. In instances of a very thin layer, where air may not get to the sealant very well, allow a week. Remember: many RTV's are activated by air (moisture).
m. When tightening where there is a gasket, such as the Airhead engine oil pan, be very cautious. No sealant (other than a coating applied to the gasket by the gasket-manufacturer) is normally used, & if the pan is over-torqued, not only will you bunch-up the gasket & cause leaks, but you might go so far as to pull the threads from the engine case. Professionals always test the case threads before disassembly, by torquing to a slight bit over normal torque (but under maximum specification). That way, if a bad thread is found, you can, and should, fix it before you re-assemble the oil pan to the engine!
https://bmwmotorcycletech.info/torquevalues.htm
https://bmwmotorcycletech.info/pangasket.htm
Sometimes ....not always! ....a sealant or other joint compound is used with a gasket, often such a gasket is made of some sort of 'paper'. Do not use but the thinnest layer of compound in this instance, and the surfaces must be very flat, smooth, nick-less. If a thick amount of compound is used, not only may the gasket shift during torquing, but excess may move inwards. In a few instances improper use of a joint compound, where none is to be used, or the wrong sealant, can cause 'walking'.
BMW has manufactured Airheads using a gasket at the driveshaft to rear drive interface (NO GOOP!!!); and later models of Airheads used a Loctite anaerobic there, with NO gasket. BMW also made a few rear drives with no large left side gasket (cardan. Be sure to consult the Airheads LIST, if you do not know what to use or do. In general, the later Monoshock bikes did not use a paper gasket at the junction of the rear drive and driveshaft. Instead, BMW used a Loctite sealant that prevented oil leaks and prevented 'walking'. You are not sealing threads, but the face areas, and they must be completely nick-free, smooth, & flat.
Cylinder base sealants, and additional sealant and gasket notes:
Clean the surfaces really well, really degrease them. Apply the sealant of your choice very sparingly and as evenly as possible...again..sparingly! If using Hylomar or Three-bond 1215, let sit at least half an hour before assembly (this is important for those). I like to let Hylomar sit for much longer before assembly of the parts. Do not block oil flow ports at top studs area. Do not allow any brush bristles to remain ANYplace in the sealing area!
Use any sealants quite sparingly for the cylinder base area, as they will almost totally squeeze out during final assembly. You do not want the sealant in the engine oil passageways that are at the top studs area, although Hylomar is supposedly a safer product if it does get into the oil passageways, than many other ...or most other....sealants. I am NOT AT ALL convinced Hylomar is all that much safer, with regards to accidentally plugging the oil gallery outlets. Do not spread with a brush unless you will be careful to be sure no bristles are left ....which can cause a leak by not allowing the cylinder to fully come home to the engine. At the top two stud areas, the place for the sealant is around the outside of the threaded case holes.
HINT: Do not let the piston rod fall. The rod will nick the engine case, and the cylinder will not mate properly, and there will be oil leaks. The base area of the cylinder, and base area of the engine cases MUST be totally flat, and completely free of nicks and any old gasket or other things.
I am NOT suggesting you absolutely do not use Hylomar at the cylinder-base-to-engine-case. If you are careful, you should get the same excellent results I always have.
The following are tested and acceptable (besides Hylomar):
Permatex 27B Hi Temp RTV.
Permatex Ultra-Grey. Works OK if you apply very thinly in the normal manner & allow all surfaces to set up for a SHORT while, then assemble. Use ONLY Permatex brand! Permatex makes sealants called Ultra-black, Ultra-Blue, Ultra-red. They all have different characteristics. Semi-permanent rigid versions seems to work well and last OK.
Pro-Seal Red 700 degree RTV 80726.
The following are probably even better sealants for long term use:
Dreibond, or Three-Bond from your BMW dealer are both excellent. Three-Bond 1215 works well. Allow time to set-up. There is also Drei-Bond 1209, but some have problems with it eventually starting to fail a bit, with oil weeping the result. It may be the applicator (THEM!). Three-Bond has a 1207B that works nicely ...see just below:
Suzuki-Bond type 1207B, part number 9104-31140, available at Suzuki dealerships (I've been told the proper number is 99104-31140). I think it's a good one and I can recommend it. Suzuki marine dealers sell it, not just Suzuki car dealers. Tom Cutter likes the Suzuki sealant too, but also says that "if you have to, you can use Yamabond-6B". Snowbum says: Be aware that the Yamabond 6B (do not use other versions of Yamabond) was designed for high temperature uses, in, yes, exhaust systems! It starts its 'cure' rather fast. If you use it, use the usual small thin amount (for the cylinder-to-case junction). Assemble within a few minutes! I think you should do the same with the Suzuki sealant; assemble within a few minutes!! Assembly after half an hour or so has seemed to work, ....but I am more cautious, due to the labor involved with a re-do.
Note: For an anaerobic sealant (gasket maker), you might want to try Loctite 515 or 518. These require the ABSENCE of oxygen to cure, so there is no assembly waiting time, etc. Use a very small amount, properly applied.
HINTS:
1. After you torque the cylinder to the engine, some sealant, even if applied quite thinly & not excessively, will probably squeeze out. If you allow that to dry for a day or more, it is usually easier to clean up with a small brass brush, etc. The excessive sealant may even be peelable. You may, however, want to use a small rag, bit of solvent, and clean up the excess sealant immediately after assembly.
2. Some sealants require 'set up time' for half an hour before assembling. For them the order of events is apply sealant, wait as appropriate, .... then oil the various O-rings & assemble immediately and torque the nuts. If you use Hylomar, apply it, wait for a few minutes minimum ...but you can wait as long as you want to. Consult instructions on your container.
3. The places sealants are
not used include the engine oil pan; inner timing chest-to-engine; head gaskets; valve cover gaskets, rear drive gaskets (usually); & driveshaft housing joint gaskets (usually, not always).4. In a FEW instances, where a previous owner has messed up the surfaces of mating pieces, Permatex non-hardening Form-a-Gasket can be used, but this is to be done with caution as gasket sealants can cause problems you may not think of, & repairing surfaces is usually better. I have repaired serious nicks & gouges with ordinary epoxy products, then sanding & filing them dead flat. I may also simply dress the nicks and gouges and there is no need for epoxy or other products. Some areas should not have gaskets and some not have sealants, to avoid the surfaces moving with respect to each other (called walking). Adding a gasket, where one is not specified, can upset clearances, gear meshing, etc.
5. No sealant, just a paper gasket, is used at the junction of rear drive & driveshaft on early models of Airheads. BMW specifies using a Loctite product on Monoshock Airheads at that particular area, where neither a gasket nor regular sealant is used. Use the Loctite product here that BMW recommends, or an equivalent. I use Loctite 640 because it is a close-enough product, & I stock it for special uses elsewhere's. Many other Loctite or similar anaerobic sealants can be used! There are reasons BMW did not use a gasket nor ordinary sealant at this junction on late models.
6. Some BMW gaskets are/were impregnated with a substance that activates after the surfaces get hot. If you coat surfaces or gaskets with your stuff, you will defeat BMW's intentions. This is/was so with the pan gasket & valve cover gaskets (on the head side of that gasket). I have seen plenty of these without seeing any activating substance. Supposedly the coated ones on the valve cover gaskets are for the head side. Engine side for the pan gasket. Might not be there. Be sure the surfaces are clean & dry. The valve cover gaskets can be used almost forever, if you do not tear/rip it. That is best accomplished by having the gasket on the head side, somehow, 'glued' to the head. So, what to do?
My advice: If you remove a valve cover carefully, without ripping the gasket, then, when replacing the cover, smear non-synthetic engine oil onto the old-style non-coated type of gasket.....gasket side that faces the cover. The gasket will semi-bond to the head from repeated heating/cooling. When you later remove the cover you are less likely to tear the gasket & it can be used over & over! Do not oil the outer surface, nor use a gasket sealer there. If you wish a faster bonding on the gasket side that faces the head, then use something like a very faint coating (fingertip spread) of Permatex Form-a-Gasket (but ONLY the non-permanent type), applying it to a CLEAN (solvent wiped!) surface. Wipe off any excess after pressing gasket firmly into place. Do not allow oil nor sealant to be on the outer surface. If you have the bonding type of gasket, that surface goes to the head. This same type of advice applies to the pan gasket.
7. Surfaces to have sealants applied should be completely clean and dry. I use a strong relatively fast-evaporating solvent. Allow no nicks at the metal surfaces that would give poor sealing. Nicks are particularly troublesome at the cylinder base area & the engine case at the cylinder area, where an accidentally dropped rod might put a tiny nick, that will keep the cylinder from being perfectly flat and going fully home.
8. When trying to clean off old gasket from aluminum parts, spray WD40 on the old gasket remnants, or a gasket remover solvent (auto-parts stores), and allow either to soak in a bit. Use a plastic scraper, not metal, unless you are very careful. Plastic razor blades are available from many sources, including your local auto-parts store. Remember, it is easy to nick an aluminum surface with a metal razor blade or metal scraper ...& those nicks can be places for oil leaks.
9. For a short period of time, BMW did assemble rear drive cardan covers (that's the left side bolted-on cover) using a sealant, & no paper gasket. If you then change to a gasket, you will upset the gear shimming.
10. Epoxies, such as JBWeld & JBKWIK:
These are popular epoxy materials that are available almost everywhere. They work well. The -KWIK is good to near 300 degrees. Some folks won't go on a tour without a JBWELD-KWIK kit. With a small piece of 50 or 80 grit sandpaper you take along with this kit, you can do an emergency fairing repair, seal a cracked valve cover & probably even a cracked oil pan. Epoxy products do not last forever, so throw them out after a few years.
Duct tape; or, better, radiator hose repair tape, is excellent for a very quick emergency fairing repair.
11. Other epoxies, such as steel filled 2 part epoxies, etc:
They are strong; can sometimes repair a broken part that is not repairable otherwise, rather than maybe Heliarcing ...etc. No need to purchase, just know about it. Some folks have put the fast cure version of these in their bike kits, instead of the JB.
I have seen a transmission case & a broken valve cover 'welded' with this stuff. As with all epoxies, surface preparation & absolute cleanliness, without the faintest oil film, is needed for the best job.
There are types of epoxies that are promoted as being able to repair threads. Some have had good results with these, after thorough degreasing, for such as stripped out aluminum drain plug area threads. I've had poor to slightly better than poor results, but often usable, if being cautious about torque levels.
The BMW fairings are SMC material. Do not use polyester's for repairs. Use two-part epoxies.
12. Weatherstrip and rubber boot adhesives:
These are used on our bikes to 'glue' the ID strips along the engine sides, some use them to install fairing boots on RS/RT, etc. Common usage has been to call this stuff Gorilla Snot, as it was originally yellowish, but black is now available. Several brands, but always purchase the 'SUPER' weatherstrip adhesive. I've had great results with 3M & Permatex brands, the black works well for RT fairing rubber boots (after degreasing the boots, use on the black painted interior). 3M, long ago, stood for Minnesota Mining and Manufacturing; a top notch company. Always follow the directions ....this means doing it in two stages of application. This is nasty stuff, so keep it off your paint. It is quite strong & does not release at moderately high temperatures. Many folks use cyanoacrylate glues (Crazy Glue) at the fairing rubber boots, but I have had that type of glue fail with age (more on this a couple paragraphs downwards). 3M or Permatex SUPER Weatherstrip Adhesive is truly strong. Its use is probably over-kill, and many get along just fine with CrazyGlue dabbed here & there on a carefully cleaned area of fairing & cleaned boot area. I have not had the best long term results with Crazy Glue, but it sure is easier to use. The ideal stuff might be a very strong adhesive in a hypo tube, but I have never looked into it.
3M sells a "Plastic & Emblem Adhesive", do NOT use it, ...it is not nearly strong enough for installing emblems on the side of your engine, that gets fairly hot.
RT style fairing rubber boots for the passage of the fork tubes:
I have not had the best results with most of the thin glues & sealants, they harden & crack & then the boot comes loose. Lots of pressure on that boot, especially in lock to lock turns. If you use a cyanoacrylic (Crazy Glue or similar name), the rubber & the fairing area must be super-cleaned first. It is hard to do correctly, & I no longer even try using cyanoacrylic cement. Others feel it is OK. I use the same SUPER Weatherstrip Adhesive mentioned above. I clean the fairing area with a knife, inside & outside the opening, for maybe 1/4" inside and somewhat less outside. I sand it a wee bit. I then clean it with acetone. I have spent over an hour at times doing those things. I then clean the boot groove & outside of the groove, with acetone or MEK ...really thoroughly to remove every last trace of mold release agent. I then install the boot (there is a Right & a Left, so don't install the wrong one, nor install it upside down ...these things have been done!). I install the boot with the adhesive generously applied to the groove, letting it overflow a bit. I use my finger or tiny rag, dipped in acetone or MEK to wipe it smooth before it dries or affects the paint, which is rather fast. I am sure the solvents are not good for my finger. It is fun & games to put additional adhesive at the junction (after the boot is installed) inside the fairing. I usually make a bit of a mess, spend too much time cleaning, & when done and dried I paint it black with a tiny brush. The black super weatherstrip adhesive stuff would be nicer inside the fairing, rather than on the outer surface junction areas.
I really do advise you to immediately clean up the fairing-to-boot areas immediately with solvent & rag. Do not overdo this, the solvent might damage paint. Probably isn't good for me, but I refuse to wear plastic gloves for this job. If carefully cleaned up right away, it looks fine, if not, paint over it. I am pretty careful so as to not need to overpaint. On the inside, such is not a problem.
13. Antiseize compounds/pastes:
The common anti-seize products, such as NEVER-SEEZ, (I prefer its quite high temperature rated "Pure Nickel Special" version, because it does not carbonize in use at the Airhead exhaust port finned nuts area.....but that is not a must), have some good lubricating characteristics.
https://www.neverseezproducts.com/bostik-nickel-pure.shtml This product works its way into metal surfaces, particularly aluminum. There is some indication that it could be good for clutch splines (actually the transmission input shaft splines that fit into the clutch disc) lubrication on our bikes.
BMW actually specified the Never-Seeze brand, misspelling it as Never-Seize, in a Service Information bulletin. It was UNCLEAR which particular antiseize product from that company was used by BMW. I'm fine with most of them.:
https://bmwmotorcycletech.info/exhaustnuts.htm is an article about the finned exhaust nuts which are oftentimes troublesome items when someone has not cleaned & applied an anti-seize compound on a regular schedule. Some over-torque them, and BMW's torque specification is too high, in my opinion.
While I prefer a pure nickel very high temperature formulation; the Permatex and others that are also silvery in color, are OK. MANY seem not to know that the Permatex antiseize compound really does contain copper. The base carrier is not as high a temperature rating as the Never Seez, but is OK. You might have to look it up, copper-containing might not be shown on the container/tube, &, of course, some versions might not have copper. The Permatex stuff (I use it now & then), does have copper. The copper color is completely hidden by other good ingredients. I am well-aware that this statement of mine conflicts with a certain person who produces U-tube videos, who uses swears in his videos a lot. He apparently does not know about the copper in antiseize compounds that are not copper-colored ...because I believe, he has never looked into it (or, has other reasons which may be questionable). Use a nickel-based antiseize compound, or, a copper-based type, or one that at least contains copper. I am OK with you using any common, non-plumbing type of anti-seize. Yes, Copper-EZE is OK.
Note: Never Seez (Bostic) also makes a 'regular' grade antiseize, that contains copper, aluminum, etc. It is OK at the exhaust ports, and its 1800�F rating is OK: https://www.neverseezproducts.com/bostik-regular-grade-anti-seize.shtml
Some have asked me what type of antiseize compounds to use if they were OK in purchasing several types. I said the Nickel based types for the finned exhaust nuts; and, a zinc-based version for where steel bolts or studs go into aluminum castings or zinc castings. I saw no reason to have other types than these, for Airheads.
Antiseize compounds MUST be used at the exhaust port threads & the associated finned nuts threads. However, many of us wrenches, not all, use it at the spark plug threads & at other exhaust fitments (& at some engine studs to help prevent galvanic corrosion). With certain items, the lubrication qualities of anti-seize need to be taken into account, so at the spark plug threads the torque used is less.
It used to be that most studs, nuts, etc., were plated with cadmium, which had good properties for such as a steel bolt being used into aluminum castings. Cadmium is a big no-no in Europe now, & the U.S.A. seems to be following the Euro standards. Without the cadmium plating, one relies generally on its replacement, a phosphate treatment of the steel parts. That is not adequate in many instances, & often the steel bolts, etc., will then rust, particularly if the bolt is inserted and then ever removed and re-installed. It is worse where the steel comes in contact with aluminum engine cases, etc. In many instances, coating the steel threads very lightly with an anti-seize compound will protect against this galvanic corrosion. Some folks have substituted stainless steel bolts. That can be OK ...or, it can be problematical, even dangerous, due to lack of strength of common SS hardware. Stainless steel when in contact with aluminum alloys can corrode and also gall (sort of mild welding, in effect), and bolts and studs screwed into aluminum can SEIZE and CORRODE....and the use of antiseize compound can greatly reduce such problems, which can be serious.
There are many types of anti-seize compounds. For Airheads, for use at the exhaust port finned nut threads, one particular thing is extra important, for the anti-seize to be effective for a long period of time. The base carrier (the base oil or grease) should be reasonably compatible with the type of heat and corrosive exhaust fumes we get at the exhaust finned nuts. When you remove fittings, do use a mild wire brush (brass brushes are my favorite for that) on the threads & the one or two metal rings, plus an old thin feeler gauge as a cleaning tool for use in the metal ring gaps to remove carbonized material. When the cleaning is done, then slather on the goop. Assemble without over-torquing. Do it yearly. It is the carrier that tends to burn-away, or carbon up. A good brand & type of anti-seize is a very good idea. IMO, as I have noted, BMW's torque figure for the finned nuts is much too high.
Exhaust port threads, and the gap in the associated pressure ring(s) is a place where nasty 'stuff' passes, and some accumulates. Some of this 'stuff' is sulfur 'stuff' (or other compounds), and they can be acidic, & react with moisture that also is always in the area of the port, engine running. Moisture collects during cool-down and initial starting, due to condensation & the products of combustion. Particularly bad, over a long period of time, is chlorine from the salt in the sea, affecting bikes being kept near a seacoast. The 'stuff', including chlorine from salt, together with moisture, creates acid and electrolytes. Acids have fun with the carbon, etc., from the combustion process, and tend to create very hard and abrasive carbon deposits that act like cement. There are often very faint exhaust gas leakages into the taper ring(s), the ring gaps, even when seemingly closed under pressure, and the gases, bring carbon, etc., into any gaps in the threads ...and as those gaps fill, the stuff again acts like cement. Threads themselves must, as fitted to their mates, have at least a slight clearance or they won't assemble in the first place. The 'stuff' collects in the threads clearance, and acts like a strong cement. BMW specifies a torque for the finned nuts, which I think is considerably too high. Too little torque, & deposit problems increase; considerably too little and the pipe moves. I never use a torque as high as BMW recommends. I've also never had a finned nut problem on any of my own Airheads, unless the motorcycle was purchased in poor exhaust port threads condition.
The exhaust port threads & finned nuts threads get some wear every time you unscrew the finned nut. There is carbon typically accumulated in the antiseize compound, in the threads, in teeny other places. Over time that carbon becomes rather hard, and every time you remove the nuts, the threads wear a slight amount & the thread fitment gets a tiny bit looser. This is particularly true in one area ... the first threads ...and, especially true with lower temperature rated antiseize compounds. Pay particular attention to cleaning the threads of carbon deposits. The looser the threads get, the more carbon can build up in them ....a particularly good reason to clean the threads & goop them with anti-seize compounds yearly ...and to not over-tighten them ...which can make things worse as wear increases.
I like to use anti-seize compound when assembling any items of the muffler system, even the pipe joints & the smaller exhaust system nuts & bolts. I believe it a must for spark plug threads. My ideas here are not held by all, including some few spark plug manufacturer's; other spark plug makers do recommend use of anti-seize compound. For full details, including specific torque advice and more: https://bmwmotorcycletech.info/sparkplugs.htm.
I use anti-seize compound, with very few exceptions, on any steel bolt that is screwing into aluminum. There are places I do not use it, including those places that Loctite is required.
You must not use antiseize compound on the steel bolts going into the driving hubs on rear wheels on single-sided BMW motorcycles, which hold the wheel to the hub/drive. That means do NOT use antiseize compound on the special bolts on Monolever and Paralever rear wheels!! NO EXCEPTIONS! If your rear hub bolts were ever coated, remove it with a wire wheel, plus solvents, etc....and use the solvents on brushes and tiny pieces of rags and do the hub threads too! DO NOT let liquid solvents get inside the hub, via the threaded hole, as they will build up before evaporating and will make the seal there swell. Once the male and female threads are totally clean, totally not oily, totally dry, then install them to the normal book value torque, tightening them exactly as BMW said to.There are special types of antiseize used with plumbing items ...and I have used the graphite-containing thick black stuff for bolts/threads going into water containing or trapped areas of motorcycles, preferably nothing aluminum or magnesium due to electrolysis that is possible with graphite. Don't use that black graphite stuff on the Airheads.
Antiseize compounds have some or a fair amount, of anti-corrosion properties. Some have used these compounds at the Airhead splines for lubrication, rather than regular greases. I wish these folks would report back to me with information on how well it worked over the miles and years.
14. Cyanoacrylic adhesives/glues:
Often called by one of the original trade names 'CrazyGlue' (there are quite a few manufacturer's, with their own names), & originally developed by the Eastman (Kodak!) company, these are strange ('glues' that are best for sticking your fingers together. See 12., above, for use on fairing rubber boots. Others may disagree, but I believe Crazy Glue, etc., is not always reliable. It tends to get brittle & crack, & has few places for use on your BMW. You may find uses for it, such as holding one of the easy to loose ball bearings to its spring in the switch gear when you are working in that area; inside the instrument pod at the odometer gear-to-shaft (they tend to slip); RT fairing rubber boots as previously noted (I don't like it there), etc. I use it (or a wicking Loctite) at slipping gears in speedometers/odometers, & I try to not use either of them if plastic is involved ...unless it is a compatible type.
15. LOCTITE....and similar anaerobic chemicals:
Just what IS this common stuff known as Loctite?
Loctite is the most popular brand name for thread lockers or adhesive/sealants made by the Henkel company; who, even under the Loctite name, make many chemicals besides thread-lockers. Many Loctite products are not anaerobic. I suggest you purchase a small size of two common Loctite products, or just purchase as needed. You might as well purchase Loctite brand, it is very commonly available at auto-parts stores. It is kind of expensive, but worth the money, and goes a very long way for its tiny container (you are not likely, unless in a shop situation, going to need anything but the smallest size container). Contrary to various literature, properly stored, Loctite in its original container (and not enclosed in such as a plastic baggy), does not easily degrade from such storage, and will be good for many years.
The most common Loctite products you will be using are strange types of chemical compounds. They sets-up or think of it as 'curing', in the absence of oxygen, so are called anaerobic. For industrial purposes they come in a huge number of grades & types, probably 99% (not an exaggeration) of which are not stocked at your auto-parts store, and for which you will likely never have a need. Some special types that you might need, someday, are for such as keeping bearing outer race shells from rotating or even taking up clearance from one that did rotate ...and avoiding expensive machining, and, for some models of Airheads, or other BMW bikes, you might need a specialty version some time. Most commonly the anaerobic products are used to lock screws, bolts & nuts, either gently or very strongly. The strange thing about these "sealants", thread-lockers, or whatever the words are that you like to say fits the particular application, is that they are not glues, and are activated by the absence of oxygen, and change to a sort-of plastic substance when cured. The containers are made of a special plastic that allows oxygen to get to the contents. Sometimes the contents will harden in the spout, mostly, however, I think those were the older spouts that were not that proper type of plastic as are the bottle bodies, which is why it hardened in the spout (most now use one piece plastic containers).....if yours hardens, simply use a needle in the spout. Do not store the plastic bottles in sealed zip-type baggies, the Loctite will harden! Do store on the shelf, in original container only, sealed.
General notes on using Loctite or similar products:
Loctite products should be carefully used. Do not allow it to creep into the rotating parts of bearings, etc. Allow at least 24 hours to cure, no matter what the manufacturer says. These products do not work well if the parts are greasy, oily, or dirty. Loctite does have some versions that supposedly work better on oily surfaces, but I discount their use.
I install most Helicoils in very clean threads with Loctite red, wait for a very full cure, then wash the excess out with strong solvents (& often a brass brush), before using a bolt in those new Helicoil threads.
Loctite also makes Locquic's, probably they have a new name for that stuff now, which are several types of liquids, available in both concentrates & premixed, that are used to coat the threaded surfaces and will make Loctite 'set up' quicker, or set up on difficult materials that have poor ion exchange, such as plastics & some plated metals. Used properly, you can be done with a job in minutes, instead of waiting a day or more. Keep in mind that wrongly using any of these can cause the parts to seize before fully assembled, or, the Loctite used as a locking method to not work properly.
Loctite can be stored a very long time. If the spout clogs, use a common sewing pin to open the hole. Do not store Loctite in baggies! It must be stored where air (oxygen) can reach the outside of the plastic bottle. That means no baggies, no Loctite tubes stored inside bottles. For super-critical applications, a fresh tube of Loctite is recommended ....but I have not had problems with even very old properly stored Loctite products.
Clamping forces & effects:
Occasionally a question will arise about possibly making changes to a factory torque setting if Loctite is used on a bolt or screw, perhaps one that was originally specified to be installed clean and dry. Loctite is formulated to have only a small effect on effective torque (its use increases effective torque slightly) so you can usually, or often, disregard torque changes, as Loctite does not act like a true lubricant ...but it does have an effect, and you might want to compensate in some circumstances.
Clamping force is really the force at the underside of the bolt head to the material being clamped-to, at least in most bolting situations. The threads are there to ensure you can reach that value. Please re-read that once more! Yes, it is true that the head to material surface interface is where the clamping force exists. This is a simplification. If the head & material do not match & mate properly, then the holding force may well include a considerable amount of the thread force. To give you an idea of what this could mean, think of someone drilling and tapping a hole in something, but they do it by eye-ball, and not with a guide...and suppose the hole and threads are not at exactly 90�. Can you see/understand, that when the bolt is screwed into the threaded hole, the clamping force is way too little? Another thing to know is that, usually, 4 fully engaged threads is the minimum needed to ensure that the parts are fastened close to rated forces and strengths, including ability for the threads to not pull out. Usually 4 is not sufficient to have a good safety factor. More threads, in particular, should be engaged in softer materials, such as aluminum.
Torque on a bolt is affected by a factor called "K", and the diameter of the bolt, usually called "D", and the clamping force F. The force goes up as the K factor goes down. For a clean, dry, not plated threaded steel bolt, nice quality threads, going into a clean, dry, not plated threaded steel hole with nice quality threads, the factor K is about 0.20. If the parts are faintly oily, K is about 0.15. Common sense says that oiling before assembly increases the real clamping force, for the same applied torque, and that is true, from the definition of K. You can simply use the relationship as a percentage, if you want to. So, you should clearly understand that faintly oily parts have a higher working torque, even if the applied tightening torque was the same. This means that if you use antiseize compound on a spark plug's threads, you need to reduce the torque wrench setting, because the head is aluminum, rather soft, and you do not want to overstress the threads. BMW's most recent specification for the 11 mm flywheel or clutch carrier to crankshaft bolts on the last of the Airheads, is 90 foot pounds!....and oiled! That is a lot of force, and the specification by BMW for the bolt threads to be oiled raises the effective clamping force, and the bolt must be made of very strong steel to withstand such a force.
Loctite type 242 (blue) has a K factor of about 0.14 to about 0.15. The effect is about the same as if the parts were slightly oily and Loctite was not used. 242 is specially made to have a controlled lubricity effect. That is hardly known by users. Since you now know about K factor, I should not have to tell you here that this common 242 blue Loctite will have an effective torque that is very good for many purposes, and a single drop may be quite sufficient, yet the items can still be taken part reasonably easily, usually without heat. Loctite blue is used by Snowbum at many places, two common ones are the special bolts that hold the driveshaft U-joint to the transmission output flange, and, the 4 small screws on each Bing CV carburetor that hold the choke (enrichener) shaped plate to the carburetor body.
Loctite type 272 (red), the strong and more permanent Loctite, has a K factor of about 0.21.
I do not know what the K factor is for others, as I have never bothered to look them up.
This all means that, theoretically, if the manufacturer had originally specified a torque with clean & dry threads & no Loctite, that you could/should reduce the torque wrench reading by, perhaps, 15-25%, when using Loctite. This does not apply if the manufacturer specified using such a sealant. However, I almost never reduce torque for parts to which I applied Loctite .....if I do, ... I use the lower edge of specified torque range. In practice, bolts and materials are of sufficient strength, so no changes in torque values are normally used with Loctite. It is not clear to me why BMW did not specify Loctite blue at the U-joint bolts, but I definitely use it there, and at 26 to 29 foot-pounds (26 is really enough) of measured applied torque. Did BMW count on the discredited & not to be used split lock-washers that had been used on early models?? Later on, BMW had a bulletin, to change the bolt lengths & eliminate the very troublesome lock-washers.
****A discussion of various methods of 'locking' screws, bolts, etc., is located here: https://bmwmotorcycletech.info/hardware.htm. You may find it rather interesting.
HINTS:
I recommend you do not use commonly available Loctite anaerobic's for the speedometer/odometer internals or other parts where a metal shaft goes into plastic. Cyanoacrylic adhesives/glues are what I use there ...also known as Crazy Glue. Commonly available Loctite can be bad with plastics, and may cause cracking of the plastic gears. If you do use a Loctite product, be sure it is compatible with your plastic parts. Some have had long-term success and no problems. Loctite may recommend a speed-up curing chemical be applied first (Locquik, for example), as the needed ions for accelerating the cure are not usually available with plastic materials, and this can include a plastic gear and an associated steel shaft.
When reinstalling fittings, it is best to remove old hardened Loctite. That can be done with pointy tools, or brushes or wire wheels & maybe acetone ....in stubborn instances try common gel-type paint remover. In a few instances, you may have to use a tap or die to clean off old Loctite. I usually put the item in acetone/MEK, overnight, sometimes that softens the Loctite for easier removal. If you cannot remove the old Loctite, simply add new, and it will work adequately in many situations.
Uncommon knowledge:
Because of these things, setup/cure times can be much longer on some materials. In this Snowbum website, you will occasionally find a mention of how long to allow for a full cure. Some more on this subject, in the next two paragraphs.
The Loctite specifications for such as curing time (to a certain stated % of final strength) assumes steel items as received from a manufacturer ...so it may not be exactly & totally & certainly not almost antiseptically degreased ...you might not see a super thin oily film that actually exists. Most of the common Loctite's you will be using are tolerant of some light oiliness, some are specially made to be tolerant, like 263. What all these words mean, is that you should be cautious in using these products, and if used on very-well-cleaned surfaces, they work much better. Loctite & the other anaerobic compound makers, further usually assume you are assembling the parts at 72�F (22�C). These anaerobic compounds generally set up far more slowly if parts are cold, the reverse is true if the parts are warm. This is common for all chemical reactions, where reactions double or halve with each 10�C change. The type of material, including any plating, also, and seriously, affects the cure time. Loctite & other similar manufacturer's may not prominently tell you on the small packages (do see their engineering books) that they assume, in some instances, that you have specially cleaned the parts & coated them with a Loctite activating primer. Activating primers are a must for certain things, usually plastics, or, where you wish to have fewer Loctite products, and speed one up. For practical purposes, for bolts of steel going into steel (or bolts of steel, plated or not, going into aluminum), & with the threads clean and dry before applying Loctite, you should assume that full & adequate strength will be obtained between 24 hours & three days. It is true that under more ideal circumstances, a near full cure on many Loctite products can had in a few hours. For most common purposes, & steel bolts into aluminum, near full strength is obtained ...usually ...within 24 hours. For use of the strongest products, like 270, 2701, and 263, the cure time to fairly good strength is likely to be 1 to 4 hours. The reasons for the real cure time is due to the type of the Loctite product and, especially, due to the type of materials, steel, aluminum, etc. It is ions on the surfaces that have a very considerable amount of effect on cure time.
The cured products get weaker as the temperature rises; particularly rapidly after temperature rises past a certain point, & the curve for strength reduction may be non-linear to quite some degree after that certain point, that is, the strength MAY decrease rather fast. Thus, one of the things to consider when selecting a Loctite product is the strength for the temperatures you expect. Most have little strength left at 300�F. Type 263 will lose 90% of its strength at 392�F. Be careful not to use a high strength Loctite, such as the ones typically colored red; and especially type 263, if you may want to unscrew the bolt without a considerable application of heat. The high heat you must apply might damage the parts. Type 263 is a low viscosity type, that can work OK with slightly oily parts. It is generally regarded as for use with not to be disassembled items. I suggest you be very carefull about which product you use for such as the Paralever bearing pins and locknuts, etc. You might want to be able to disassemble them for future servicing, and pin-point high heat will be needed with the stock Loctite recommendations. I use a moderate locking Loctite, with witness marks. I am not advising you do. Be especially careful with extra strength Loctite if you are the type of person who tends to use dull tools, rounds the edges of nuts, have poorly fitting sockets and poorly fitting old worn Allen wrenches; ....and use poor techniques in general!
|
Historical Information: In January of 1983, BMW published Service Information Bulletin 00 029 83 (2068) covering adhesives & sealants for use on BMW motorcycles. That bulletin is out of date, but still useful. It describes various types of products. Here is the information, with some personal notes added: Loctite 242, medium-firm thread retainer, blue color. This is a controlled lubricity product, very useful. Still in wide use. My shop uses more of 242 than other types. Loctite 272, high-strength keeper/retainer, was green, now red, fast-setting, has a fairly high temperature rating. It will not release without heat ...sometimes a lot of heat. Still in wide use. I use this one a fair amount. Loctite 495 Super Bonder, transparent. This is sort-of like Crazy Glue. BMW later added 496 to the list. Loctite 515 Surface sealing, was green, now purple in color, is a gasket-eliminator product, which has a characteristic of remaining flexible. Loctite RC/601 and RC/860: Obsolete joint seal products, originally green in color. BMW never identified, AFAIK, where to use Loctite RC/601. BMW said to use Loctite RC/860 at only one place. Note the reasoning: BMW said to use this joint seal compound at the "Flange joint between rear-wheel swinging arm and universal joint housing on R80G/S (absolutely essential as an additional safeguard against twisting in this joint, and to seal the joint face)". I am not convinced one needed this specific product, & there are other Loctite sealants that work well at this joint interface. Re-read BMW's reasonings; compare to what I said about 'walking surfaces', much earlier. You might not have a walking surfaces problem with a twin rear shock Airhead ...but might with a Monoshock or Paralever! Later, BMW specified an anaerobic Loctite. You could use a common one you may already own. |
Some places and comments on various Loctite products used on our Airhead motorcycles, including some noted earlier in this article:
Loctite 242, blue, noted above in the box area:
This is the one you should always have on hand. Many uses, including the shouldered nut retaining the coupling hub at the pinion in the rear
drive, to secure the nut. BMW also said to use it at the lower part of the air cleaner at engine and gearbox, and under the bolt contact face to prevent air (and gearbox oil) leakage. I say not to use it there & I recommend you use Permatex non-permanent version of Form-a-Gasket at that 13 mm vertical bolt in roughly the center of the airbox. Other places to use 242 are the 2 stud bolts in the aluminum for the timing chain cover; the M8 screw plug at the front and 2 M 12 x 1 screw plugs at side & rear of engine block to seal oilways (or use red versions, see next paragraph); the inner in engine pipe threads in the center of the oil canister if the pipe comes loose (I use red); the 3 x 8 fillister head screw at the breather to secure the diaphragm spring (those models with such) & baffle plate to breather valve body; the 4 M 8 x 18 hex bolts for the oil pump cover; and, the 2 hex bolts for the oil pickup dome on the engine block. I also use it at the carburetor butterfly screws and one drop only at the U-joint bolts at the transmission output flange. I use it in rebuilding transmissions, at the top screw that holds the baffle. BTW...I tend to tag that screw "Do not loosen"....because if you loosen it enough or remove it, you will have to open the transmission to fix what is now rattling around inside, an oil directing baffle.
Loctite 263, 270 (green) or 2701 or 271 or 272, red:
Very strong. The 270 & 2701 were European-sold products. They set up slightly faster, & 2701 is very slightly stronger than 271. 263 sets up a bit slower, so you can assemble things over ~an hour ...but I suggest you assemble within minutes! Type 263 is a low viscosity type, that can work OK with slightly oily parts, but best not to. It is generally regarded as for use with not-to-be disassembled items. But, of course, if used at the Paralever nuts/pins, you will, someday, have to remove them. Some, or many, probably use common 271 in place of the 270 or 2701. Loctite discontinued 2701 from retail sales, & might even ship 271 in place of it. Be careful using these very high strength Loctite's as they often need a lot of heat to enable loosening the fitting. This is particularly so of type 263, probably you would chose it for ultimate safety for the Paralever pins & their nuts. It will not release without pinpoint heat ...a lot of it. Sort of the same for the old 270, 271, & 2701. For 270, for easy disassembly it requires 250�C (452�F) although it weakens considerably below that. Low viscosity. For 270 and 263; on a practical basis, you can usually remove the parts at 300 to 400�F. That is still a lot of heat. I do use the very strong Loctites at a few places, such as the special stud bolt (to be permanently installed) in the aluminum of the rear wheel drive for attaching to the swing arm. I don't usually use it, too strong, but you might, at the spring strut mounting lug to the damper piston rod (rear shock stud to upper retainer); and, while BMW says to, I never do, at the pivot pin for the gear shift pedal at the footrest. BMW specifies its use at Paralever pins threads and locknut. I do not use this product on my own Paralever pins and locknut. I find this version much too strong, and difficult to get to release during parts removal attempts. I use blue 242 Loctite. I am hardly the only professional doing this. You use what you consider safe for those Paralever parts. If you use blue; or, anything but what BMW says to use, you are responsible, not me, ....so....do at least put a bright colored 'witness' paint mark on the parts to be sure they are not loosening; inspect the marks regularly. I've never seen any such treated Paralever pins and nuts parts loosen on my K bike. Please pay attention to my comments, for your safety!
Loctite 495 and 496 for knee pads, twistgrips, etc:
These are cyanoacrylates (you probably call these substances, no matter the formula, Crazy Glue). Technically, 495 is a ethyl formulation, and 496 is the methyl formulation. Loctite categorizes them both as 'instant' adhesives category, which they are not. While the initial cure is in minutes, the full strength takes 24 hours. BMW said to use 495 on knee pads on tanks and twistgrips. A later bulletin (32-003-85, 2159) says to use Loctite 496, which is similar but a bit stronger, and a bit thicker. If you want to use Loctite 495 or 496, I am OK with that, although I do suggest you first clean the surfaces to be bonded quite well with a strong evaporating solvent. Many folks use hairspray to install twistgrip rubber. For permanence on engine labels, etc., I use the product I discussed much earlier in this article, 3M or Permatex Super Weatherstrip Adhesive.
Loctite 290, green:
This is a thread locker for small diameters, can sometimes be applied after assembly as it is very thin and thus may creep into things, which it is designed to do. It has a medium low strength & the parts are held OK, but removable. Not for heavy duty parts under strain. I have used this, but no longer stock it, as I have found that use of the common medium strength blue at the 4 enrichener (choke) screws on the side of the Bing CV carburetors & any other place for small screws for some extra holding strength is better. I have used the #290 at the carburetor fuel pipe interface; but blue 242 or one of the strong reds is even stronger ....but the 290 is OK to adequate. For the carburetor fuel pipe I clean the area with an strong evaporating solvent, let that dry, then I warm the carburetor, and apply Loctite blue 242, which I always have in stock, to the pipe interface. I find the blue will then creep deep enough, and set up stronger, which I want.
Loctite 620 and 640:
These are special types used to hold such as previously spun outer races of bearings that have not deteriorated the bores they fit into too much. Expensive, usually available in larger containers only. I have this item in the larger 50cc container if you need #640. Free to you. You pay shipping both ways. It is used on Airheads primarily at the /5 & /6 left side rear wheel bearing outer shell (race), where the shell has spun in the wheel, but the diametrical clearance is still reasonably small. I can supply details on wheel measurement and the use of 640. While I have not used it, Loctite also has a #620 for bearing retaining. While the specifications of 620 and 640 appear to favor 620 slightly for temperature and fully cured strength, a characteristic of 620, called thixotropic, is something I rejected, and also considering its thickness, is why I stock only the 640. 620 and 640 are both for high temperature, the 620 going to 450�F, the 640 to 400�F. The 640, per Loctite, fills gaps to 0.007", the 620 to 0.015"; but there is a bit of leeway. You will need to measure the diametrical clearance, which is easy with feeler gauges, and if OK, clean the surfaces to perfectly clean, and assemble the wheel bearing pack carefully using the 640.
16. Penetrating oils:
Penetrating oils are used to free-up frozen or rusty screws, bolts, & nuts. The better and most convenient rust penetrants are typically aerosol products that you spray on, using a wand, around the head of the bolt or nut in question and keep the area wet with the penetrant, and allow a long time for the stuff to penetrate and loosen the rust, carbon, etc. In MANY instances, the best method is to HEAT the items first, then apply penetrant, and then allow the cooling to 'suck in' penetrant. Serious testing on penetrants have been done by a number of people, a few doing formal tests. One of the better commercial products is Kano's "Kroil". Regular common WD40 is very poor at this job. The WD-40 Rust Release Penetrant Spray seems somewhat better than regular WD40. Blaster 16-PB Penetrating Catalyst is about the same as the WD-40 Rust Release. The "Liquid Wrench" brand is nearly as good as Kano Kroil. Mousemilk is popular with aircraft mechanics. Of the very thin oil-based commercial penetrants, all are reasonably similar, with the Kano probably the best (again, for the COMMERCIAL products).
I think you will find all of these not as effective as making your own mixture.
The origin of the widely quoted tests, that said acetone mixed with ATF was the best penetrant, was an article in the April/May 2007 issue of Machinist's Workshop. Here is a link in this website to that article: CLICK. It has been variously reported, and wrongly, that they corroded a lot of nuts/bolts so there were enough samples to try out the various penetrating oils on. In other words, that they set up a bunch of nuts and bolts that they rusted, themselves! Here is a copy of the original April/May issue of 2007 article, and note that the article specifically says that nuts and bolts were NOT used.
If you have problems reading the print on the photo, here is the information:
The results (lower # is better):
50/50 mix of PSF & acetone - 53 Lbs.
Kroil - 106 Lbs
Liquid Wrench - 127 Lbs
PB Blaster - 214 Lbs
WD-40 - 238 Lbs
None - 516 Lbs
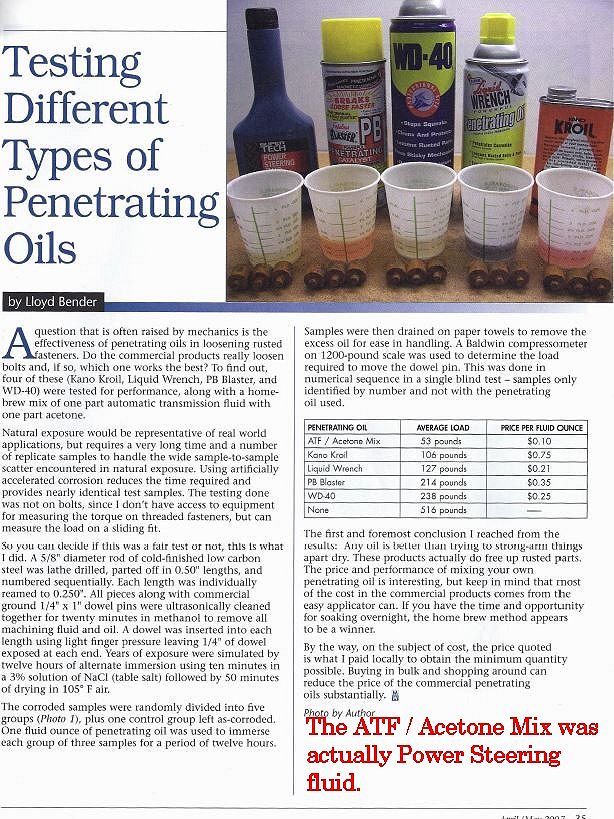
It is interesting that the SAME Lloyd Bender, the author who did this comparison work over a period of a number of years, has had the information re-printed in other places, here is one, and note the date, years later:
www.antiquemodeler.org/sam_new/news_letters/assets/wham_2011_07.pdf
***NOTE, that even later information says that the original article was wrong, way back in 2007, and that the actual oil was Power Steering Fluid. I found references to that error in the article. Thus, the above .jpg is noted/corrected to show PSF, and not acetone. I was initially unable to import the .pdf version from 2007, so early versions of my article used a photo of it, above.
What is particularly interesting, to ME, is that Bender's article has been ""interpreted"", and, as is common on the Internet, the information has been added-to, distorted, lied about, etc., by many others over the years. The original article is useful, but needs to be READ and UNDERSTOOD, and it is important to note that threaded fasteners were NOT used, and that the corrosion was NOT exactly naturally occurring, and certainly NOT aluminum stub's exhaust port threads with the BMW finned nuts. Still, the information is good, as far as it goes, and my own testing on THREADED BMW EXHAUST PORT THREADS (and finned nuts), corroborates the Bender information.
It is my belief that ATF (which contains detergent and friction modifiers) and PSF will give similar results. Note also that some folks have had decent results with brake fluid or brake fluid with water added, I have not tested that mixture, and note here that it will eat nearby paint you spill it on. I advise against trying to free-up rusted items with anything with water in it!
I use a mixture that has worked very well for me & others. It is a modification of Benders fluid. It definitely tests better than commercial products! The solvent I used at one time was carbon tetrachloride, but that solvent is not safe to breath nor have on your skin, and is difficult to find anyway, and it is not needed. Just as good is MEK (methyl-ethyl-ketone), or acetone, from any hardware store. MEK is sometimes hard to find & ethyl acetate will work well, & is often sold as an MEK 'substitute'. Ethyl acetate is safer to use than MEK. Ethyl acetate is a good solvent & evaporates somewhat slower than acetone, and is otherwise excellent for working with fiberglass resins, and even some plastics as crack line glues, etc. If you were making up a simple penetrating oil mixture, I'd suggest ~50% be power steering fluid ... and the rest a mixture of ethyl acetate and acetone. HOWEVER, you may want to add some kerosene or paint thinner (mineral spirits) or stoddard solvent, as these all evaporate much slower, and, thus, may tend to work better over time, >>>>and overnight, wet, is THE best way to go. In many instances, the frozen parts need to be heated first, the penetrant applied, and as the items cool down the penetrant may be re-applied, the idea being the cooling sucks in the penetrant. In some instances (I commonly do this for the finned nuts) the area is wrapped with something like kitchen-type plastic film, to keep the item wet, even overnight.
Have I found anything better than what has been discussed lengthily, above? Not really. I never developed anything much more worthwhile, but I suggest you use any common ATF or power steering fluid, and add some common paint thinner (usually called mineral spirits), acetone, and kerosene in very approximately equal amounts (all components equally). This is a modification of what was, supposedly "Ed's Red", a solvent used at Frankford Arsenal for government firearms. Never found anything better. Keep whatever you are applying it to, wet. Use the heat method.
17. Solvents, strong cleaners, etc.:
Acetone and MEK are excellent fast evaporating solvents, but keep away from paint and most plastics! Keep away from plastics unless using for gluing cracks. Used for degreasing & some plastics gluing or glue solvents. Don't inhale fumes. Useful for cleaning some types of parts, including removing old hardened Loctite (in stubborn instances, use paint remover gel). Real MEK is sometimes hard to find & ethyl acetate may work, & is often sold as an MEK 'substitute'. Ethyl Acetate is safer to use than real MEK. Ethyl Acetate is a good solvent & evaporates slower than Acetone.
Kerosene, Stoddart solvent (Mineral Spirits), paint thinner, etc.:
Good for greasy parts cleaning, relatively low fire hazard. If you are going to be cleaning greasy messy surfaces or items to which you are then going to apply a sealant, do a follow up by using a quick evaporating solvent, such as acetone, etc.
Berryman B-12 Chemtool, in the particular version called "Carburetor and Choke Cleaner":
This is the best spray stuff I've found for cleaning carburetor and carburetor parts. Still surprised that all the various air quality controlling agencies have not outlawed this great stuff. Keep it away from plastics & paint and your eyes! Next best thing to a formal carburetor cleaning machine. Also nice to use on those outside carb stains now & then. Many other brands of cleaners that I have tested are nowhere near as strong as this one. Be sure the spray can says, amongst its other ingredients, that it has acetone and MEK (methyl-ethyl-ketone) in it. California air quality regulations have caused Berryman sold in California to be "reformulated". The California reformulation is not nearly as strong as the old Berryman. If your B-12 Chemtool has numbers 0113C; 0117C; 0120C; or 0152 on the can someplace, it is OK for general use, but not for serious cleaning of such as carburetor passages. The 0113; 0117; and 0120, are much better. All or some of these numbers could have changed. I've had to purchase my Berryman in Nevada, and I read the can's contents carefully.
Cleaning carbon from pistons and heads, oily filthy parts, etc:
For general purpose cleaning of oily greasy cruddy parts, see the note on Kerosene, etc., 2 paragraphs above. At somewhat more expense, is Hydroseal, which is particularly good for cleaning carbon deposits off such as pistons and combustion chambers, although it works slowly (but safely!). In severe cases, it could take a week or more, with some brushing now and then. Hydroseal is sold under the GUNK brand. It is a mixture of quite a few strong hydrocarbons; see the msds available on the manufacturer's website, if you are curious enough. Hydroseal will not damage metals. It can be used over and over until terribly dirty. You can leave parts in it as long as you like. Use a stiff brush, perhaps at daily intervals, to help remove the carbon deposits, etc. Some use Hydroseal for carburetors, but I suggest you do not do a full dipping cleaning unless you intent to replace all the O-rings (including the one on the throttle shaft). When the item is clean, wash off Hydroseal with water and detergent mixture, then finish with plain water.
SIMPLE GREEN:
Simple Green is a product often used around the home and in the garage for cleaning parts. It is not anything like Hydroseal. Simple Green is mostly alkaline containing water, but often must be diluted with more water, perhaps by half, if soaking parts in it to release carbon. It works fairly fast, many have used it overnight for instance. Brushing is helpful during the process, and Simple Green is, more or less, similar to a detergent cleaner, but it is fairly well alkaline in PH, and CAN corrode aluminum and change its color too. Because Simple Green is often used wrongly, that particularly means overnight, instead of for a few minutes, I am recommending you do NOT use it for overnight soaking. Start with a 50% solution. It works faster when warmish, just like most all cleaners do.
18. Brake fluids:
Use only DOT3 or the slightly better DOT4. Keep it off the paintwork; keep a very wet rag on your paintwork when working with brake fluid near the paintwork! If, horrors! ...it gets on the paintwork, wash it off with water, instantly ...that means right now! Always have a water-wetted rag instantly available when using brake fluid! When I bleed brakes, I keep a large and very wet rag below the master cylinder ...over the fuel tank too....etc!
Never use DOT 5 silicone fluid in your BMW braking system...never! DOT5 silicone fluid does not absorb moisture, allows moisture to condense into droplets in your braking system & thereby probably rotting it out faster; and, it can, in freezing weather, freeze up the brakes!. Silicon fluids are not compatible with the rubber parts in your bike's braking system (some seals may be compatible, depending on when manufactured). There are premium DOT4 fluids & confusingly, a 5.1 that is not silicone based; ...these generally have even higher boiling points (Castrol for instance)....that are OK, but the RACE types MUST be changed at least yearly. I recommend DOT4. It is entirely possible that some BMW systems are compatible with DOT5 silicone fluid, but BMW says not to use it. Some have used them for long periods of time, successfully. The big problem is that some brake rubber parts are not compatible and it is near impossible to clean the old DOT3 or DOT4 out, without a total rebuild, or, go the other way. I highly recommend against using DOT5 silicone fluid ....which have almost no advantages for airheads.....(it is thinner, so maybe easier to bleed on an opened system) (but tends to get tiny bubbles, defeating that idea)....won't absorb water...but water gets inside from various means, forms globules, and corrodes the parts! At very elevated temperatures, totally possible in our airheads brake parts, it gets compressible! ...a VERY bad thing to have happen.
There is a fluid called DOT 5.1. Confusingly it is not a silicone. Do not use it. If you insist on using it, or a 'race brake fluid'; change them every 6 months, fully flushing/bleeding ...and only from a fresh small can.
See my brakes article! https://bmwmotorcycletech.info/brakes.htm for a more in-depth discussion of brake fluids!
DOT3 and DOT4 Brake fluid need yearly changing, as they attract moisture, right through the non-leaking lines, caliper seals, screw holes at the covers, etc. This happens molecule by molecule, over a long time. Brake fluid contains certain inhibitors, and once they are used-up by excessive water molecules, expensive damage begins. Bleed the brakes until clear fluid comes out; and, then bleed some more. Best to use a fresh 8 ounce can each time. If you do this from new, you are unlikely to ever have to replace the master cylinder or calipers. If you do open a system, such as for new hoses, lines, modifications, repairs to calipers or master cylinder, etc. .... then ...never ever use anything but brake fluid in simple cleaning ....although if a more in-depth cleaning is required, then soap/detergent and water is OK, but be sure to fully dry and use brake fluid again during assembly.
The truth is that if an 8 or 12 ounce can is opened, used quickly, and then recapped immediately, it will still be OK, for the next year's bleeding. Not if its color changes. Since you may use only half a can in a simple bleeding job on one motorcycle, you can save the can and use the contents, if you put the cap on after refilling the master cylinder during your bleeding process. It is not true that the air, even in a humid climate, will ruin the fluid, ...if you do not leave the cap off for more than a few minutes at a time, for a total of perhaps half an hour. Note that you will be getting some moisture molecules into the can, but if tightly capped when done, the damage to the internal contents is exceptionally slow. Obviously, you introduce moisture molecules into the master cylinder reservoir during the bleeding process...but it is, if done properly, good for at least a year for DOT3/DOT4, and probably nearly two (be sure to keep an eye on the color). My recommendation for yearly bleeding is well-founded.
Brake fluids mixed with water have often been used as penetrants to help unfasten frozen/rusted/etc., fittings; and, as paint remover! If you want to try this, save some old brake fluid!
19. Fuel Tank sealants. Fuel Tank Repairs. Who does them? How to clean fuel tanks and treat them chemically to prevent rusting, etc. Treating frame and other rusting.www.gas-tank.com/bike.htm this is Moyer Fuel Tank Renu. Every sort of fuel tank repair for any vehicle; even the worst possible condition tanks can be repaired, & lined so they never rust again. 1-800-328-9550 2011 Western Ave., Greensburg, Pennsylvania 15601 [email protected]
www.advancedwelding.info Located in Mountainview, Calif. Will repair K bike and other aluminum fuel tanks.
[email protected] John Borella 860-774-5535 ABC#7221
Holt BMW, 9000 Cycle Lane, Athens, Ohio, 45701. 740-593-6690 Does tank work.
The above list may not be up-to-date, so see https://bmwmotorcycletech.info/references.htm
KREEM: This product is NOT recommended.
POR15 rustproofing coating: see internet for sources. Requires a lot of preparation work, but it is worth it. I cannot overemphasize the need for very thorough, labor intensive, prep work!
Damon Products Red-Kote: http://damonq.com/Red-Kote.html Radiator shop's "Red Kote" jobs are usually much cheaper. You can do a Red-Kote job yourself.
www.4secondsflat.com/ Telephone them. I have purposely not shown the full URL to get to the specific tank sealant page, because their website may still have faulty internal links, and I have repeatedly been unable to find the tank sealant page.
https://www.caswellplating.com/restoration-aids/epoxy-gas-tank-sealer.html A premium product, with somewhat less serious prep needed.
Steel fuel tank interiors; aluminum parts, etc.
Aluminum door and window frame cleaners/etchers (hardware store item).
SEE ITEM 20, BELOW.
Get ONLY the type that contains phosphoric acid.
Clean the outside of your aluminum wheels, engine, carbs, etc. ..any aluminum or magnesium...with solvents, and detergents, washing well...and more water...then, while still wet, apply this stuff, but do not let it dry. If it starts to dry too early, use more. Hose off. Keep it off your skin. Some use it for cleaning aluminum cases and covers.
When touching up painted steel surfaces, and you have rust areas, do fine grit sanding and feathering into the 'ok' paint area, and then treat the area to either a metal etching liquid from the local hardware store (it contains phosphoric acid, and will so state on the container), or; for surfaces where the liquid would flow off, use a similar but gellied product called Naval Jelly. Naval Jelly usually works reasonably quickly, but you won't use it to try to pour it into your fuel tank, so use screen door and metal etch stuff that will work fairly quickly, but I usually use it diluted 1:1 with water, and let it sit overnight. I do this for the bottoms of fuel tanks, after the tanks are well-hosed-out with warmish water and a bit of detergent, then flushed well again. These phosphoric acid products convert the rust, even hidden rust it comes into contact with, to iron phosphate type that is grayish-blackish and is protective. Do not sand it off, only wash the acid product off.
Let dry, repaint your rusted frame area you just fixed (flat black...matte black...).
No need to paint the inside of the fuel tank you treated.
FUEL TANKS:
Cleaning a fuel tank that has nasty very old bottom deposits of jelled or dried gasoline, etc., takes some extra time and cautions to avoid damaging the tank outside paint. For the heavily dried/jelled/deposits I recommend using a variety of solvents, letting each one sit numerous hours. Start with real methanol; then use isopropyl alcohol; then real MEK; then acetone. Then use detergent-water mixture, then just plain water. Be sure to protect the outside paint unless repainting. When done, you will want to read the rest of this section. If the tank is not all that messy inside, and perhaps needs only minor cleaning, do that, and, again, you will still want to read the rest of this section.Sometimes I've been asked how to go about cleaning and "pickling" the insides of a fuel tank to provide protection against rusting, or prevent further rusting; yet not go to a full-bore internal coating job, which involves a huge amount of labor plus expensive product.
Wash with a water hose and sharp spray, full strength, after removing petcocks. If anal, start with a strong solvents, see well above, then wash with water and detergent. Plug the petcock holes with 1/2" tapered corks from the hardware store. Pickling the tank is needed at the bottom, to prevent the bottom from rusting out. 16 ounces of the etching (rust conversion, etc.) product (must contain phosphoric acid) is enough. You can use it full strength, or diluted, and I will assume here you have diluted it 1:1 with water, and now have a total of 32 liquid ounces. DO NOT do this rust converting process on a cold day. It is important that the phosphoric acid mixture and the fuel tank are at "room temperature" ...otherwise the process will take a LONG time. Put half into each side of the tank. Jiggle the tank. Let sit a full day or 24 hours or so, in a safe place, in case the corks leak. You can jiggle/shake the tank some during this process, if you want to, and I recommend it. At the end of a full day or so, remove the corks and save the acid mixture, which can be used for any other de-rust job. Wash the tank very thoroughly with water. Many suggest NOT washing, and I agree that it is OK to not wash, which MIGHT start a rusting process in places the phosphoric acid did not get to properly.
Re-saying, somewhat: Drain tank as best you can. Turn the tank upside down when it seems clean and empty. Tilt to one side, then the other, then drain again, right side up. When you have removed as much as you can, then put tank upside-down, with some sort of small soft support pieces (wood?), over your home floor heater outlet vent. The vent should be one that does not get too hot to put your hand briefly on it. The heater output must go through the tank refueling opening, circulate in the tank, and then out the one or two petcock place holes. Even if the heater is on for only a few minutes a day, this works fine. A day or two, and the inside of the tank is fully dry right into the tight seams. I often turn the tank right side up, and do a day or two with the outlet ports downwards onto the heater vent. If you have to, just put the tank without its cap or the cap open, in the sun every day for a couple of days.
If you do the cleaning, phosphoric acid treatment, and drying ...every few years ...and ...maintain your tank full or nearly full of gasoline when parking overnight (especially high humidity places); you will likely not ever have the bottom rot out. I live in a dry area, not often humid, do pickling of my fuel tanks once every 5 years. Do not remove the old layer, that is not necessary. The phosphoric acid only works on rusting and bare metal areas. It converts steel to a gray color. You can use a mild concentration, such as 4%, or, dilute it by half. Don't be rushed.
NOTE! A very worthwhile read is the greatly expanded section on cleaning and phosphoric acid treatment of your steel fuel tank.... located in article 9D.
20. Cleaning the cases of the aluminum engine, transmission, etc.:
You can use a chemical cleaner like Nice 'N Easy (Ace Hardware), product 901, made by Alumin-Nu. Keep the parts wet, and don't let the parts get hot in the sun. You do not want this stuff to dry before you flush it away. Repeated applications may be needed.
For a much fuller discussion, see this article:
https://bmwmotorcycletech.info/alcorr.htm
21. Sandblasting, or other media blasting::
I don't like the finish that soda blasting leaves ...and soda must be 100.00% removed, or it starts its own chemical reactions, especially on aluminum surfaces. Walnut shells are OK. Carbon Dioxide (CO2) is OK. Sand and glass bead blasting is not OK (it leaves particles imbedded in the aluminum, which can come out and raise hell with the engine and other innards!) ...with one POSSIBLE exception! ....the form of particle blasting called wet blasting, or slurry blasting, is OK to excellent, leaves a lovely finish; this includes what is called Vapor Blasting. However, the MEDIA is usually super-tiny glass beads, and you MUST do a super good cleaning job, including into every hole, recess, threads, etc. Failure to do so can lead to excessive wear in bearings, etc...as the super tiny beads get into the oil system.
https://www.facebook.com/Boxerworks/videos/454660561931598/
22. FUEL ADDITIVES: I can presently recommend only two, & these are for fuel storage purposes:
Startron Enzym type, such as from https://www.amazon.com/, etc. Stabil, but get the proper type for your application.
23. LOCKS: What to use to free up a lock; and, what to use to lubricate the lock:
If the lock is frozen-up, due to below freezing weather, and you suspect moisture got into the lock, you can use common antifreeze, preferably not diluted, and of the type used in water-cooled engines. That will usually free up the lock quickly. Use some heat if need be. If the problem will be repetitive, I'd just leave the antifreeze in the lock. I do NOT recommend graphite for key locks used on motorcycles ...particularly those locks used for rotating an electric switch. The best thing is to never put any liquid into the lock, but to heat the lock
slowly, and then put graphite or a moly oil into the lock.
Miscl section:
Brake system: A full discussion of brake fluids is here: https://bmwmotorcycletech.info/brakes.htm
Fairing repairs:
BMW fairings are SMC material. Do not use polyester's for repairs. Use two-part Epoxies.
Black Plastic items:
Faded luggage and other faded parts can be somewhat renewed to look better with a variety of protectant treatments, such as Back-to-Black, and many others, including Armor-All & Boeshield 303. In general, the treatment does not last very long, and after using them painting is a PIA due to the silicones! Mild abrasive rubbing and then coating with one of the mentioned protectants, is a chore; and worse is re-painting to look really good; although there are some specialty paints that work well.
I do not have a really good answer and a permanent fix ....although one easy to apply product does work better than most others, and also seems to last longer, on black luggage: Bondo's "Restore Black", which is applied like a paint, and contains a true corrosive to pickle a rubber or other unpainted surface. It works pretty good on car rubber and 'plastic' bumpers, trim, etc. If the surface was previously treated, particularly with a silicones product, try to remove it, using strong solvents, first.
Rubber protectants:
BMW used to recommend common glycerin ....and then a bit of talcum powder, on your fairing pieces rubber molding separators and some other rubber items. Good, but other products, like silicones such as Black Magic, are also available. Don't even think about products like these for your tires ...slippery!
BMW use to sell a product called Gummi-Pflege, for squeaky rubber & as a protectant, 82 14 9 407 015. Was a tube with a foam top for applying. It's purpose was for such as car door rubber flap seals, etc. It is water-based, using a rub-on applicator. It is likely still available, although maybe not from BMW. Do an Internet search, or try https://www.amazon.com/. A good substitute is Zymol Seal, which is made from modified Glycerin.
Installing Tires.............tire lube & tire talc:
Real lube and real tire talc is much better than substitutes. Real tire talc contains no oils that are not good for the tire (& tube if used). Purchase tire lube, dilute per instructions, put about 6 ounces or so in a flip top 8 ounce plastic bottle. If you use tubes on your motorcycle, carry both diluted lube & real oil-less tire talc with you. For tube tire owners just carry the tire lube. Yes, it is true that 'personal lubricants', water based, work OK, in place of tire lubricant (both of which are made from a vegetable product, flax, AFAIK).
Condoms:
Useful, with some sort of glue, as an emergency sealant for a ripped or torn carburetor diaphragm. I don't know what type of glue is best to use, since I have other uses for condoms & never have used them for carb repairs, since I never let my carbs go over 60,000 between changing diaphragms, & have not had to fix diaphragms for others when traveling. I suspect that Super Weatherstrip Cement/Adhesive will work OK with condoms.
NCP2:
This is goop in a tube or brushable container, available from battery stores or autoparts stores that stops corrosion from happening at the positive (+) battery terminal. It used to be available in a cardboard display package with a small tube of the stuff and both a red and green impregnated felt washers (for large car battery terminals). Even nice on sealed batteries ...and should be applied to just cleaned and shiny tight connections at the + terminal, and forced up into the + electric cable for 1/4 to 1/2 inch if your insulation allows. It contains an anti-corrosive, and has been around for a hundred years. Vaseline will do sort-of OK, but it contains no anti-corrosive. Some folks use silicone grease, another 'sort of OK'. Apply any such protectant goops after the wires & nuts, bolts and washers are clean, shiny, assembled, & tightened. You do have those parts clean and shiny before assembly, correct?
Duct Tape:
Instead of carrying a small bit of a roll of this in your bike's tool tray, consider a small roll of the better
product called Radiator Repair Tape. There are glass fiber reinforced Duct tapes and Radiator Repair tapes. The tapes can be useful, for fairing damage, etc. Please remove any type of sticky-backed tape at earliest opportunity, as the glue on any tape will be messy to remove after the sun has been on the tape awhile.
Engine Coolant:
Many of you have K bikes, and other bikes with water cooling. Read the following article that covers coolants, in depth, you may learn something:
https://bmwmotorcycletech.info/k-coolant.htm
WARNING! Never expose Brake Cleaner or any chlorinated hydrocarbon to extreme high heat or flames. High heat may create the intensely serious poisonous substance called phosgene. Bad things have happened when someone sprays such solvents on a very hot part, or uses a torch flame on the wet (by chlorinated hydrocarbons) parts, ETC. This also means that you must not clean brake parts with brake cleaner and then, while still wet, use a torch to burn up deposits. Cleaning old deposits out of brake system master cylinders & calipers can be done by using brake fluid. Mix with water and detergent. You may have to let it sit a week. Clean with hot water & detergent, drip dry, then clean again with fresh brake fluid during assembly work....as a lubricant too. Caliper halves can be heated with a torch to help remove hardened deposits. You can also use a broken piece of old piston ring as a scraper.
Alloy wheels are painted in a silver color. An excellent match for that paint is W�rth's Silver Wheel Paint. See my paints article:
https://bmwmotorcycletech.info/pcodes.htm
Starter sprag clutch, as used on such as Classic K-bikes:
For information, & oil to use & any additives to help fix/prevent the problems; or, help cure them, see:
https://bmwmotorcycletech.info/kstartersprag.htm
Revisions: 12/14/2006: Incorporate all previous revisions; update information on oils & greases in line with the latest information; edit entire article and release. � copyright 2023, R. Fleischer
Return to Technical Articles LIST Page Last check/edit:
Thursday, May 11, 2023
01/10/2007: Add more information. Add fork oils viscosity.
01/25/2007: Rework item #12 with latest information.
01/16/2008: Combine from some of 52B, and renumber from 73A to 73.
03/14/2008: Update information on 270, 271, 2701, and a few clarifications elsewhere's.
06/25/2008: Revise #4; minor editing elsewhere's.
09/14/2008: Revise entire article, mostly to add additional information.
09/26/2008: Add info on Honda moly grease part number from CAR dealerships.
06/29/2009: Minor updates, combining some things that were redundantly repeated, clarifying some details here and there.
01/25/2010: Add hyperlink for anti-seize.
08/06/2010: Add #19 and re-number.
12/16/2010: Phosgene warning.
10/01/2011: Links to hardware article regarding locking methods.
10/13/2011: Slight updates for clarity.
11/16/2011: Clear up the Honda, Moly, Guard-Dog, and similar areas.
09/23/2012: Minor editing. Add QR code; modify Google code; add language button function (language code removed 2013).
02/25/2013: Emphasis added here and there. Minor clarifications. No substantial changes anyplace.
04/14/2013: Revise to eliminate several duplicative areas. Clarify a few details. Update a few things.
12/09/2013: Revise slightly for Loctite 263 addition, and cautions, etc.
01/30/2014: Update the silicone-ptfe grease part numbers info.
02/18/2014: Revise #6 extensively.
03/01/2014: split #10 into 10A and 10B, and revise wording. Eliminate #19.
05/10/2014: Update info on Berryman's.
07/30/2014: Add CRC 5-56 information.
08/06/2014: Add more moly information.
08/16/2014: Expand general statement on sealants and RTV desc. and usages.
09/23/2014: Fix for better use on smaller devices. Re-arrange entire sections on sealants into one. More work needs to be done to make things neater.....did so on 10/2/2014.
10/05/2014: Add information & link for kstartersprag.htm
10/11/2014: Re-write 10B to clarify Radio Shack and Deoxit by Caig.
11/07/2014: Expand the antiseize section re: finned nuts.
05/06/2015: Expand plastic treatment, cleaning, etc., area. Clean up some.
07/23/2015: Totally revise #6 on greases, removing 7 and 8 also. Revise with new item 7.
11/11/2015: Clarifications and some updates.
03/18/2016: Update meta-codes, font sizes for readability, reduce excessive use of colors & underlines, clean up article layout, reduce redundancies, tech updates.
08/05/2016: Update information on the moly greases....and, again, on 08/07/2016.
04/10/2017: Improve information, particularly clarity, on solvents and cleaners.
06/21/2017: Clarify use of greases and coatings/protectants on electrical connections.
08/07/2017: Overhaul article. Simplify html, clean up presentation, decrease colors, bolds & font changes, etc. Modest clarifications of content.
12/15/2017: Updating article content; further reduce excessive html, colors, fonts. Some small updates in Oct-Nov 2018.
11/30/2018: Expand 4A.
02/21/2019: Improve #13 a bit, with better explanations and more information.
08/16/2019: Improve cautions on vapor blasting; and, add vid link.
05/02/2020: Update on spline lubricants.
12/09/2020: Fix wrong html URL code for paint codes.
12/15/2020: Update Never Seez URL and some details added.
04/03/2021: Update specifics on Caig products.
06/15/2021: Expand item 19 on fuel tank treatment.
10/05/2022: Add note on correct Suzuki base sealant product.