
|
|
Cleaning exhaust systems.
Drilling/cutting/repairing windshields.
Noisy fairings/dash. Pesky hollow rivets.
Cleaning plastic visors & windshields.
Washing the bike.
Maintaining the paintwork & aluminum.
Sandblasting?? Vapor blasting? Bent levers.
Repairing fairings & luggage (hard bags).
Black plastic & rubber trim.
See also article #73:
https://bmwmotorcycletech.info/chemicalsetc.htm
and,
#75A: https://bmwmotorcycletech.info/locks-caps-etc.htm
Cleaning Exhaust systems:
Pipes, headers, mufflers, etc., can all be cleaned with 0000 grade of steel wool. Use of 000 grade should be reserved for the worst cases. Exhaust pipes polishes, said to reduce bluing, are available, most do little, and the bluing tends to come back soon. A particular problem is that exhaust systems tend to get oily grunge & other stuff on them that gets thoroughly baked onto the surface. Burned-on boot rubber soles is usually not any big problem to remove. One of the worst places to clean up is the under-transmission pre-muffler/collector on Airheads having those, which can can be 'wire brushed' with a fine steel wire wheel, but is abrasive to the surface. Brass bristled hand-brushes are safer. Metal brushes may be your last resort if the items are quite bad, & this is particularly so if your items are chrome plated steel & are 'rusting'. Spending the time & effort to do a really good cleaning will result in much easier cleaning in the future.
Strong chemical means (which will not eat the metal like steel brushes will) often work really well for heavily baked-on oil/grease/etc. I HIGHLY recommend the entire process be done OUTDOORS, and not in your garage.
Clean off any oil/grease you can, with a petroleum solvent. Suggestions are kerosene (aka parafina); paint thinner; and Stoddard solvent. Stronger solvents such as MEK or acetone may be needed. Don't bother using 'brake cleaner', it is quite weak. Wash with hot water & dish washing detergent mixture.
If the items are still mounted on your bike, you want to mask off, by whatever good means (except sticky-backed tape!), the bike from the next step. I also use paper, cardboard, etc. You do NOT want any aluminum castings getting the strong spray cleaner on your castings, etc. The recommended stuff, below, can damage some paints.
Obtain a spray can of oven cleaner. Get only the type containing sodium hydroxide (also known as Lye). Potassium hydroxide is also OK. No other types but these provide seriously strong chemical cleaning against burned-on grease/oil. Sodium bicarbonate is not going to work. These oven cleaner sprays are dangerous, and you do not want to get any in your eyes, nor inhale the fumes/spray. If it gets on you, flush/wash it off immediately.
READ THIS ENTIRE PARAGRAPH SEVERAL TIMES BEFORE BEGINNING WORK!
If you can, warm the parts to be cleaned. The warmer the parts, the faster the stuff works...but, never higher than water boiling temperature. WEAR SAFETY GOGGLES! If any spray gets on you, WASH IT OFF, right now, NO waiting. KEEP IT OUT OF YOUR EYES. PAY ATTENTION to the direction the sprayer tip is pointing. DO NOT BREATHE-IN, WHILE SPRAYING!
Spray the surfaces generously. How fast the chemical works depends considerably on surface temperature and that it remains wet. It is OK to use a foggy spray of water to keep the chemical wet if it is showing signs of drying. In particularly bad instances, use a thick layer plus keep it covered so it will stay wet, perhaps overnight. The chemical must be kept wet. It is better to do this job with the parts off the bike, but that may be very inconvenient. After a while, perhaps 15 minutes or longer, wash off very thoroughly with water. Use a stiff floor scrubbing type of brush where you can. If the wet surface feels soapy/slippery, it is not washed off enough.
How to drill plastics:
Lexan & polycarbonates ....in general ....are somewhat easier to drill, as opposed to such as Lucite, Acrylic, etc. Hints on drilling & avoiding sudden grabbing & cracks from the drill bit on just about any plastic follow:
1. I highly recommend you purchase special drill bits designed for plastics work. If you decide to sharpen your own drill bits, use 0�rake, and use 90� sharpening at the very most. I use 60� to 80�. Some professional plastics drill bits have a sharp point of very small diameter, in a steep triangle shape, that is short. Just past that point is the rest of the drilling area, that makes the final hole size. That portion has hardly much of an angle downwards. This all means that the drill has a very tiny 'tit' to start the hole or align the drill to an existing tiny hole ...and then the end of the drill that does the cutting is very broad ....it almost acts like a spot-face or end mill...with a small amount of angle. These can be tricky to use correctly, and require the drill be quite square to the surface and constant. Any use of a hand electric drill must be done very carefully. While I have successfully used small 'centering' drill bits of large angle (a type used by machinists with lathes & mills) to drill holes & countersink them at the same time, it is only with equipment that maintains squareness. Because the use of such items are tricky, and your plastic items are usually costly, I cannot overemphasize my recommendation to purchase brand-new drills designed for plastics. There is a fair amount more information on this subject in the following article at section 4C: https://bmwmotorcycletech.info/chemicalsetc.htm
2. I have, in the past, suggested you drill a very small pilot hole first. Use a drill bit with maybe 120� for the primary drill bit cutting area. While that method works well, and you can use common drill bits, I have decided to remove that recommendation, and add a better and safer method for amateurs (and some professionals use the following method, ...I DO! Often!). Determine where the hole will be exactly located. Use a hot soldering iron with a very small round tip; it should be pointy, or nearly-so. Use the soldering iron briefly to melt the plastic and provide a very small hole, which need not go fully through. You can now use the full ending size of PLASTIC type of drill bit, and drill the hole, details follow:
3. Use a slow drill speed; do not use much pressure. If the material is quite flexible, such as a windshield, hold the material reasonably lightly with your fingers and do not bend it. Drill a small amount with a plastics type drill bit, as squarely as you can see, then stop. DO NOT use a high RPM. Repeat drilling, stop, repeat. Never allow the drill or material being drilled to get hot. GREATLY LIGHTEN the pressure as you approach break-through.
4. Larger holes, 3/8 up: consider the use of a spot-face type of tool ...which has a small drill bit at the center, and 90 degree cutting surfaces. That is, this looks something like a milling tool, with a center drill in it. A machinists centering drill if properly sharpened can also do well here. I have used larger size plastic drill bits with very good results, however. I still recommend purchasing special drill bits designed for plastics.
5. When drilling plastics, you want the resulting hole to avoid encouraging cracks. In most situations, a tiny amount of smooth countersinking, often done with a hand tool, on the two sides of the drilled surface, will eliminate sharp edges. Note that common terminology is "break the edge". That does not mean you are really breaking something, just removing a tiny bit of sharp edge. DO NOT do this with a larger drill bit...you WILL leave microscopic weak areas or even crack the plastic; this is especially so with acrylics. There is a burr tool meant for plastics for this, but you don't really need it, but if you do a lot of plastic holes, get one, and never use it for anything but plastics. What you want to end up with is a very smooth hole with SMOOTHED edges; no sharp microscopic nicks! ....avoiding cracks & possibility of future cracks! You may want to shape a wooden dowel to a taper point, perhaps with a grinding wheel, and use with grinding compound ...or even use a pencil...& use a tiny piece of 360 grit sandpaper, by hand, to remove these hard-to-see nicks at the outer edges & even in the hole walls after drilling. This results in a vastly better hole, which resists cracks. Some are anal enough to use heat ....from a butane/propane torch ...for smoothing ...yes, this works, but practice on an old piece of the plastic....and....be very careful! If you have abrasive typewriter eraser 'pencils', you can shape them for small holes, for a finishing polish.
Cutting down windshields; installing windshields; those pesky hollow dash rivets;
fixing noisy fairing/dash vibrations, etc.:
I dislike looking through windshields; I like to look over the top (unless it is raining!). There are other opinions. Cutting down a windshield is not fun & must be done correctly. Cutting down acrylic windshields/windscreens is especially tricky and can be nerve-wracking. You will crack it if not careful in your technique. I suggest you use BLUE painter's masking tape (NEVER duct tape). You can use common masking tape (BLUE Painter's tape really is best!), over the entire windshield (in case the jig saw or its power cord, slips, ETC., and then rubs the windshield!) (or use tape and thick paper). Do a very careful outlining with a non-permanent marking pen on the tape (you don't want ink bleed-through).
Do the cutting using a low-powered coping saw or low-powered jig saw, with the windshield fully mounted on the motorcycle, which will help the shield stay in the proper curved shape and help avoid cracking from you (or the buddy 'helping you' by holding the windshield on the workbench). BTDT! Have the saw guides covered with masking tape to avoid saw guides rubbing the windshield and leaving scratches. It really is easier to do this job correctly if the windshield is mounted on the bike. If off the bike, do not hold the windshield with so much pressure that it is squished from its rounded shape ...that will promote cracks while cutting. It is far better to have the help of a friend, one holds, one cuts ...the windshield is mounted on the bike, and hold the windshield with quite light pressure!
Use a medium coarse file to make an initial smoothing. I prefer a single cut file. Then comes sanding, with progressively finer grits of sandpaper; with the edge, following the shape. Finally comes the use of WET sanding (water) with fine grit "wet or dry" type of paper. After all noticeably visible scratches and sharp edges are removed, then buff the edge, but do this quite carefully. Don't try the flame-heating method of 'buffing', as it is very tricky to do ....unless you have experience, or have practiced on a piece of the same material. You can completely avoid buffing if you do very fine grit sanding. Beware of power buffing ....it tends to overheat the plastic quickly. I always sand the sharp edges lightly too ...it looks better and relieves stresses!
PESKY HOLLOW RIVETS:
How to deal with the hollow rivets that BMW uses at the fairing upper trim is often asked about.
You do NOT need the BMW tool, you do NOT need to take the whole fairing off the bike. Below is a tool that I made ....and method of use ....that is very simple, costs nothing, & solves a real problem. When you do need this tool, you will be amazed at how well, fast and easy my method does the job for you.
On the FAIRED models, BMW uses a tubular (hollow) rivet to fasten a black plastic trim piece (that contains a clock & voltmeter on many models, other models those are not installed) to the fairing. You need a tool to tighten loose rivets for various reasons, or perhaps you are installing new rivets? You may need to do such as fairing repairs/installations, fix noisy loose dash pieces (those noises are often hard to find). Perhaps you are installing an aftermarket windshield ...especially the installation of Parabellum's that use an additional black plastic cover piece that fastens to two centered BMW rivets, etc. The BMW hollow rivets need to be fairly tightly fastened to the fairing, but do not over-tighten.
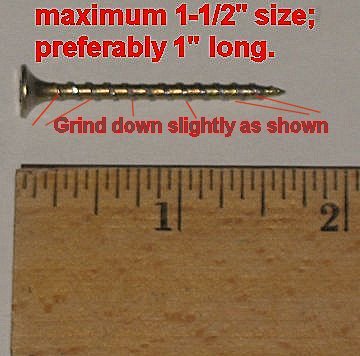
The problem is how to tighten them. The secret is very simple! You obtain a proper "drywall" screw. Carefully grind (do not overheat the screw which is very tough unless overheated) the entire threaded area as in the photo, so that the threaded area will "just smoothly" enter the 'chuck' of a common pop-rivet installer hand lever tool, using the 3/16" diameter chuck. Most common inexpensive pop-rivet plier tools come with 1/8" and 3/16" chucks.
To use, insert the modified screw from underneath via fingers or forceps, use the pop-rivet tool on the outside. The reason the photo text says to not have over a 1-1/2" screw is so it is easier to insert from underneath.
Use JUST ENOUGH pressure from that hand operated pop rivet tool. If the outside of the rivet does not flatten properly (the inside will be slightly cup-shaped), reverse the screw for the final moderate tightening. Do all the rivets, there are eight of them. If installing a Parabellum windscreen, FIRST be sure the black plastic cover piece from Parabellum does NOT interfere with the gauges (source of squeaks/rattles), if it does, grind it a bit before final installation; .....I have found many that needed that...do it before installing the rivets (MUCH easier!!).
Hints!! for cleaning windshields, helmet face shields, etc:
Don't use paper towels, they WILL scratch plastics. Don't use Windex! Use nothing with ammonia in it! The wrong type of commercial glass/plastic cleaners, WILL cause damage that tends to take a long time to fully show up; then is nearly impossible to fix. Some chemicals will soften/cloud plastics, & start doing it suddenly, after seeming to be fine. BEWARE of hydrocarbons, strong solvents,
etc. ...they may damage the windshield very fast. Some windshield spray cleaners will remove, in annoying patches, the coatings used on windshields, over time. These coatings may be INVISIBLE until damaged! These comments also apply to many types of helmet face shields.
Many plastic windshields REALLY DO have a very thin bonded plastic layer, it is something like a non-peelable film. This layer can get damaged over time, and when it does, often from use of wrong chemicals on the windshield, you will see large areas where it has disappeared or looks delaminated. The 'film' edges are very pronounced. There is NO GOOD FIX, even the best treatments or trying to blend it at the edges, will leave MUCH of it. Windshields are $$$....it will definitely pay you to clean them PROPERLY!
NEVER clean or polish plastics (that you are going to look through) in a circular motion ....the nearly invisible circular swirl marks will drive you crazy when riding into a setting sun. SOME folks, including ME, use vertical movements on the outside, horizontal on the inside, so you can see what you are doing with polishes, etc. Others use just one direction for both sides. Use a plain-water-dampened cloth over the plastic to soften bugs before removal ...this can take some time, & it IS worth waiting. Many products are available to clean & then polish/wax plastics. SEE MY CHEMICALS ARTICLE FOR MY RECOMMENDATIONS! https://bmwmotorcycletech.info/chemicalsetc.htm. It is in that article that I have my latest recommendations.
Don't use petroleum products. If the plastic is badly scratched, the process to remove the deep scratches is VERY laborious, using coarse and then finer products.
Removal of sticky emblems, labels, MISCL....etc.:
Sticky labels are often a big PIA! Removal of sticky emblems is usually best done with slight heat from a hair dryer or other concentrated heat source (be careful!), and peeling the labels off very slowly as you apply the heat to the edge (not too close!) you are GENTLY pulling on. Residues and label tearing are minimized by doing it that way ....but any residues that are left are tricky to remove without injuring the plastic windshield. I usually use methanol on a rag, and only briefly. Many commercial residue cleaners will damage plastic windshields. Be very cautious! After peeling off the label using carefully applied heat, I recommend you first try a petroleum product, WD40, to clean up the residue. If that is not working, you will need to try more aggressive things, starting with the mildest, perhaps methanol, followed by Naptha (lighter fluid), a product like Goof-Off; and, only if fully frustrated should you try such as MEK or acetone. Windshields are made of various plastics, and sometimes you can get away, briefly, using MEK or acetone, without damaging the surface. Other plastics may be dissolved!
The old motorcyclist's standby for windshields, to fill-in exceptionally fine scratches & to leave a bit of protection on the surface, is using Johnson's Pledge (plain version). It works OK for this for quite fine scratches, but is not necessarily safe for all plastics, & for sure is only for the finest scratches. It does not remove scratches. Some plastics will be damaged by long term use of such as Rain-X; so be cautious.
An old trick is to use a cloth dampened with common household vinegar, to help 'condition' the plastic or contaminants; .....it can considerably help with bugs removal. Some have used WD40 for bug removal.
Many helmet face shields and/or sunshields, are specially made to limit fogging-up in damp weather conditions, etc. Pay attention to what the manufacturer says about cleaning these. In some instances, the inside surface will be quite differently manufactured; hence will be quite different on cleaning and even drying, than the outside surface ....but looks identical. Premium faceshields may be like this, such as from Schuberth.
Paintwork:
To protect the paintwork, use an auto-parts store sold concentrated soap in your bucket. These do a good washing job and nicely won't remove but a faint amount of wax. Dish detergents are rather harsh and will remove wax; I do not recommend them; they are OK for the metalwork though; sometimes nothing but a good detergent will work OK on grungy stuff.
Avoid using petroleum products on the paintwork, unless you have no choice. Sometimes WD40 works on some types of stains and deposits that soap and water does not remove. Once properly cleaned, a polish coating of wax on the paintwork & also treating the seat & any fairing, rubber bits, etc. with the appropriate stuff; ...all are needed ...all are time consuming ...but will then last a long time even with regular mild auto-parts store type of soap washings. Note again, that car washing type of soap does not remove waxes like kitchen detergents will. Don't wash the bike when it is hot from riding.
'Paintwork' here does not mean rubber trim, a special treatment is needed for that ....and many such treatments are not lasting.
If tree sap does not remove with soap or detergent & water (some tree saps DO remove with soap and water), then use turpentine, briefly, on a rag, then immediately wash with the soapy water mixture, then hose off.
|
SPECIAL PRECAUTIONS AND WARNING WHEN WASHING YOUR AIRHEAD MOTORCYCLE: Be CAREFUL not to get water into the transmission & driveshaft. DO NOT spray water at the speedometer cable holding hollow bolt, located at the right rear of the transmission. At the right rear of the transmission, the speedometer cable enters, and it is covered by a rubber boot, that tends to deteriorate from the sun, etc. Be SURE that rubber boot over the speedometer cable is in good condition. I highly recommend cleaning the top inside area of the boot & the outside cable sheath; then sealing the junction of the speedometer cable as it goes into the boot at the top of the boot. A coating of Armor-all on the boot, or something that protects from UV rays, AFTER you seal the top and it has dried/cured, is a GOOD idea. The speedometer boots have been made of a 'rubber' that seems to deteriorate from sunlight & smog much faster than most other rubber parts on the Airheads. The boot expands as it deteriorates, and the expanded top of the boot is then susceptible to water coming down the speedometer cable, getting inside at the top, thence into the transmission. I have seen the boots deteriorated to the point that they can admit water at the bottom, where they fasten around the metal sleeve ...usually the boots are quite bad by then. Boots are to be installed with the base fitting around the metal sleeve lip. Some have used zip ties at the top, around the top of the boot. I don't, because I found that it takes very little pressure of the zip tie to make the top of the boot oblong ...even on a new boot this makes leaks start up immediately. I usually replace the boot at every other rear tire change, but you may have to replace the boot sooner. Imagine what happens when someone cleans their Airhead using a nozzle on the water hose; spraying at the boot and the hollow bolt. Water inside the transmission will lead to VERY $$$$ repairs! |
| Be sure to grease or oil necessary items on the bike after washing & drying. Do NOT forget to oil the barrel ends of the throttle cables at the carburetor levers. Same for clutch barrel end & at the control levers ....after EVERY wash job! Allow the bike to dry first if you can. |
The aluminum:
For simple cleaning of dirty greasy castings, you can use something like Gunk or kerosene or paint thinner with some liquid detergent (shake it, it otherwise separates), use a siphon blaster or manually with brushes. Then wash with common dish detergent & water. Best not to use detergent/water for the paintwork; best use soap and water, unless only detergent and water will work adequately. Re-wax paintwork.
The Carburetor metals are probably aluminum & zinc, with minor others such as brass, and a few steel items. Use Berryman's B12 Chemtool ("Carburetor and Choke Cleaner") spray on them. Be sure to read-up about the particular version to use. See item #17 in https://bmwmotorcycletech.info/chemicalsetc.htm for the latest information. The BEST spray (use it with the tiny tube it comes with) I've found for cleaning carburetor and carburetor parts. Still surprised the various air quality controlling agencies have not outlawed this great stuff; although see the next paragraph, for California. Keep it away from plastics & paint and your eyes! Next best thing to a formal carburetor cleaning machine or dip tank. Also nice to use on exterior carb stains. Many other brands of cleaners that I have tested are nowhere near as strong as this one. Be sure the can says, among its other ingredients, that it has acetone and MEK (methyl-ethyl-ketone) in it.
***California air quality regulations have caused Berryman's sold in California to be reformulated. The California reformulation is not nearly as strong as the old Berryman. If your B-12 Chemtool has numbers 0113C; 0117C; 0120C; or 0152 on the can someplace, it is OK for general use, but not for serious cleaning of such as carburetor passages. The 0113; 0117; and 0120, are much better. The powerful stuff has acetone and MEK (methyl-ethyl-ketone) in it; don't purchase unless it has them.
UNfortunately, there are no good practical simple low-labor just-chemical methods of cleaning badly corroded aluminum castings. Even light discolorations are hard to properly remove. One of the problems is the types of alloys used in castings. Exposure to salt air really makes a mess of the cases, cylinders, heads ....etc.
The commercial spray stuff for magnesium wheels, or any other wheel cleaner (I've tested plenty of them years ago ...I anally tested a whole bunch of them...>$50 worth (more costly now!) ...one weekend). ALL are not very effective ...some better than others though. If the cases-castings are really corroded & rough surfaced from the corrosion, only abrasive methods will clean them up, although chemicals can help. Salt-air corrosion is difficult to remove. Media blasting is the most effective.
The etching-type of wheel cleaners, screen door cleaners, etc., will help with the process of cleaning off minor aluminum stains & magnesium corrosion, but don't let the stuff dry on the bike ...always flush before it dries. Some folks DO use magnesium wheel cleaners from the auto-parts stores and aluminum cleaners from hardware stores. There are two basic types, one a silicate, one an acid. SOME work better than others, but do not allow ANY of them to DRY on the wheels!
Brake dust on the cast wheels can be difficult to remove. The best method I know of is not some magnesium wheel cleaner spray from the auto-parts store, but a mixture of common household baking soda and dish detergent....and then add a FEW (very few) drops of water. This very thick mixture works fine with old toothbrushes. VERY THICK syrup consistency, really a paste, is correct. Wash off VERY thoroughly when you are done. In between serious cleaning of that sort, you might consider an old coffee-pot type of kitchen brush, many auto-parts stores stock various types of long roundish brushes too, especially for use on wheels, used with your normal washing mixture. Brake pad dust is cleanable with the mild & faintly abrasive soda-detergent-water mixture, but using strong cleaners on the wheels does not work well, in particular if the wheels are COATED; many Airhead wheels ARE clear-coated, or painted; some have clear coats over the paint. Once any coating starts to go truly bad, only vigorous cleaning helps; you might also consider removing the coating (big job) or re-coating professionally. The alloy wheels are painted. An EXCELLENT match for that paint is W�rth's Silver Wheel Paint.
I have found that commercial chemical wheel cleaners often DO help, some, once the wheels are cleaned with detergent & water and maybe the soda mixture first ....if the bike is washed relatively often. The BMW snowflakes usually have a coating which gets chipped at the rim, due to not being careful with metal tools ...that is...not using a bit of plastic or some-such, to protect the rim when doing tire changes. Once the coating is disturbed, the wheel is more vulnerable. The coating can be touched up....most folks seem to just keep the cleaning process going. Use of Simple Green WILL help some, either full strength or diluted 50%, but do not let it stay in contact for very long, and keep it wet. It is OK to leave it in contact far longer than the commercial magnesium cleaners and aluminum cleaners. MY advice: AVOID using etching cleaners on clear-coated wheels.
The barrels, cases, covers, etc., are a big problem in salt air. Salt air can occur FAR from the ocean! I have seen bad damage from a bike stored for only a few weeks, outdoors, when it was at least 30 miles from the Pacific Ocean. How you deal with this is a matter of how much labor you are willing to provide. Aluminum is not the same as iron, when it comes to oxidation versus rusting. There are several types of aluminum in use on the Airheads. Aluminum tends to be somewhat self-protecting once the surface looks awful enough. To clean it up really nicely, you need abrasive methods. This means you will use such things as:
1. 3M, Scotchbrite, or similar, abrasive pads. The best are the industrial pads, 1/4" thick, ~6" square pads, etc. Both the smaller (but unfortunately thicker) kitchen pads/sponges with one side abrasive; and, the industrial types, are available as more abrasive and less abrasive. The kitchen types that are noted on the package as Heavy Duty are better. You cannot depend on pad color for abrasiveness; but, GENERALLY, common supermarket-sold kitchen and laundry abrasive pads have blue or green abrasive on one side, the coarser, green, MAY have hard carbide type particles in the plastic abrasive material side, and can work fine on aluminum cases. It will pay you to purchase the thinner abrasive pads from an industrial supply company. I sometimes cut these pads into small pieces and use forceps, etc., to abrasively clean between cylinder fins. See 2., just below.
2. BRASS, as well as aluminum, scouring pads. These are available as rolled-up/tied-up puffs of kitchen pot scrubbing items. A supermarket item. Brass scouring pads are quite effective & safe. I also use BRASS gun-cleaning brushes to get into the cylinder and cylinder head fins areas.
I recommend AGAINST any type of common 'steel wool'....which tend to leave teeny microscopic bits of steel in the aluminum ....which turn into brownish RUST!
3. Simichrompoli, or other compounds ...(takes a tremendous amount of labor for these) ...does polish aluminum alloys... you CAN end up with fairly decently polished aluminum, if that is what you are after. Many a carburetor has been polished with this stuff. Some types of aluminum staining is removable with this type of stuff.
Try Berryman's Chemtool for fuel staining on the carburetors; and, it is good for carburetor inside metal items, even the jets, etc.
4. In appropriate places you can use power tools ...with brushes and abrasive compounds and 3M pad pieces ...all sorts of inventive ways of doing things. You can use power tools with brass brushes of the type used for cleaning gun barrels. I also use stainless steel brushes. I have quite a collection of various types and shapes of metal brushes.
5. Whatever methods you use, you will probably spend a lot of time at it, perhaps some every week, until you get the effect you want, particularly if your bike's aluminum is already badly corroded. Then comes the problem of how to maintain it all. If you do a regular cleaning with perhaps a modest grit 3M pad during the regular washing, that does fairly well.
Some folks purchase some 'chrome' or "aluminum paint" ...and put some of that paint onto one of the 3M pads, to work the paint into the surface, after very thorough cleaning (possibly abrasive) (and drying of course), and then carefully wiping the surface to leave only 'some' paint in the pores. This really does work well, but can change the color. There are various colors available in these 'aluminum' or 'chrome' paint products ...some are really close to aluminum casting color! There is more than a bit of change if you are overly generous with the paint and not removing enough excess from the surface ...but, once you have the correct paint, the secret is to use very little of it and on properly prepared surfaces! The paint REALLY WILL reduce future salt air corrosion by a large amount, if used AFTER the surface is properly cleaned up. The use of such paints also makes for much easier future cleaning of the bike when washing it, etc.
It is impractical, & results will be very irregular, to use such things as anodization & other treatments for aluminum, on our Airheads. It is a matter of the composition of the casting alloys.
HINT! One of the recommendations for a paint product, which can be sprayed on & left that way ....or, worked into the pores & then surface cleaned, is Alumablast, a product by Eastwood Supply. It is rated to 300�F, is an acrylic lacquer, and is available in aerosol and brush cans.
PREP WORK IS CRITICAL!
6. WARNING: Sandblasting (media blasting) with glass beads, sand, or commercial hard blasting media ...and this includes what is called VAPOR BLASTING (which is really water and a very hard media, such as super tiny glass beads) can bring TROUBLES! Sandblasting or vapor blasting, etc., is too often done during a top end job; carburetor job, transmission job, etc. The grit gets into everyplace, even imbedding in the surfaces of the aluminum. It gets everywhere's even when masked-off. You never seem to be able to get it all out of important places. It may then get into the cylinder, rings, pistons, bearings, and your oil supply. AVOID sand blasting! That especially includes glass beads blasting. Walnut shells are a bit iffy; soda and CO2 are OK. Frozen Carbon Dioxide is probably the very safest. AGAIN: There is a type of 'media blasting' called VAPOR BLASTING, or Vapor Cleaning. Due to the compounding, that method APPEARS REASONABLY SAFE, but I am NOT 100% convinced. It does result in a nice-appearing job. BE SURE to do a VERY thorough cleaning-up after any Vapor Blasting...every hole, every cavity, every threaded area...and you may need to do it over and over, ..... I use gun cleaning brushes.
7. While I have given some general advice, you may be interested in a somewhat more in-depth approach. For those that would like to see how someone cleaned up an Airhead ....it looks very nice ...here is a link to his write-up. He describes exactly how he did it. If you can find brass/bronze/aluminum or stainless steel type of wool pads, they do not leave microscopic rustable particles in the surfaces. Regular steel wool will work OK, if cleaned up thoroughly afterwards. Use a 3M pad or other mild abrasive pad. http://brook.reams.me/bmw-motorcyle-rebuilds/1973-bmw-r755-rebuild-project/51-bmw-r755-refinishing-techniques/
BENT LEVERS:
Most just purchase new or good used levers (clutch, brake, etc.) if they get bent. However, it IS possible to repair many, if not most. You can do this at home, or, possibly even on a trip into areas where there is no close-by source to purchase a new lever. What follows is practical advice, what works on many motorcycle handlebar & many foot levers. If you want to learn something about aluminum alloys, try this:
http://en.wikipedia.org/wiki/Aluminium_alloy
Aluminum alloy material varies considerably, and all sorts of manufacturing methods are used to fabricate or complete the making of a part, such as casting, rolling, drop-forging, etc. These alone, besides the alloy itself, vary the result as far as granular ultra-microscopic grain appearance ….and, vary with how the alloy typically work-hardens (or doesn't), etc. However, only a very limited number of alloys are used for handlebar levers, and most really can be "annealed" to be softer & much less brittle, especially after the change after they got bent. Once you bend an aluminum part, most aluminum alloys, if they do not crack, or do not have surface stress fractures (look with a strong magnifying glass), can be re-bent back into shape and maintain most, if not all, strength, ....& in a few instances they can be stronger than previously. The following hint works well with shiny/dull aluminum levers, but not quite so good, but still OK, for levers that are black anodized or painted.
This old-fashioned method, well-known to old-time metal-workers, DOES, OFTEN, work. From a fair amount of personal experience, I would say that for 90%+ of levers, INCLUDING BMW's, this can work OK.
1. Clean the lever with a strong evaporating solvent.
2. COAT the lever from a bar of SOAP. Must NOT be soap with skin-softening additives; must be real old-fashioned soap. DO NOT use liquid soap. Rub the bar of real soap all over the outside of the lever.
3. Slowly heat the entire lever, as evenly as you can, until the soap turns BLACK. This will get you to a SAFE heat, for every aluminum alloy I know of. No need for special temperature indicating sticks, or other methods.
4. Immediately start bending the lever back into shape. Use a SLOWLY increasing amount of pressure; AND, once the lever shape starts to move, back off. If the lever now moves a bit & stays moved if you back off the pressure (known as taking a SET), of any sort, then that bending pressure was approximately the correct pressure. If the lever did not move, try higher heat.
5. REPEAT, this time holding ~ that same pressure, re-applying heat if need be, & possibly a bit hotter if the movement was quite small, as you bend the lever SLOWLY back into regular normal shape. Don't overdo things, & do NOT over-apply pressure. NOTE that aluminum takes TIME to re-orient itself microscopically, it is VERY different from steel. The process works better if you let it cool a FEW minutes, then re-heat & continue.
6. When you are done bending (the lever should be still quite hot, approximately as hot as in the bending process), plunge the lever into cool water. This does not do the same thing as it would with, for example, orange or red-hot steel. A technical explanation is not needed here, just take my word for it ...or, do your own research & testing. I was lucky, I had a large selection of bent levers when I did my testing; I also had a real old-time metals guy advise me as to methods of testing.
7. A such "annealed" lever can be quite usable.
8. Understand that common Aluminum alloys do NOT work-harden like some other materials do. In general, aluminum alloys work harden considerably on the FIRST TIME bend. Another way of saying this is that the aluminum will, or could, get close to cracking, on the very first bend ...that bend that bent the lever in the first place! If there are visible surface cracks, & these may require you look with a magnifying lens, then the lever may well NOT be repairable. Do not mistake cracks in a coating, for cracks in the metal.
9. Aluminum alloys are really different. Once bent, they need to be annealed to be AS STRONG (sometimes very) ...and the old steel methods of water or oil quenching do not do the same thing. Aluminum does NOT "harden" in a water quench, like you might be used to with such as steels. Aluminum quenching in oil is unlikely to do much.
10. You are also NOT going to be heating the aluminum to the equivalent of orange or red-hot as done for steel annealing or heat treatment of various types.
11. Aluminum CAN, and is, COMMERCIALLY annealed during production, specifically to obtain certain final characteristics, and this is done by very precise means at VERY high temperatures. THE problem is that unless you know the exact alloy, and its characteristics, then the margin between the proper temperature for annealing …and the temperature at which damage, even melting, occurs …is quite NARROW. You need a source of even heat, and a very accurate method of measuring the temperature, and common melt sticks OR cheap infrared heat guns, are NOT accurate enough ....so don't try that method.
Luggage; Painting & Crack Repair:
You can sand the BMW hard bags luggage and repaint them. Be sure to start with a thorough cleaning. I usually use detergent and water, such as for dishes, then I use a fast drying strong solvent. If not cleaned properly, the painting won't stick well, and might even not paint at all well. Common rattle-spray-cans of truck bed liner paint usually work well, and may be available in more than basic black. When the luggage has cracks or has other damage you want to repair (new hard bags are very pricey!), one secret is to go to the hardware store and get a can of ABS pipe cement; black is certainly available. If the repair requires filling in areas, you can get white or black ABS sticks from some hobby stores (see URL below for other ideas), and dissolve stick shavings or shavings from some old ABS pipe material, in such as Methylene Chloride. This is nasty stuff, so keep it off your body ....and do the work outside so you don't get exposed to breathing in the fumes. If you need to fill areas, use that dissolved ABS material, dissolved to the point it is quite thick ....it will dry very quickly after you force it into holes, fill wide cracks, even add sections. You can use aluminum foil or some plastic films, temporarily, to provide backing. Here is a hyperlink to an article:
https://www.webbikeworld.com/repairing-motorcycle-saddle-bags/
Black plastic/rubber trim, faded luggage, other faded plastic & rubber items:
Faded luggage & other faded parts can be somewhat renewed to look much better with a variety of treatments, such as Back-to-Black, and many others, including Armor-All, Boeshield 303, etc. In general, such treatment does not last very long. If you plan to paint the luggage, I suggest not using those products because a goodly amount of strong solvent scrubbing will be required to remove the silicones left by such products. As black plastic & rubber trim pieces age from sunlight, etc., they tend to fade to a grayish color. There are a number of products that claim to restore the surface. If you do not mind treating the surface often, then you can use almost any of these products. Most incorporate a silicone base & once applied, must be continued with such use, unless you clean them with harsh solvents. If you intend to do a longer-lasting job, Bondo Restore 800 can be used. In that case I suggest you first do a very thorough mild abrasive cleaning. Water, detergent, toothbrush and other brushes, maybe baking soda or other mild abrasive. Most products do not stick to surfaces still having silicone on them. Many common waxes also contain silicones.
Repairing BMW Fairings, a PRACTICAL method:
If you are careful, you can do a job that looks and acts ...and really is .... like, or close-to, a real professional job. My method shown here is somewhat time-consuming, in that you must do repeated applications (explained later herein), but each of these takes only a few minutes; but, you must let that application cure overnight. My method only requires a few minutes every day; although it can be done over longer periods of time. The initial prep work will vary a lot, depending on the damage.
BMW Airhead and old K bike fairings are not molded plastic. They are not fiberglass either, although commonly spoken of as such. BMW fairings are made from resins that have a filler ingredient that I think is primarily talc. The material is often called SMC by professional repairers, which stands for Sheet Molding Compound. I recommend against a quick & dirty hasty job with 5 minute epoxies. It is not necessary for me to get into the type of plastic resins that BMW uses, and other technical minutiae, because it is not pertinent here. One thing is pertinent; SMC as used by BMW will not repair properly (for the long term) if you use polyester resins in repairs. Due to ingredients in the SMC as used by BMW ...you must use epoxy (and fiberglass cloth or other if needed).
This is the my basic method for repair (note: do not do repair work in a cold area):
1. Remove any hardware that is in the repair area that would interfere with a good repair job. Clean the damaged area with acetone or 'real' MEK. Do not use your wife's fingernail polish remover which is acetone based as it may contain an oil. Go to the hardware store or a chemical supply house, and purchase a gallon of acetone, etc.....it is a great cleaner, as is real MEK. Real MEK is methyl-ethyl-ketone. Accept no substitutes!
2. Unless the damage is only a faint crack & touch-up painting might not be done, do sand the damaged area on the outside. Just how wide & long for sanding is up to your repainting efforts. Some will want to only do touchup painting with a fine brush, so their method will be to sand the crack into a quite narrow V form & not sand much outside the crack V; others will do a bit wider for slightly better adhesion. Both methods work.
3. For the typical more serious cracks, sand the outside until all the paint is removed from the crack, and, at least slightly outside the crack (at least 1/16"). Just how much sanding & width will vary with the damage. If you are not repairing the outside, then leave it alone. In most instances the paint has cracked nastily in a jagged pattern at the broken edge; you want that sanded to a nice edge. End up with the last sanding being done with 100 or 120 grit sandpaper. You must make a judgement as to whether or not the crack is serious enough appearing on the outside, to sand, and how much, how much width, etc.
4. On the inside of the fairing (typically BMW paints it flat black) sand very much more vigorously & very much wider. You want a large sanded area. I recommend doing the initial inside sanding with 50 grit & then with 80 grit. Hard to give a rule of thumb for this, but perhaps at least an inch or more in width. Get all black paint off the area you will be dealing with.
5. You can, depending on what the crack looks like, sand a slight V on the inside. In some instances you might not want to sand a V, or hardly any, on the outside, but make a large V on the inside. This is done when you want minimal exterior touch-up painting, perhaps only such as with a very tiny thin brush on the outside, using touchup lacquer....or, not any outside touchup.
6. I may use 80 grit sandpaper for the beginning on the outside, and 80 then 50 for the inside. Another judgment call. For minimal disturbance, outside, it may be 100 or 120 only. The inside of the fairing can done with 50 grit & 80 grit only. All outside sanding is more of a judgment call.
7. Clean all surfaces with acetone. Do not use your wife's finger nail polish remover acetone, as some contain oils. You can also use real MEK.
8. Due to fairing shapes, it is difficult to do any formal sort of clamping, with, say, pieces of wood ...but sometimes that has to be done in various ways. If any parts need to be clamped or otherwise held in position, you should do that as best you can. It is actually possible to use a strong duct-tape on the outside or inside, while you repair the opposite surface! I prefer to place the tape on the outside and repair the inside first, as the inside repair will be the much larger and stronger repair. Hint!..... Strong tapes directly into 'the wound' may lead to lifting some paint when you remove the tape. I have found that small narrow strips of common household plastic wrap placed into/onto the wound, then covered by wide strong tape, allows pressure on the crack/wound, with NO paint lifting when the tape is removed. This is especially good when you want absolute minimum paint touchup.
9. In some instances you may be installing a clip or threaded post, etc., into the material, then epoxying it in place. For any specific instance, consider when you will do this as it is not always the first thing. Sometimes it is the last thing before the touchup painting. Do not get epoxy into inner threads, and if you do, clean it out immediately as best you can, and be prepared to tap the item to do finish cleaning of the threads after the epoxy fully hardens. You can epoxy threaded fasteners, etc., into the fairing, quite successfully too. Many of the round-type threaded fasteners that BMW casts into the fairings have rough outer surfaces, which bond well to epoxy. I usually plug the inward side of the insert, so epoxy does not get pushed into it, as you push the fastener into the epoxied area. WAX will do OK for this. You can also fill the tube fastener with Vaseline ...be sure the outside is not contaminated by it! My favorite method is to coat a screw with a releasing substance, and insert the screw. In some instances I drill a hole that is smaller than the threads, into the material beyond where the threaded post stops. I use the lubricated screw. After hardening and screw removal, it is easy to use a tap to clean the hole, and beyond, if carefully done.
10. Be sure you are totally ready to do the final steps: ...you must have clean bare sanded surfaces.
11. Use marine grade two-part epoxy for the best repair. If you are doing a "quick & dirty repair", sure, you can use common epoxies, even 5 minute types.
12. You can do the inside or outside first. You must decide which is best. See 8.
13. Large cracked areas must be backed-up by use of fiberglass cloth and in some instances you will need a filler like fiberglass mesh or gauze or matting. I have done almost all fairing repairs with just fiberglass cloth/matt, it is easy to work with. You will brush epoxy into the V crack, and then apply the fiberglass material, and brush epoxy into and through it, which also keeps it in place for hardening. Cut the fiberglass cloth to roughly the size needed. I start with a smaller piece, and use a stiff 'acid brush' (shorten the bristles) to work the freshly mixed epoxy into the fiberglass & further work it into the V groove. Be sure to use the brush properly, work the epoxy into & through the fiberglass cloth, brushing out any air bubbles. Let it dry & harden overnight. It is up to you as to the speed of the hardening of the mixture (the hardener percentage determines the speed). I have used 10 minute & 15 minute mixtures, and I still let them fully cure overnight. Some think long cure epoxy is stronger ....maybe so, but you really want the product to stiffen some while you are working with it, via the shortened brush, so it all stays where placed and brushed-into.
14. The next day, sand the work you just did. Be thorough. Clean with acetone.
15. You are now ready for the next cloth and epoxy application ....as required. For the more serious outside cracks you will need to build up the outside to a bit higher than the original finish, so you can sand to the exact level of the finish. For much less serious outside cracks, you might even use only a thin layer of epoxy resin. You may be doing several applications & overnight hardenings, until you get a surface that can be sanded down & look good. Usually I find that if the V is on the outside, I use little or no fiberglass cloth or matt. You can use other materials besides 2-part epoxies if you know what you are doing ...some of these materials harden very quickly, which can be a good thing if you are trying to reform the surface.
16. The inside can be much cruder, and much larger patch sizes of the fiberglass should be used, & as mentioned earlier, mostly I do the inside first. This is where the major strength of the repair is made. Remember that you must allow overnight hardening & full curing; remember to sand, remember to clean with acetone. Built up the inside repair area to several cloth layers thicker than you might think you want. You need strength and a wide area ....and usually no one sees the inside repair anyway (especially after repainting it dull black). If done correctly, sanding properly and smoothly between applications, the inside need not end up bulging much.
17. Final inside fairing cleanup should be rough sanding of sharp edges, then some sanding so the repair looks relatively smooth, although it will bulge from the rest of the fairing surface some for strength. Then do acetone cleaning, & then spray can flat-black paint.
18. I wait a full week in a warmish place for a 100.00% cure of the epoxy, then I prepare & paint the outside with a very fine brush. If you do it carefully, it can be hardly noticeable. It is up to you whether or not to put a clear coating over your outside work.
Marine grade epoxy & hardener are typically sold in pints as the smallest container. You are unlikely to be using very much of it. Keep the cap on moderately tightly & in a cool place when you are done with your work. DO NOT leave the cap off during your work; this avoids the contents from absorbing moisture and oxygen from the air. Measure the amounts of each part you need into one small container, mix well, using swirls & figure eight motions. I use almost any type of plastic teeny cups from grocery items that I have first cleaned & dried. I collect them and snap-on small metal tops of old spray cans for this type of repair! You can also purchase tiny mixing cups from your marine epoxy vendor. You can use left-over epoxy items for any number of other jobs. Epoxies are mixed by either volume or weight. Be sure you get instructions for using small amounts of mixture, before you leave the store. I strongly suggest you do not try to do epoxy work when it is cold. I prefer to do it outside, in the sun, where strong cures happen fast. If the temperature is colder than roughly 70�F, the setup gel time is lengthened. For every ten degrees under room temperature the speed slows by doubling. Below 50�F, don't even think about doing this type of work.
Acid brushes are available at almost any hardware store. These are thin rolled metal tubes, with a small brush on the end. Cut the brush down by maybe 1/2 for deep V work, and only a third for epoxy-laying the cloth ...final work with uncut length ....cutting the brush is done so the brush is a bit stiffer when needed to be so. These are cheap, throwaway items. Harbor Freight sells them in packages of 100 cheaply. You likely will need a dozen or two or more anyway. These brushes are also useful for your spline lubrications jobs, etc.
Revisions:
01/28/2004: Finally resurrected and uploaded as #44.
08/13/2006: Edit, revise, add information on plastics, etc.
02/19/2007: Add luggage section, and expand a bit in 08/07.
11/29/2009: Clean up entire article some.
07/20/2010: Some cleaning-up; minor clarifications, add copyright notice and proper Google coding, etc.
05/09/2011: Slight updating and cleaning-up.
01/16/2012: Greatly expand fairing section.
09/18/2012: Improve a few sections somewhat; improve meta's; add additional references to other articles; add QR code and update Google code.
10/23/2013: Add note and hyperlink to Broom Reams article; improve clarity here and there, and add black trim area.
12/08/2014: Add entire aluminum heat treatment/bending section.
05/25/2015: Add more to section on cleaning, and add cutting the windshield down section.
10/21/2015: Expand exhaust cleaning section.
12/31/2015: Meta-codes. Narrow article. Justification left. Cleanup.
05/04/2016: Final update of meta-codes, layout, cleanup; clarity changes.
12/01/2017: Reduce excessive HTML. Better layout, including adding 10pxl margins. Greatly reduce font and color changes. Completely re-write the plastics drilling section; clean up explanations some.
10/17/2018: Modest cleanup, fix typos too.
12/14/2020: Fix hyperlink.
� copyright 2020, R. Fleischer
Return to Technical Articles LIST Page
Last check/edit: Monday, December 14, 2020