
|
|
The advertisements above are Google-sponsored. These
support the testing I do. Thank you for clicking on them at
every visit, ....and for your donations! The Donating article
explains this website's history, philosophy, and
operations.
Access for Tire Repairs. Pressure. Sizes. Mounting. Tubes.
Conversions. Balancing. Vibration/Thrumming. Mudflaps.
Rims. Tools. Hints. Schrader tire valves. Studding. Hints. etc.
You may be interested in reading these:
https://bmwmotorcycletech.info/section5.htm
https://bmwmotorcycletech.info/instability.htm
How most motorcycle tire punctures/flats occur (maybe!):
I am not sure of the accuracy of the commonly held belief that the front tire "sets up" road debris for rear tire punctures. I do think it quite possible & would be one of the reasons the rear tire always gets more punctures than the front. BUT...I think the main reason is because the rear tire is the power applier; hence produces much more force to things in the road, for example, it grabs a nail, rotates it to where it can puncture the tire/tube. I have seen arguments that the use of a mud-flap on the front will 'reduce' punctures. That may also be correct, but is a tenuous argument, IMO, if one really thinks about it, and how it might or might not work. A few think that a mud-flap on the front of the rear fender also helps some, if it sticks down enough. That is not very easy to accomplish properly on some bikes, as the rear fender is not necessarily part of the wheel unit. I have found nothing but anecdotes; no definitive testing on how/why/details punctures occur. If there is such testing, I'd be interested in looking at it; so let me know. https://bmwmotorcycletech.info/emailimage.htm
I suspect that more than one motorcycle and car tire company has done testing in this area. I once tried to find out, from two tire manufacturer's, and did not get much useable information from them.
It may be a combination of things, but primarily the power applied by the rear tire is what I believe. Various discussions & arguments put forth (some by me!) have included weight; the high pressure-point contact of the rear tire when the motorcycle is accelerating; the fact that the rear tire slips a lot even in cruise, even when not accelerating; etc. A factor probably is low tire pressures increasing the likelihood of flats, & many do not check tire pressures regularly. Excessively worn rear tires are, for sure, a factor.
Until I get some sort of definitive answers/replies from motorcycle tire manufacturer's or others who have actually done testing, I leave my speculations & ideas ....for you. I suggest you don't ride in the middle of the lane, don't ride on shoulders of the lane, keep your tires inflated ...and inspect them regularly. A fair amount of flats occur from small nails, screws, etc., that have been in the tire for some time. Consider installing a mud flap at the rear of the front fender; and, the front of the rear fender (BMW has offered both types of these).
Getting a front wheel out of your Airhead:
1. Read the next section first.
2. Bike on center-stand. If front tire is touching ground, use a board under the center-stand.
3. Unfasten front wheel (and brakes, etc., as required) and remove. DO NOT hang hydraulic brake by its hose!
Getting a rear wheel out of your Airhead, various methods for access:
Method #1. Bike on center-stand at curb, rear wheel hanging over curb.Method #2. Bike on center-stand. Tie center-stand to front exhaust crossover pipe; OR, to the front engine mount (both sides). SECURELY! Use extra strong bungees. USE TWO to reduce chances of problems! Remove front wheel. You will have to undo any disc brake caliper(s) that prevent the wheel from removal. Hang caliper(s) via a bungee, NOT by the hose, which could permanently kink the internal tiny thin hydraulic plastic tubing, and ruin the hose, by causing a one-way valve, etc. Put gloves on ground. Slowly tilt bike forward, so forks rest on the gloves. You now have the rear end of the bike WAY up in the air, and PLENTY of room to work. If you plan on this Method #2, consider ahead of time how you will deal with it, and obtain the necessary tire repair tools. I have found that solid rubber (not woven cloth covered) bungees like truckers and others may use, of proper length, and modify the hook ends if need-be, are good, particularly if you have them fastened to the front engine mounts. I use the center-stand cross-piece for the other end. LOOK, SEE, TRY, before you have an on-road problem!!!
3. You may find that the wheel does not come out, even on an angle, unless the front end is lowered, or the center-stand is used with a board underneath it. That is common if you have a Reynolds Ride-Off center-stand; so, put a board under the center-stand. It is also common with an oversize front tire. If you are careful, you can remove the wheel all by yourself by tilting the bike a bit to the right, while getting the wheel out. It helps if the tire is fully deflated. Some have gone so far as to lay the bike on its right side. In a touring situaion, whatever it takes.
4. If you have tubeless tires, you probably will repair the flat tire temporarily with a plug or sticky string, etc. In such a situation you probably will just have the bike on the center-stand and have easy access by lifting on the bike a bit so as to allow rotating the tire, transmission in neutral. If you have a ride-off stand, you may need a board under the center-stand. SOME HAVE MADE ADAPTOR TOOLS (2), ONE TO FIT EACH CENTER STAND LEG, THAT DOES THE SAME THING AS A BOARD. If the damage is quite extensive, you could consider removing the wheel & inserting a tube. An internal plug/patch (on the inside of the tire) is the proper permanent repair. Use your best judgment on this. Sidewall repairs almost never hold up. You are not really suppose to ride at any speed with an external plug. Steel cords tires can cut inside or outside plugs, over relatively few time/miles; and it is best to ream the hole a fair amount with your abrasive tire tool.For serious work, such as repairing a tube, or installing an INternal patch/plug, 'breaking the bead' (getting the tire bead removed from the inside rim bead area) is necessary and THIS IS OFTEN NOT EASY. You must have the tire totally deflated. You can try the weight of one side of the center-stand; or side-stand; I think those things are iffy for most riders. I prefer a real tire bead breaker. You CAN carry a multi-piece bead-breaker, that assembles easily, and usable by the side of the road. I suggest the following product, and it is a LOT better than the modified C-clamp that I used to carry, all-things-considered:
https://bestrestproducts.com/product-category/beadbrakr-tcm/
There is ...or can be... quite a difference between fixing a tire with tube, versus tubeless; and, between various years and models; how equipped, etc. The appropriate procedure for one's particular bike can vary a bunch. Those with tubeless tires will most likely not remove the tire/wheel when on the road, the flat is almost always the rear tire, and tubeless repairs (for the short term, yes, some never re-do it properly with inside plugs...) are relatively easy, with the wheel left in the bike. In the rare instance of a serious sidewall problem, which cannot be repaired, you may have a quite different situation. Some have put Slime or whatever into their tire, or tubes, depending on if tubed or tubeless. It may work, it may not, but it can create a mess. Some types of tires are the devil to spoon on and off when brand-new; and the reverse can be just as much fun when out on the road someplace. There are plenty of riders, even Airhead riders, who have never repaired a flat when out and about...or, even in their garage. If contemplating a ride into the boonies, it is a good idea to find out how to deal with a flat tire on one's own bike. Doesn't hurt to absorb knowledge about others' fun and games. You need to know what to do, and what is safe. For example, if you use the remove front wheel method and your center-stand strapping fails, you will find it extremely difficult to get the motorcycle back onto the center-stand. On some motorcycles, the rear fender can be rotated easily. On some, laying the bike on the right side is best, and I have seen instances where a right side saddlebag and/or front crash bar are of great help. KNOW YOUR BIKE!
Tubes, conversions, tire sizes, hints:
The purpose of the single outside valve stem nut is to help installation of the new tube. After installing the new tube & inflating the tube/tire (making sure the stem is sticking straight out, not angularly), the nut can be thrown into the junk box, thrown away, or moved up against the cap. I seldom to never throw anything away! ...unless it is totally, forever, worthless! I find uses for things, often MUCH later. Just do NOT have that nut down against the rim. If it was against the rim, & if the tire should shift a bit on the rim during a serious flat situation, the tire could try to rotate the tube, and rip the valve, and destroy the tube. It could allow very fast air release. Having the nut at the rim does not allow for ANY tire/tube movement, not a good idea (BMW had bulletins to do just exactly what I am saying ...NO NUT AGAINST THE RIM). Later in this article are some inexpensive small tire tools described and illustrated, that will be of use to you, one of which is rather helpful when combined with using the outside stem nut.
Be sure you put a decent amount of TIRE talc on your hands, several times, so you can transfer that TIRE-type talc all over the tube and inside of the tire ...the inner tube must be able to move about, normally, not have folds upon itself, etc., hidden during installation & inflation. The inflating, then deflating and bouncing the tire, and then re-inflating, is done to help eliminate dangerous folds in the inner-tube, and the talc makes that work much better. More on this a few paragraphs below
Some folks have modified the 8 mm hole in the snowflake tube type rims to 11.5 mm, and possibly otherwise modified the that hole inside, typically flattened it some, so that larger tubeless stems can be fitted, for using tubeless tires without running tubes. There are also metal valve stem styles available that fit the original 8 mm hole, but definitely need a flat inner surface (these incorporate a base rubber O-ring seal), and I think that type are preferable for these purposes. BMW and others sell them. More on them later herein. These don't always fit properly, nor seal properly unless the rim conversion is done quite properly.
If you have a hole size conversion involving a larger hole & then revert back to tubes, I suggest you do not just use a piece of old innertube or similar flat rubber to seal the inside. Use a curved metal washer, shaped properly; they are available, or make one. Use of rubber could cause a real air seal thereby not allowing elimination of trapped air between the tube & tire, leading to causing chaffing of the tube in operation.
Some have cut off a 'rubber doughnut' portion, by modifying an old car-type tubeless rubber stem. They then use the rubber piece to seal the m/c tube at the rim, with a washer & nut. This also seals, but keep in mind all caveats and possibilities. You don't want a tube failure from excessive tube/tire rubbing.
Anything done besides the original stock method means you are on your own, safety-wise and performance-wise. Think things through carefully!
For those who use inner tubes: Obtain REAL tire talc (no oils in it) and REAL tire vegetable-based lubricant (thin it per instructions). These are available from tire distributors and auto repair stores. You might want to obtain a couple of 6 or 8 ounce plastic bottles like used for certain hair and other products, and put some talc in one. Put some thinned tire lubricant in the another (I like the flip nozzle type plastic bottles). Keep them on your bike with your tire repair items ....or, at least someplace handy.
If using tubes, you will need something, perhaps a big C-clamp or bead-breaker or whatever you use to break the bead from the rim. Those withOUT tubes may decide to not have a bead breaker, and not install inside plugs. I have suggestions in this article for compact bead breakers that work very well. Consider a spark plug hole type of compressor adapter. Take patches or plugs as needed. Tubed folks should consider carrying a spare rear tube and possibly one for the front. Often tube size can be selected that will work for both front and rear tires, even if they are several sizes different ...as on a tour the idea is to not get stranded. Some tubeless-using folks carry tubes. Some (me too!) may want to use the guts, modified slightly, of one of a cheap 12 volt compressor such as sold at WalMart, etc. They DO work just fine. I LOVE those modified 12 volt compressors. Custom cased versions using the similar Chinese-made pumps are available from motorcycle shops, etc., often at very considerably higher prices. Some of those Chinese-made compressors are now quite small and are sold cased. Slime, and other brands, sell them. Look carefully before purchase. MOST will use largish alligator clips on the power leads. On some bikes, getting to the battery terminals and using the large alligator clips is a problem. You may....or may not....decide to install a BMW style DIN socket.
ALWAYS replace tubes when replacing tube-containing tires. This advice from tire makers, etc., is quite sound.
SOME say to never patch a tube, only use new tubes. I have done both, but replacing a tube anytime the tire is demounted after the tire has been on the road, is probably the safest thing to do, if possible. There are several good reasons to replace a tube when replacing a tire, including a used tube being weakened by use. A used tube will not refit weakened areas into the same 'grooves', on the inside of the tire, and some tires have those molded ridges rather prominently. Tubes that fail from being re-used, and fail at those thinned ridged areas often do not hold up to patch repairs. The inside of a tire may or may not have those ridges, but the tube will still have weakened areas. The best tubes are natural rubber based, and these resist long tears/rips better, but they also are slightly porous, so they leak, although very slowly ....another good reason to keep an accurate tire pressure gauge in your tank-bag, or wherever on the bike. There is a lot of confusing information about Natural Rubber tubes and those 'not so'. The truth is highly mixed-up, and both the Natural and Butyl/other tubes just vary in their percentage of ingredients. But, the easiest way to think of this is that ones sold as natural rubber types ARE less prone to rips and tears. I recommend you not use thick competition tubes.
Almost all tires marked as TUBELESS are actually OK to use with tubes. If not sure, ask your tire distributor, although many motorcycle places that sell tires know almost nothing about the finer details. This generality about tubeless usage is NOT necessarily true for radial tires. There are now some radial tires designed for old classic motorcycles, even in sizes that will fit your Airhead. Tubeless tires containing tubes should be speed limited ...to less than the tire rating. The rule of thumb (and, from some tire manufacturer's) is to reduce the speed rating by one position. This is because adding a tube causes more heat from the flexing. You also can expect tread life to decrease with a tube. There seems to be some evidence that using a tire withOUT a tube on tube type rims will extend tire life, due to less heat buildup. BUT, zero information on if performance suffers due to the possibility that the tire does not operate in the designed temperature range. I think all of this highly speculative and can mostly just be forgotten. ...or tucked into the 'around the campfires discussions'.
Some have run tube type rims using tubeless-type tires. I have an article on that situation, and many others, with a wide variety of rims discussed. https://bmwmotorcycletech.info/section6.htm
It is not commonly known that H rated tires may last longer at reasonable speeds & loads, as compared to V and higher rated tires. This is especially so with the same make and model of tire. Sometimes this is purely the result of the lower rated tire having deeper tread. Deeper tread squirms more, and generates more heat, so for higher speed rating, the manufacturer may reduce the depth of the tread. So you might have the situation of purchasing a high speed rated tire for whatever reason (not speed!, on an Airhead), & find out it costs more and lasts less!
Even slightly larger tires or tires of different profile ratio will change the handling of your bike, you may or may not like the difference, if you notice it. You might chalk it up to 'new tires', and get used to them. In some instances a larger front tire in a faster handling type (the Metzeler ME33 was an example here, long ago), will return to more stock-like handling, but last a bit longer, and may handle better or to your liking when pushed hard, rather than the smaller, stock size. Typically, the handling is still decent-enough if the front tire is up one size and same for the rear tire. DO NOT expect more 'grip' from a larger tire ...that is unlikely, mathematics & testing proves it. This is particularly so on slippery surfaces. For the rear tire, increasing the size may help with load carrying ability of the bike, but going too far may cause the rear end to effectively change the front end handling too much. Mostly, a larger tire gives more mileage, at a cost in handling feel.
Some early Airhead front fender braces do not allow for wider than stock size tires, and a later brace may work. This is a COMMON modification. This is covered in my tire article.
BMW has shipped tire rims with rim widths from 1.85 to 2.75 inches for the tube-type Airheads. Some tires are too wide for fitting, safely, to the narrower of those rims, and the tire might have an excessive rolling-over-the-rim tendency or feeling in cornering. Don't try to measure a tire rim exactly, there is not a quite specific place you will see for doing that. Don't believe me? ....then, next time you remove a tire, look on the rim for the rim width size ...and then try to figure out just where the measurements were taken.
A larger tire may not fit the rear swing arm, especially pre-eighties Airheads. But, this can be true on some tires on early eighties and even later bikes. A spacer may be required (BMW sells them for this purpose). On the Airheads that specified a 4.00-18" rear tire, generally a 110 rear tire will fit, 120 may or may not, and the same for 100 on the front. Trying to fit Enduro tires, even in the stock size, example 4.00 x 18, may interfere MIGHTILY with the swing arm.
Tires expand in WIDTH as speed rises. This is the reason that a rear tire may fit with some clearance to the swing arm on your Airhead, yet rub at speed (you usually will smell it!).
Front tires of 90 or 100 section or 3.25 or 3.50 are quite usable (handling will change slightly if not stock size). Same with rear tires of 4.00, 110 and even 120 section, on all the earlier Airheads that came with 3.25 front and 4.00 rear. Some 120 tires are too wide to fit without rubbing. Often the rubbing occurs only at high speeds. The 10.7 mm wide spacer (stock is 9.2 mm) used at the right side of the rear wheel, part number 36-31-2-301-737, is usually not needed on 1981 and later twin shock models, when using the 110-90 x 18 tire, but sometimes it is with the 120-90 x 18 oversize rear tire; especially with 1981+ models. The 110-90 x 18 rear tire fits most Airheads. Unless you have real reasons, such as very high loads, the 110 size tire is likely the way to go if you want a metric tire instead of a 4.00 inch tire. Rear tires usually must be fully deflated, and messed a bit with, to remove or replace over the brake drum rear ends; sometimes with the disc brake rear ends, even though the caliper can be moved out of the way. It can be helpful to cut the rear fender sides on a smooth curving angle, from the license plate area up and forward, to help tire removal. Those with /2 bikes with hinged rear fender may smile at reading that. Comments about the 129-90 x 18 tire rubbing the swing arm do NOT apply to the late model Monoshock RS and RT Airheads, after all, those bikes were designed for that size tire (they also use 2.5" rims, not 2.75" rims, like the twin-shock Airheads do for the older RS and RT). The 120-90 x 18 size tire works best on the wider 2.75 inch rim used on the twin-shock RS/RT models (typically 2.75 inch marked rim or "C" on disc brake models). But, that brings the tire closer to rubbing. The 120 tire will work on the 2.50 rim on the drum brake models. I do recommend that you use the stock size tire, or use a 110, instead of a 120. It is probably better to use a 110, unless you know and for some reason insist on a 120; know the 120 will fit OK and not rub the driveshaft tube, nor perhaps the disc brake stay....at speeds of 85 mph this has been known to happen, even on later 1981+ bikes not needing the wider right side spacer. If you have to move the rear wheel to the left with a wider right side spacer, you MIGHT, in some situations, need a flat washer between the disc brake caliper cast holder, and the left side top hat spacer, and might have to play with the brake stay a bit. This is very simple to do.
For instances of tire interference, at rest or at speed, the 'disc brake stay' can be easily offset, and a washer used between disc casting holder and the left side of the wheel. It may well be best to just use a 110/90 size tire, only a very FEW 110 are too wide to fit all the Airheads.
There ARE some 4.00-18 tires that will not fit the rear twin-shock swing arms, these are usually Enduro tires; but often can be made to fit by using a wider top hat spacer of some sort on the right side of the rear wheel, that is even wider than the -737 spacer mentioned above. There IS a wider spacer available, you will find information in the following article: https://bmwmotorcycletech.info/wheels.htm. Since the twin-rear-shock models have a splined coupling at the rear drive and the wheel cup has splines to match, change to a wider spacer, or vice-versa, may concern you. It is usually not very important.A flat-worn rear tire is the most common cause of high speed INstabilities ...REALLY!! My instability article gets way deep into this.
On the front, the stock 3.25-19 tire can be substituted by a 90/90 or 3.50 or a 100/90. Some oversize front tires will not fit due to fender/fork brace interference (later braces were wider, & can be fitted), but other airhead braces or modifications can be used. The larger size tires generally give a more stable feeling, but are not quite as quick handling. Remember that tire profile varies with size. In some cases, such as with a Metzeler ME33 tire, which is quicker handling due to design, going to an oversize front tire seems to make the handling exceptionally nice. After 1984, in general, the stock size tires seem to work best, all things considered.
The classic BMW handling is had ONLY with the exact original brands, sizes and styles of tires. Unfortunately, this also means that for classic BMW handling, you have original shocks, springs, etc, ....AND....in good working condition.
Removal and replacement of tires is vastly easier if the tires, and tubes if used, and the wheels, are placed in sunlight on a warm to hot day, and allowed to heat up quite considerably. It is very helpful to have three tire irons, two can be the standard shorter ones from BMW, and one should be the longer available BMW one. You can also use aftermarket tire irons. Real water-based flaxsoap type of tire lubricant is considered a must, for me.
Do NOT pry on wheels with the discs laying on the ground ...discs must NOT have pressure placed sideways on them.
Gasoline is NOT an appropriate tire lubricant, and neither is common soap, saddle soap, nor anything else (well, almost ....'personal' lubricants, water-based, are OK). REAL tire lubricant is a vegetable product, made from FLAX, and is water soluble, and does not dry slippery.
Balancing? MOUNTING; MORE HINTS:
Whether or not tire balancing is any big help, meaning worth doing, especially if you are paying for it, is debatable. It certainly is worth the effort and cost if the assembled wheel/tire is quite far out of balance. It almost always is helpful for moderate to high speeds. The better brands USUALLY have tires that are quite well balanced as they come to you, and they may have color markings for the best balance during installation. Those who do a lot of miles and do their own tire work WILL likely want to invest in a tire balancer. Some no-cost one's can be built, and one of many such types is described on the https://airheads.org website, but something like the Telefix balancer may really be worth the money. The tire balance mark, usually a color dot, goes next to the valve stem. If two dots, usually the red is the balance point. There are 3 hole, 4 and 5 hole adaptors available for the Telefix balancing stand for the single rear shock airheads and K bikes. Balancing can help, can certainly weed-out (or fix) badly made tires, compensate for imbalanced wheels; and if the imbalance is over 20 grams or so, can improve your ride; ...BUT.....you may want to THINK about the costs, although quite low or moderate, for you to own balancing tools, versus your tire seller/installer/etc., charges for adding balancing ....versus your type of mileage. You may want to consider your labor involved in changing and balancing tires you purchase directly. I prefer to own and use tire balancing equipment. I prefer the Telefix stand STYLE; a picture of that stand is in Anton's, below linked article, but the stand has the Metzeler name on it. In fact, my old Telefix stand was purchased from Metzeler! Metzeler probably no longer sells them?For Classic K bikes & Monoshock and Paralever Airheads too; I have, for a long time now, used a Telefix type of stand and an adapter that fits the wheel. I have a thinner "axle" with cones, for use on the Airheads that are twin-shock type. That thinner axle is still larger and more beefy & does a better job, than the Harbor Freight item, which also does not have the nice movable and rotatable cones, at least not the last time I looked at them.
I think that for most folks, whether or not to balance the wheels and tires, is not all that cut and dried. I do know a few folks who are very anal about how smooth they can make their motorcycles. These folks purchase quality tires (such as by Michelin); maintain their bikes well, and always balance their tires.....and they RE-balance the tires after they are well-broken-in. Yes, tires can change balance after they have been in use ....they tend to do this only once.
Here is an edited version of something I posted to the IBMWR.org tech list:
Anton Largiader put a page on his website http://largiader.com/balancer/ discussing SEVERAL of the various balancing jigs/methods, applicable to K and Airheads too, and there is certainly even more information available in the ibmwr.org archives and other articles you could find. Anton's site has dimensions for some adapters, etc. You can also purchase balancing equipment such as a stand, a round 'axle' (and cones for Airhead jobs), and an adaptor that fits 3, 4, and 5 bolt wheels. I think, considering what dealers charge to install and then balance tires, that a really proper balancing stand will pay for itself if you ride much. There are some simple methods using string, etc., that work; but, in my experience, they are not as good....and, I find them a PIA to use, compared to the real stand types. I have also used a motorcycle type high speed balancer in my BMW shop, but found that it did not work much faster; was not hardly much better in actual on-the-road tests, as the static Telefix stand (Metzeler)type.
A long time ago, Harbor Freight sold an adaptor for use on its own balancing stand, applicable to other stands too, but the adaptor is, to my best present knowledge, NO LONGER available from them; it was also a bit crude in the hole threading, but usable ...especially if you re-tapped the holes (just insert a metric tap, to clean the threads). For the curious, in case they find one someplace, heck, even at a Harbor Freight store, the adaptor was 98490, for 98488 stand, and the adaptor was 3-1/2" in diameter, 1-3/4" high, and had 8 each 1/2" mounting holes, so spaced to fit most all of the wheels. The center hole was smaller than the Telefix adaptor (the Telefix used a larger rod as axle), but the hole diameter could be changed on a lathe to fit whatever size "axle" you use with your particular balancing stand. Note also that the bolts used with the Harbor Freight adaptor had the cones pressed onto the shank tightly. Two additional threaded holes were in the Harbor freight tool, enabling a bit more versatility for various wheels (3, 4, 5 holes). The Telefix, part number 65.10.01.12, was a nicer-made item than the Chinese-made Harbor Freight adaptor, as you might expect; but fit only the older 3 and 4 bolt wheels. It is possible that you can now purchase adapters for any wheel. I VASTLY prefer the Telefix/Metzeler/Handy/etc. brands, over the Harbor Freight product. You will find they do a better job, too, and no axle bending, poor fitments, etc. UNLESS, of course, Harbor Freight has an improved product now.
MOUNTING:
Motorcycle tires MUST be mounted concentrically. If not concentric, the motorcycle will vibrate BADLY. Motorcycle tires are manufactured with a concentric ridge line near the bead, on both sides of the tire (YOU MUST check both sides!) so you can easily see if there is equal spacing all around, using the rim edge as a guide versus those concentric tire ridge lines. It is a PIA to have to demount the tire if it is not concentric and the most common cause for that is failure to use a lot of proper tire lubricant during assembly, AND to have a quite smooth rim ...you MUST clean and then sandpaper the rim and clean it again if not smoooooth .....with a secondary causes being an inflation rate that is too slow .....I will get into THAT later in this article. Wet the lubricant or add more if it starts to dry out. A new tire, after mounting and before being ridden-on, should be VERY thoroughly washed with common soap or dish detergent mixture and a stiff brush & then hosed off really well. NEVER ride very aggressively, especially in cornering, on a brand new tire; rather, allow 50 miles or so. If the tire was vigorously washed, the mileage for this can be reduced some....but break-in includes carcass changes, so break-in is NOT just tire cleaning.
****This information applies to tubeless type tires with or without tubes, and it applies to tube type tires with tubes in them. In other words, it applies to all tires, and tubes. It is well-known that some riders test for the optimum tire pressure by riding, then quickly checking the pressure, to see if it has risen maybe 8 degrees or whatever. The idea is that under-inflation causes a higher rise due to flexing; and, excessive inflation causes a lower rise; and, somehow, the 'correct' percentage or number of degrees of temperature rise will indicate that the tire is running correct contact temperature, for the rubber compound, construction, etc. These tests are not all that useful UNLESS you have the tire makers data, and likely not all that useful anyway, except in true racing, where the rise is totally a different thing, and tire makers work closely with professional racers and their mechanics. ALSO, the surface (black asphalt? cement?) temperature makes a difference, more on that a bit later-on. For non-pro-racing folks, there are considerable variances between common road use temperatures and pressure readings. It is rather considerably effected by the amount of moisture in the air that you put inside the tire or tube. Some use extra dry nitrogen, most do not. If you have a compressor at home, investment in a good moisture trap and cleaning the compressor tank of accumulated water, regularly, is a good idea. When installing a tire, use of tire lubricant, which is water-based, is a very good idea...but; try to avoid getting excessive amounts inside the tire. If any chance of excessive moisture, then after the bead is seated, and before riding off, deflate the tire (the bead will stay seated), fill with low moisture air (or, dry nitrogen), perhaps twice or thrice. Using simple techniques, your tire wear and your riding will appreciate the efforts. Yes, my bike's tires had dry air in them, for my own tire testing; https://bmwmotorcycletech.info/section5.htm. The BEST test for tire pressures is how the bike handles. Manufacturer's recommendations for pressures may well be wrong. This is particularly so if you use BMW's original tire pressure values in the owners booklets back in the seventies. Modern tires need higher pressures.****
It was not all that long ago that tire manufacturer's generally did not want you using over perhaps 50 psi to seat the bead. Most will now say a maximum of 50% over the maximum pressure molded into the sidewall. Even with lots of tire lubricant, I never go over 60 psi. Going much higher than 60 CAN BE QUITE DANGEROUS, although BMW themselves allowed 67 psi in a SI bulletin. Be careful, use safety equipment & I recommend you DO NOT go over 60 psi! Less is safer! Use LOTS of tire lubricant on the tire bead. Have a CLEANED & SMOOTH rim (edge and inside) ...and everything HOT from being in the sun for quite some time. The tire expands in the sun, helping immediate inflation seating ...but, also, the tire MAY continue to move slowly upon the rim, seating itself concentrically, after several minutes of sitting in the sun, well-lubed, inflated ....so be patient, and ...again ...the use of proper tire lube is a BIG help (flow the lube onto the bead during the initial assembly & during the inflating). Occasionally you must demount and remount a tire .....but this is VASTLY less often if you use my high flow inflation techniques with proper preparation of rim bead cleaning ...and proper tire lubricant. When a tire is properly seated, the molded-in concentric ridge line near the bead, on both sides of the tire (YOU MUST check both sides!) is even, everyplace around the tire.
FOR TUBED TIRES:
Once the tire is fully inflated, and the ridge lines look concentric on both sides of the rim, the tire is then fully seated at the bead. It is now a very good idea on the tube-containing tire to THEN FULLY DEFLATE the tire (it will not come off the bead-rim), bounce it a bit (upright, turning it & bouncing a few times in different spots). Then re-inflate it to NORMAL pressure; or, to maybe a few pounds extra, to allow for settling-in over the next day or so (that is a good idea for tubeless tires too). ONE of the reasons you got your hands coated with tire talc and rubbed it all over the tube outer surface and the inside of the tire, is because bouncing, deflated, will tend to let any tube irregularities inside smooth out when you initially inflate; and then, after the bead seats, deflate and refill again with compressed air.
HINTS & SECRETS:
Many a person has tried, without success, to get a tire, properly located in the middle of the rim, to fully seat to the rim EVENLY all around (those concentric molded lines thing) during inflation, ......even after a thorough rim cleaning and smoothing and use of lots of real tire lubricant, and even with the tire/wheel ...and tube, if using a tube ...all being quite hot from sitting in the sun. Some modern tires can be quite difficult to bead-seat. There are trade secrets to always (usually) getting the tire to seat its bead properly. Many of you will not have the proper equipment, and will have to use the air chuck at a Service Station. But, I will make some recommendations below that really DO help!
Your compressor should have a substantial tank, 5 gallons or more being fine, 2 might be barely OK. Have the air tank filled to 100 to 125 psi, or whatever maximum your compressor can safely do over 100 (check your compressor/tank rating), the more the better. It is important that the air chuck NOT HAVE ITS CENTER PIN. You need to remove it! That allows a FASTER flow of air from the chuck. Even more important to ensure a FAST flow of air is to REMOVE THE TIRE/TUBE VALVE CORE. Doing these things with a well-lubricated tire, and a very well smoothed and clean rim, and with real tire lube, will usually ensure the tire snaps into full concentricity NICELY! You will have to hold the pin-less chuck against the tire stem while you quickly open the air outlet valve on the compressor. It is the SPEED at which you inflate that is so important (assuming a lubricated hot tire and reasonable air availability). Having the tire and wheel in the sun, and thus HOT, is also a BIG HELP, together with tire lubricant, in the bead slipping over the rim edge and into proper position. In some instances, you may have to drill out the pin-less chuck, or change hoses to a larger inside diameter, etc. Check your equipment for all places where the inside diameters might be too small. These things became THE answer in my shop to inflating even difficult to mount tires, so they are fully properly concentric. If you are using an extremely long hose, certainly that is if in excess of 25 feet, then get a shorter one, and, again, get one with a large internal diameter, and the fittings should also have large diameter holes. If your fittings have small holes, you may be able to drill or otherwise machine them larger.
The heaviest part of a snowflake wheel is ...or may ...be marked near the rim with a CIRCULAR STAMP. Put that marked spot, which is the heaviest point of the wheel balancing, next to the factory balance mark on your tire, if there is one. For SPOKED WIRE WHEELS, the tire mark goes next to the rim valve hole. If your tire is off the rim, you can, of course, use a balancing stand to check the wheel. In some instances I have balanced the wheel separately; which makes balancing it with the tire mounted easier, or at least better.
Airheads CAN use the spark-plug hole type of air compressor, but this results in a slow fill, and may not work for getting the bead to seat. That type of compressor is for field use. Any possible influx of gas mixture from the carburetor is quite minimal, as these devices use an intake port in the adapter itself. However, since ANY gasoline vapor will rot rubber, at your earliest convenience deflate fully and re-inflate using fresh air. Spark-plug hole type compressors will NOT provide fast enough air flow to inflate SOME brand-new tires to the proper concentricity lines ....but these types of compressors are fine to take on trips ...as is one of the very inexpensive Chinese-made 12 volt compressors.
The original BMW wheel weights of the snap-in-place type are still available, as for Snowflake wheels, etc. ...as are the clips to hold them to the rim. I prefer these to the glue-on/adhesive types, but the preference is not an overwhelming one. Only certain sizes are still available. The below information is subject to change.
|
36-31-1-235-625 5 gram |
| 36-31-1-235-626 10 gram |
| 36-31-1-235-627 20 gram |
| 36-31-1-235-628 30 gram |
| 36-31-1-240-152 15 gram |
| 36-31-1-240-153 25 gram |
|
You will have to hunt for the spoke-mounted type of weights, if you want the original genuine types. Here is what is available from Buchanan's: http://www.buchananspokes.com/categories/miscellaneous_tools.asp |
| 36-11-2-227-943 are 5 and 10 gram segments on a strip, peel-off, self stick. These were originally for R1200C |
| The clip is 36-31-1-235-632 |
NEVER EVER work on a wheel ...especially with tire irons, ...with the brake disc lying on the ground. Support the wheel & tire on 2 x 4's, or use a lidless old oil or grease drum, etc. Repeating a prior caution here, NEVER hang the disc brake calipers by their rubber hoses, you can seriously damage the internal plastic tubing, which has thin walls and is easily damaged. That has been the cause for many a brake pad dragging problem ....& can cause serious overheating and even total loss of your brakes.
Brand-new tires need to be cleaned as mentioned earlier, & need to be run ~50 miles to break them in. Do NOT try tight pushy turns, nor anything but modest speeds, until the tires are broken-in. No matter how you try to speed up the breaking-in process, the tire will need some riding to warm up the tread and properly scrub-in and modify the rubber from the heat generated at the surface contact area. Tire break-in is more than just scrubbing off mold-release chemicals. Riding quite briskly before the rubber is normalized for road use is a poor idea. That is over and beyond that it can be dangerous to not wash off the tire molding release agent, which acts like a lubricant, before riding. This is particularly so if you happen to ride through some water ....the tire can SUDDENLY get very slippery. Detergent in warm to hot water works fast, with a scrub brush.
Failure to have a sealing-type valve CAP on the valve stem CAN cause you to loose air at high speeds, as centripetal force allows the center part to release air (the spring might not be strong enough to prevent that). There ARE high speed Schrader valves available. Best caps are metal, with a tit tool, inside the metal cap is a rubber seal. Second best is a plastic cap, with a rubber seal inside.
After installing a new tire, plan on rechecking your tire pressure the next day, or soon.
Tire Tools, etc.:
71-11-1-237-855 Was a SHORT tire iron, was replaced by -871 which is the longer one. I prefer my on-bike tool kit to have TWO short, ONE long, because you do not need three long ones, and the two shorter ones take up less room in the on-bike tool kit. BMW seems to have discontinued the short -855 irons. In that instance, I'd purchase & carry THREE long ones. There are aftermarket tire irons available that are quite good. BestRestProducts has a kit that contains irons, etc. https://bestrestproducts.com/More tire repair items to carry on your motorcycle:
Type of 'kit' you put together depends on whether or not you have tubes in your tires. While you WILL want to carry a tire repair kit, I recommend against CO2 bottles (of ANY size). They are EXPENSIVE in actual use & not "green" environmentally. You probably will find them to be a PIA and it is EASY to NOT have enough of them along. You might have to re-inflate, have problems seating the tire ...etc. They typically come in 16 & 45 gram sizes. You will need at least several, no matter the size. It can take way too many of the small CO2 cartridges to fill a tire adequately, typically even a handful will only fill the tire partially. Even the larger CO2 cartridges are not adequate many times. If you have to refill the tire if the repair worked only partially in such as seating the bead, you'll likely have no more cartridges. Even the large ones will not inflate the tire properly ....the pressure will be low.
FAR BETTER is a very small 12 volt compressor, see below. Important is something to de-bead the tire if you have tubes installed. I have made tools for this from C-clamps with welded curved pieces on the anvils. Better for most of you are commercial types that are cleverly designed. There are others that are metal & massive overly heavy things to have on the bike. A good one, not overly heavy, seems sturdy, and it folds up and comes apart and stores nicely, and does more than just bead breaking, in fact it INCLUDES the tire irons, etc., is this one, & you may well want to look at it: https://bestrestproducts.com/product-category/beadbrakr-tcm/
Just what you get is up to you. There are some complete kits from various manufacturers, some include tire irons, patches/plugs, glue, a cylinder operated air compressor (via spark plug hole), & they all work OK. You can purchase, very cheaply, under $20, a very small 12 volt electric compressor; remove the innards including the fan, make a plug for it to fit your auxiliary jack ....or alligator clips to go directly to the battery. You can purchase these small low-cost compressors at such as WalMart. If you want to, you can remove & dispose of the case. WalMart also likely has really small-cased versions that need no modifications except a BMW accessory plug (if you want that). Coleman and SLIME also sell very small compressors that do not need the case removed, and they have gauges! I've seen them at WalMart. All of these types of compressors ...spark plug hole ...or electric ...are far better to have than the near-worthless BMW hand pump that fit on the rear frame; and, also much better than CO2 cartridges. The electric compressors are also available for lots more, perhaps $80, mounted in a modest sized can/box. I think them a waste of money; but YOU MIGHT NOT, and the BestRestProducts.com is a good one. For ideas on tire repairs ...see: https://www.stopngo.com/ & https://bestrestproducts.com
StopnGo external plugs don't work exceptionally well with steel corded tires, but if you ream the hole really well on those steel-corded tires, you can use them, but be prepared to replace such a plug on steel corded tires if on a long trip. IMO: A tubeless tire that does NOT use steel strands in the tread is more likely to have a LASTING on-road repair from use of sticky strings, or certain types of external plugs. This is particularly so if you are using such as the Stop'nGo slippery mushroom type of plugs, which require a lot of reaming of punctures in steel belted and steel ply tires. Conversely, NOT having steel strands in the tread MAY make tires more conducive to punctures ...but I have NOT seen any studies. I have not seen advertising getting into this subject.
Be sure, if you use the cylinder spark plug hole style of compressor, that the compressor hose is long enough to reach each wheel; and, if using an electric compressor, be sure the electrical connection and hose is long enough. Nearly every one I have ever seen was long enough.
Many motorcyclists have never repaired a flat, nor have they ever changed a tire. Many have never seriously considered the consequences of having a flat while on the road; especially if out of cell-phone coverage. It can be critical to know how to do the repair if in some areas. Perhaps an equal number of motorcycles do their own tire repairs, tire changes, balancing, and wheel bearing service. A LOT of $$ can be saved by doing your own servicing. Knowing it was done correctly is an added plus. Knowing how to do it yourself if stranded in a remote area is a really good idea! I REALLY DO SUGGEST YOU PRACTICE.
In the middle area of the photo below is my own modified C-clamp tire bead-breaker, note the welded-on shaped plates on the jaws/anvils ...yes, hard to see. The welded-on plates are shaped on one edge of each to match the circular portion of the wheel rim, so as to have good wide contact with the tire bead at the rim area. The C-clamp has been moderately lightened by drilling holes in it; much more lightening could be done. This type of modified C-clamp could be taken along with you on your rides; or, a commercial biker's type, see https://bestrestproducts.com. Those with TUBELESS tires NOT containing tubes normally do NOT take any type of bead-breaker on rides ....but you may want to take along some sort of strap or rope that fits around the circumference of the tire, in case of bead seating problems during trying to re-inflate, if the bead became unseated. That usually does not happen. Some have used a waist belt or 2.
Fix-A-Flat, as shown in the photo below (or similar brand of goo like Slime) is NOT overly practical, and perhaps should NOT NORMALLY be used. These sometimes work on tube tires, but may work better on tubeLESS tires. Fix-A-Flat and similar makes a mess inside the tube/tire/wheel, OFTEN do NOT work (particularly tubed tires), often prevents a patch from sticking if you are forced to try that later .....and if the stuff does work, it often fails shortly thereafter. One should NEVER have a dealership repair your tire without first telling them that you installed such stuff. You will NOT like using solvents and rags to clean out your wheel if YOU are doing the tire job. Most dealerships will NOT be happy finding out that your tire/tube/wheel has that messy stuff in it. Cleaning it out takes time. Time is money, ...out of YOUR pocket. SOME do carry these cans of pressurized goo for emergencies, and have had decent results. It DOES give added protection if you are doing a tubeless repair, particularly with steel-belted tires, or any tire with steel cords.
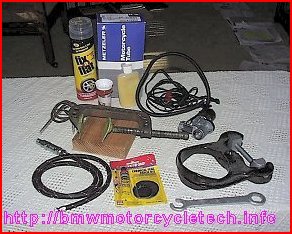
At the lower front in the above photo is a common patch kit for a TUBE-type tire. The patch kit contains patches AND A SMALL TUBE OF GLUE. BE SURE you check your glue tube now and then....even if has never been punctured for use, they have been well-known to dry out. Put the Check Tire Glue onto your bike regularly scheduled service list. Some folks replace those glue tubes yearly. Others, LIKE ME, purchase a larger container, usually a small metal can with a brush inside the screw top, and check it every year. I even go so far as to add a small amount of the proper solvent every time I open the can to check on the stuff's condition. On my Alaska trips I made very sure that my entire tire repair kits were in top notch condition, and even I practiced doing repairs. One of the very first things I learned, the hard way, was NOT to keep the repair items where I had to first unload a lot of the things I had packed on the bike!
I have not shown a kit for tubeless tires ....see information later in this article. I found sticky strings ("worms") to work OK, but carrying some glue was a good idea. I also have not shown any BestRest products, as you can use the link:
https://bestrestproducts.com
At the top middle area of the above photo is a package containing a new spare inner-tube. For most bikes, with not hugely different front to rear sized tires, you can use a front or rear tube at front or rear in an emergency. It is usually OK on our BMW's to carry just a spare rear tube, rather than a front tube or both. Also in this photo is an old pill bottle that contains real tire talc (REAL tire talc contains no oils that rot tubes); needed for tube type repairs. To its right is a plastic squeeze bottle with flip lid; one can use any sort of these flip lid plastic bottles, such as from hair styling products, and this particular bottle is partially filled with REAL tire lubricant liquid, made from properly water-thinned concentrate. Some use thinned soap, I vastly prefer REAL tire lubricant, which actually is 'flaxsoap', which is not "a soap" as you would normally think of soap. Auto-parts stores carry real tire lubricant in tubs (thin per the tub-printed information) ...one tub will last several lifetimes for you and several friends; so share your 5 pound tub with your buddies. "Personal Lubricant" also works well.
Note the electric air pump with hose & electrical cord (I removed and tossed the original large plastic case before taking this photo). These are available very cheaply, often less than $20, from such as Wal-Mart, etc. The large outer plastic case is removed, and the small fan removed by cutting the shaft with a Dremel and disc, or similar tool, & alligator clips as shown or perhaps a BMW accessory plug attached at the other end. The current drain from the battery is fairly low for this item. Some of these pumps have air pressure gauges which can be utilized, or not. Motorcycle batteries larger than about 10 AH are capable of running these small electric compressors to fill quite a few tires (even the low capacity lithium batteries sold for bikes will refill one or two) ....and still start the engine. These cheap little Chinese compressors also hold up better than you may think. Some folks are packaging these tiny piston compressors in a metal box, and selling the boxed compressor for $$$. These electric pumps are now available in a SMALL package; previously they were not ....this article has photos of them, half a dozen or bit more paragraphs below.
The engine-driven type of pump is at the lower left in the above photo;...these come in kits including various sizes of spark plug hole adapters. Only the 14 mm spark plug adapter is shown in the photo, as I had no need for the other sizes. Many overlook that these adapters have slits in the side, and it is outside air, not air-mixed-with-fuel from the carburetor, that primarily fills the tire. Above it are two coiled-up Sash Rod springs, available from any hardware store. Those two springs, when you need to use them, are wrapped around the engine cylinder and spark plug metal body, so that the removed spark plug, with its electrical cap attached! can be held to the cylinder fins, to avoid injuring the ignition system during the one-cylinder operation of the Airhead engine. If the spark plug was just laid on the engine, it could fall off, and produce an open circuit, causing a lot of $ damage to the coil(s), that might not show-up immediately. On the 1981+ models you can additionally damage the Hall device in the ignition canister, and even the ignition module under the fuel tank. Damage may not show up right away! ...so USE THOSE SASH ROD SPRINGS on the metal body of the spark plug, fastening securely to the cylinder fins.
The lower right area in the above photo has a weighty and heavy duty tire bead breaker. You'd be UNlikely to take this one on the bike due to its weight, which is MUCH higher than it looks ...but it is OK for the home shop that does occasional tire work. In front of it is a modified wrench to operate the nut of that bead-breaker, although any common open-end wrench would do. There are many versions of bead-breakers for motorcyclists; the one shown here is much too heavy although smaller than the one two paragraphs below. I had no good use for it.
I vastly prefer, for my own home shop work, a floor type bead breaker. Just below is a pre-modification photo; similar to those that I've purchased over the years, and sometimes modified for others. This tool is practical for the home or small shop user. It can easily be modified to work well with motorcycle-size wheels by removing the small vertical tab. You may want to extend its tail a bit too. Using it with two pieces of 2 x 4 allows it to be used with single or dual disc brake wheels, without putting pressure onto the discs. The bead-breaker shown here in its automobile usage style, not yet modified; ....is not expensive, often available from such as JC Whitney; or other stores. There are motorcycle specific versions of these, most are OK.
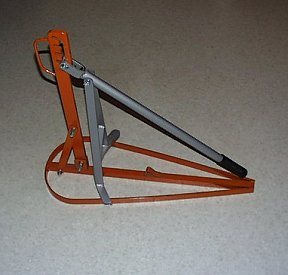
Some folks use one side of the motorcycle's center-stand to break the bead area, but I have never liked that method, being a small person. The worst part is that it can injure disc brakes. If it works for YOU, then you need NO tire bead breaker. Keep in mind that putting pressure on a brake disc and disc carrier is a VERY BAD thing to do, you could, and are LIKELY-TO, warp the $$$ disc carrier permanently. If you plan to use the side-stand or center-stand, perhaps carry a piece of wood to keep the disc off the ground, of course, then the side-stand likely won't work well. BTW: If you have disc brakes, do you have something to hold the caliper up, so as to not bend the hydraulic hose, which can damage the tiny inside-the-hose plastic tubing...?? I carry bungees of various sizes.
TEST YOUR IDEAS!
There is a bead-breaker combined with tire irons, a clever, if complicated looking unit, that is called the TireIron BeadBrakR, sold by https://bestrestproducts.com. I have not tried this unit myself, but have heard favorable reports from those that have purchased and used this item. It completely folds-up and is a small package, totally carry-able on your bike.
I do all of my own tire changes (except for the car and car tires on the sidecar rig), & there have been many hundreds (really!) in my BMW motorcycle shop done with three old-fashioned tire spoons + the heat of the sun, talc, proper compressor setup, tire lube, etc. When changing or repairing a tube, or installing an internal patch/plug, breaking the bead is necessary. This is not at all fun when on the road someplace. The answer to repairs while touring is to carry a multi-piece bead-breaker, that assembles easily, & usable by the side of the road. I suggest the following product. It is a LOT better than the modified C-clamp that I used to carry, all-things-considered:
https://bestrestproducts.com/product-category/beadbrakr-tcm/
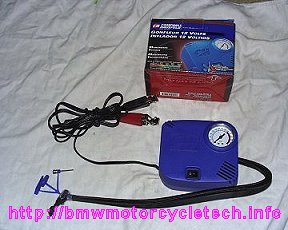
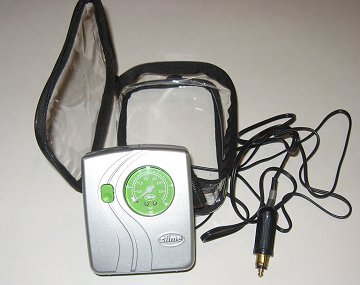
The two compressors, below photos, are small; but, if you want even smaller, you can get one or some other type/style of these Chinese-made compressors, and discard the case and gauge. I did that for the compressor that is a much earlier photo in this article, the one with all the various miscl. tools.
| A small compressor. This one, in its blue package (the carton it came in is above it) came with a standard American cigarette lighter plug, which I changed to alligator clips. $9.99 at Wal-Mart. Note the gauge, which is nice. | Slime brand compressor with gauge. Small, fits easily with tire tools in my Airhead's fairing pocket. Fits some tool trays too, even leaving some room. $9.99, Wal-Mart. I installed a DIN style plug; standard for BMW motorcycle use, instead of the cigarette lighter plug; it plugs into any BMW bike accessory socket. |
 |
 |
For TUBELESS TIRES (no tubes inside) repairs when on the road, you should carry on the bike some sort of tire plugging devices and tools for them. One common brand is Stop'nGo, either the standard model 1075 gun type, or the compact hand unit model 1000. NOTE that the Stop & Go tire plugs are useable for steel belted tires, but with steel belted tires the injury hole nyst be reamed really well, with the tool included, before installing the plug. Failure to do that will likely result in the plug eventually being sheared and permitting a leak. In general, I recommend the Stop'nGo smaller plugger kit, and also recommend you carry BOTH their plugs PLUS some sticky-strings ...AND glue/cement. In egregious instances, having a plugger kit, sticky strings, and extra cement, can be very worthwhile.
There is something hardly ever said, that is favorable for some tires (and, any others similarly constructed): A tire that does not use steel strands in the tread is much more likely to have a lasting repair, from use of sticky strings or internal patch. This is particularly so if you are using such as the Stop'nGo mushroom type of plugs, which require extra reaming on steel belted & steel ply tires. The Avon Roadriders do not have steel plies, and there are many others. Conversely, that makes them possibly more conducive to punctures. Strictly speculations!
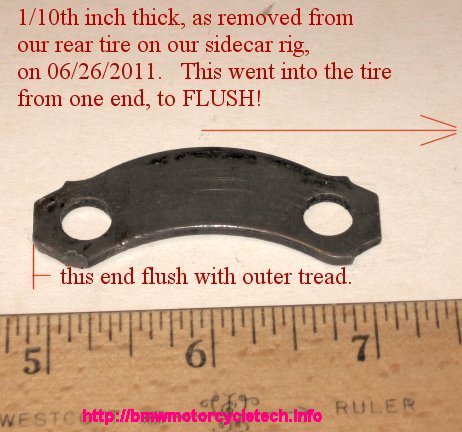 |
I personally have had one exceptionally bad large tire puncture, not a round hole either. I had to use BOTH sticky strings & mushroom plugs. When this nasty bit of metal went into the tire, it did not go straight in, but went in on an angle before it straightened out. I then had a large, rectangular, & truly nasty hole in the tire. Was the devil to get the tire to hold air so we could get home, maybe 70 miles away, in the mountains. Towing service asked for $800 ...NO WAY! I managed to fix the tire enough with sticky tire repair inserts & two mushroom inserts. I carry a tiny electric pump which did fine (see photo of all the tools, WAY above). It had to be used to inflate the tire 3 times from flat, + topped off once, & this is not a motorcycle tire, but a small car tire on my sidecar rig rear wheel. I replaced the tire when I got home. |
Plugs, 'string' type, or otherwise, installed from the outside, are a temporary repair for tubeless tires. You are not supposed to travel far and fast using an externally plugged tubeless tire. Many have done it, but I think it not at all advisable. Many who have bikes with tubeless tires will carry a tube, for emergency repairs, not trusting external plugs. Tubeless tires should eventually be properly repaired with an inside patch-plug ....or replaced. Please keep in mind that if you install a tube in a tubeless tire, you should reduce the tire speed rating by at least one step, as the combination causes more heat to be developed. I think it prudent to consider any motorcycle tire repair, of any kind, to be capable of failure, so ride more gently!
Hints, methods, advice, ideas to consider, etc:
If your fuel tank is approximately half full (or more), I "suggest" you REMOVE the fuel tank before repairs, particularly if you have to lay the bike over onto the ground.
One very popular method of repairing the rear tire on ALL twin-shock airheads (some do it for Mono and Paralever bikes too) is put the bike on the center-stand and then SECURELY! tie the center stand to the front exhaust crossover pipe. Be sure to bungee any disc brake calipers so their hoses DO NOT have sharp bends, especially at the fittings ends. NEVER hang disc brake calipers by the hoses!Remove the front wheel. Tilt the bike slowly forward onto the fork lowers, onto something like your gloves, etc., to protect the fork bottoms. You will now have superb access to the rear wheel.
You could, instead, simply remove the fuel tank, and lay the bike over.
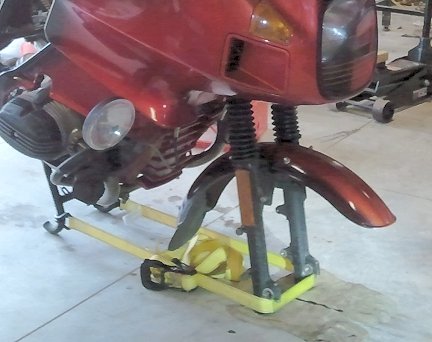
Below are two photos of another method of strapping the center-stand ...here it is to the front forks. Note that here there is no use of any strapping of the front exhaust crossover pipe to the center-stand (or, to the front engine mounts). You really want to be sure that the strapping can NOT come off suddenly. YOU MUST, if doing it this way, or ANY other way, do it such that the bike CAN NOT POSSIBLY fold-up the center-stand rearwards during the lashing operation!
Photos courtesy of Dann Rudd (which I cropped). In the photos below, Dann has the strap around the very bottom below the axle fitment projections of the fork lowers. Be very careful that the strap can NOT come off the lowers. The bike is tilted forward so that easy removal of the rear wheel can be made for whatever servicing needs. Be VERY careful about trying this method.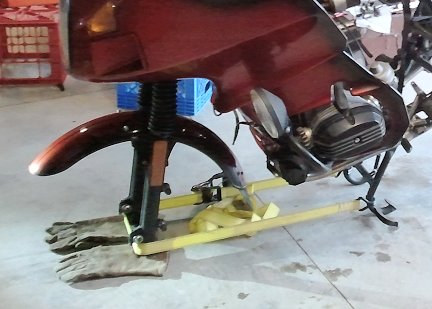
Snowbum would not use the above strapping method when out riding and having a flat rear tire. He uses heavy-duty Trucker's type bungees, between the front exhaust pipe crossover (or, front engine mounts) and the center-stand, then slowly tilt the front end down.
NO MATTER WHAT METHOD YOU USE, YOU DO NOT WANT THE CENTER-STAND COLLAPSING BACKWARDS!
If you carry a spare inner-tube, and the problem is a punctured tube, the repair is much faster if you install the new tube. Use tire talc put on by your hands on the inside of the tire and all over the new tube. This is faster than removing, patching, & reinstalling the original tube. A tube takes up room, and motorcycles don't have a lot of storage room when touring, considering all else you must take along. Don't forget to remove the offending nail, screw, etc., from the tire ...many have forgotten to do so!! Unless your front and rear tires are the same size, or close to the same size, it is really best to have both sizes of tubes. Many carry just a rear, which can be put into a front in many instances (such as 18 rear into 19 front, but not recommended for 18 rear, 21 front).
Some do not carry tire repair items, or have limited items, or install some sort of sealant product into their tires or tubes. YOU REALLY SHOULD HAVE DECIDED, LONG BEFORE ANY RIDE, what YOU are going to do about flats.
No tube that has quite long splits, tears, etc., should be patched, and usually the patch is not successful if huge, on a motorcycle-sized tube.
Both Butyl and natural rubber tubes, with punctures or small tears/slits, etc., are certainly patchable, contrary to some beliefs.
Most people fail to first roughen the tube and clean it properly. Most also slather on WAY too much tube glue (DO check now & then that YOUR glue is in good condition!). They also fail to dry the applications of glue the correct amount of time. They additionally fail to allow a long-enough final cure. All these things can lead to patching failures.
The insides of tires vary between manufacturer's, including differences between models of their tires. A particular variance I will describe here happens on both tube rated tires & tubeless rated tires (which can be used with tubes). The inside of the tire may ...or may not ...have ridges, that you can see and feel. These ridges are on an angle (SUPER-NERDY folks might want to concern themselves with those angles and tire rotation direction, if not marked. Most of the time the tire IS marked for one of several reasons and provides ridge places for the TUBES to press-against, and thereby the tubes deform on them ....THIN a bit to the ridges during inflation. While the ridges do 'capture' the tube to some extent, the over-all long-term effect is a weakening of the tube. That is why NEW tubes are installed with new tires.
****In order for the tubes to properly equalize to the tire, & that includes the movement during normal tire rotation as you ride; & to ease installation, tire talc is generously applied to the inside of the tire, and onto the tube surface too, by one's hands ...rubbing it into the materials ...during tube installation ...including when installing a new tire. This is also why after first inflation using tubes, you are supposed to totally deflate, and bounce the tire around at various points, to help equalize, distribute tube folds (if any), and then re-inflate. Any tube fold left because you did not do this WILL result in serious stresses, and if the stress is enough, a long slit failure occurs. If you remove a tube for patching, & reinstall the tube, it is HIGHLY UNLIKELY to align itself with those tire ridges again. Under the best of circumstances, the alignment is not perfect. If the tube sides are reversed, they will NOT align, EVER. The bottom line here is that the tube has stretched & thinned in narrow but longish areas, where these ridges made tube changes. Thus, the tube is weaker at those areas. Tire & tube makers always say to replace the tube, rather than repair it ....or, they say to always replace the tube with every tire change. Obviously, the implication, and sometimes this is stated, is that a reused tube, patched OR NOT, is less strong. Thus, a patched tube should be regarded as a temporary on-road emergency fix. I completely agree. Remember, a patched tube is not as strong as a new tube, no matter what you read elsewhere's.
HOW TO DO IT>>....including lots of hints. Primarily for tubed tires:
BASICS:
Be sure the tire is fully deflated. REMOVE the Schrader valve core (you do use tire valve caps with the tool tip on them?). Remove the Schrader valve slowly, not letting the valve shoot out suddenly and disappear (carry an extra). "Break" the tire bead on BOTH SIDES of the wheel, being careful of any brake disc. Yes, you can break just one side, and remove the tube, but that can be difficult, and makes it much harder to find and remove the puncturing item, in some instances. If you do just one sidewall removal, do NOT rip the tube with your tools! To make this clear, you are not removing the tire completely, just breaking both beads from the rim ....unless you have to remove the tire. To remove a tube and repair it or replace it, you need only spoon-off one side of the tire, but the other side will remain either onto the rim bead area, or, pushed into the middle of the rim area....it is usually much easier to do a repair job with both beads disassociated from the rim.
PUSH the valve stem (on tubes only) to the inside. REMOVE the offending screw/nail/etc, then remove the tube. Remove the tire, unless just repairing a tube. BE SURE you have removed the puncturing item BEFORE removing the tube, otherwise the tube may be damaged beyond repair.
Repair the tube or replace it. Rub talc with your hands all over the tube; try to do it to the inside of the tire too. Inflate the tube a small amount, just to shape it a SLIGHT AMOUNT. Put the wheel rim on an angle, & insert the tube's valve into the rim hole. Feeding the tube stem into the rim hole can be difficult. There is a tool for that makes it easier. Later in this article I will have some specific advice and photo of the tool. Once the stem is inserted through the rim, put the nut on a few threads. Insert the tube into the tire/rim all around. START spooning-on the tire bead at a point totally away from the valve; that is, at the opposite side of the rim. It is during this spooning-on procedure that many make the mistake of doing it wrongly, and pinch the tube. Be careful, and watch what you are doing!
DETAILS:
1. Tubes may or may not come with a concave washer, and may or may not come with one or two nuts and a cap. The cap, if any, may be a metal type with a rubber internal air seal, or a plastic type that hopefully has an internal rubber seal (none?...get proper cap!). The purpose of a concave washer, if the tube comes with one, is that the construction of the tube valve area is such that the concave washer goes on the valve on the INSIDE of the rim. If there is no concave washer, you do not need it with that particular brand & model of tube ...unless it is missing! A careful inspection of the tube valve stem will usually identify the situation. Some stems and rims require a nut on the inside, and if so, there is likely a second, perhaps knurled, type for the outside.
2. If there is a single outside nut (whether hex or knurled round...etc), that nut's sole purpose is to help you with installing the tube into the rim hole. That nut is put on the OUTSIDE of the rim, TEMPORARILY. When the tube and tire are fully mounted, the stem must be at 90� to the rim. Once it is, either toss the nut, or, screw it up to the CAP. That nut is NOT to be tightened to the rim. The tube stem must be free to move about a bit in the rim; this helps if the tube and rim try to rotate a slight bit to each other, it avoids the valve assembly ripping out of the tube. The stem also acts as an indicator, and if it is not, in the future, at 90�, you know the tube has rotated.
3. If there are two nuts, the primary purpose is to allow use of the tube in a TUBELESS RIM. That is because the valve stem hole in a tube type rim is 8 mm, and for a tubeless rim it is 11 or 11.5 mm. The inside nut is usually a hex type, and the outside is usually a knurled round type. If there is a concave washer AND this second nut, you could use the nut and concave washer inside the rim...yes, both. In this situation, however, I carefully inspect how the tube was constructed, and I may well not use the inner nut. In any case, do not screw the inner nut, if used, tightly down the stem. NOTE that a concave washer may be better to use than an inside nut. INSPECT your tube and rim! I wish I could give you hard and fast rules and photos here.
4. Most will install a new tire on one side, then install the tube, then install the second bead. Be very careful, no matter how you do yours, that you do NOT pinch the tube with your tools! It is even possible to put a hole in the tube in the VALVE STEM area, if the tire bead is trapped and moved about at that point. Take your time to watch what you are doing! It is vastly better, and easier, to do all work with everything in hot sunlight, until quite warmed-up, & continue the work in such sunlight.
5. Any puncture or tear ...that you intend to repair ...needs to be cleaned up, sanded/abraded with a inner-tube metal abrader, & best to do that VERY thoroughly; don't use sandpaper, unless you have a way of solvent cleaning the area afterwards (gasoline if you must). Next clean the area with alcohol or other solvent; gasoline is NOT good here, it MAY have ingredients that MIGHT prevent solid patch adhesion. Gasoline is better than nothing. It is very important that the inner-tube be abraded and then cleaned, otherwise the patch may not adhere well. I well-remember a situation where I was helping a stranded biker with a flat and I was on a tubeless tire equipped bike. I did not have an abrader. We used a rough surface rock, then cleaned with tank fuel!Using one of the repair kit patches, peel off the protective layer, KEEP FINGERS OFF THE ACTIVE STICKY SIDE! Using a CLEANED fingertip, spread the smallest amount, thinnest layer, of the glue goo on the tube, and the patch's active adhesive side. Yes, BOTH of them. BE SURE the patch is covered to its own edge. BE SURE the tube is properly prepared & you kept your dirty fingers off of the repair area and patch active surface. If you can't easily clean your fingers, use fuel. Allow each such application of the tube's goo, in tiny amounts remember! ...to dry. How long depends on humidity and temperature. I suggest several minutes. Repeat the fingertip application of glue THREE TIMES. Use the TINIEST amount, but thoroughly cover the tube and patch, each time.
On the last application, before it is dry, press/clamp the tube & patch together & leave clamped for a day or two if at home. If doing this on the road, try to clamp with some sort of flat wood or ?, as flat as you can; and try to have the patch lay quite flat, particularly at its edges! Allow as much time as your patience allows. When installing the tube, use your hands with TIRE talc all over the tube, and inside the tire. I like to wait a bit after inflating, perhaps 15 minutes or more, before riding on a patch job. LONGER if the weather is cool/cold or high humidity.
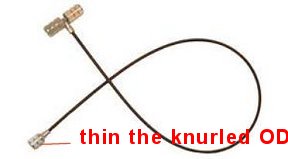
6. Feeding the tube stem into the rim hole after the tube is inserted into the tire may be difficult; especially if the sidewall is quite stiff. The sidewall may need considerable finger pressure, & some may use a small block of wood or a tire spoon to keep the sidewall more open. If you go too far with that idea, the other side of the tire will move & block the valve access. Some have used forceps gripped onto the stem threads to help guide the valve into the rim hole. I recommend you do NOT using any tool that can injure the threads. There is a thin braided steel flex cable tool available, it is specifically for doing this job. It screws INTO the valve stem. Tusk Valve Stem Puller part number 1188500001. Get one of these; try your auto-parts store, if necessary an internet search. These really work nicely for tubes. But, it is not the only type of these tools. I recommend you own both types, see the two photos below; or, at least the second type modified slightly as noted.
Below is another type, this one was for tubeless rims for pulling the common tubeless style of valve stem into place. If you modify it, it will work on tube type rims. The Knurled end of this tool, see photo note, as purchased, will NOT fit through the smaller diameter TUBE-type rim holes; it WILL, if you carefully thin the outside diameter, by grinding the knurled cap a bit thinner. Grind the O.D. just enough so it goes through the rim hole without forcing. If you grind too far the walls will be too thin. Haltec TL-645-24, or Grainger 33510, or similar on Ebay. Get ONLY the flexible cable type as shown here. One of the dual-barrel ends of this tool is to R/R the valve core, and the other end is to depress the center pin of the valve core on an already inflated tire, and there is a small side hole; this allows the air to come out slowly, avoiding you unscrewing the valve core and have it, from air pressure, flying into 'never-find-land'.
Once the tube valve stem is in the hole, using one of these two tools, then put the nut on the stem, only a few threads engaged
7. You will want to line up the painted marking, if you have such on the tire, with the valve, when installing the tire onto the rim (I do it before installing the tube, if there is one), before spooning the second sidewall onto the rim ...this is a good time for more tire lube ...note that tire lube is used on the bead seating area of rim/tire...and, on the EDGE of the tire bead area.
8. If you have to, move the OUTSIDE nut down fully to the rim, & move the tire slightly one way or the other (NEITHER bead has snapped to the rim yet, because you have NOT inflated the tube/tire) so the stem is centered at 90�, in the rim hole. The valve stem should be at 90 degrees to the rim, and, the tire marking(s) lined-up, BEFORE spooning the final bead or inflating.
Do the spooning of the final bead now.
Assuming you now have the tire and rim and tube valve in proper alignment, move the nut upwards a considerable number of turns. DO NOT have the nut down to the rim. The purpose of the outside nut is ONLY to keep the valve from going back inside the rim during your work. This outside nut that is used as a tool can be tossed after installation, or, moved up to the stem cap. I recommend you move it up to the stem cap (after cap is tight), as sometimes new tubes do not come with a nut and I like to have one, in case I do not have the fishing tool, and, it makes things easier even with the tool. DO NOT leave this outer nut tightened to the rim on a tire containing a tube ....even BMW had a bulletin on that. The stem should be free to move about in the rim hole, stick straight out at 90�, and not on an angle, when you have the tire/tube/wheel properly assembled and inflated. You cannot determine if there is any side forces on the tube, unless you have the nut loose, during and after inflation. When done, THEN you can put the nut against the cap. DO NOT fail to use a cap that SEALS well.
From here, the following are mostly hints, and not in any specific order.
9. If your tire is marked on either sidewall that it is to be installed in one direction, pay attention to that.
On BMW twin-disc wheels, the carrier NUTS are normally on the LEFT; which, thusly, identifies the wheel direction of installation.
Many wheels and some discs, are marked for direction.
Whatever your wheel is, consider keeping it that way, or you will need to re-break-in your disc brake pads ...however, there may be reasons to install it correctly, if it wasn't previously.
10. Install one sidewall of the tire onto the WELL-CLEANED inside rim surface first (do smooth the rim edge too), using tire spoons and REAL tire lubricant. Cleaning the rim bead and edge surface is important, do the best you can if on the road. I've carried sandpaper for this purpose. At the least, use gasoline and a rag (careful! flammable!!). A smooth bead area and rim edge makes for easier bead seating.
11. Sidecarists sometimes use rear tires at the front, and front tires at the rear. Sidecarists may mount tires with any direction, disregarding any arrows.
12. Some motorcycle tires now come with molded sidewall information FOR BOTH DIRECTIONS. The tire has mould markings that tell you which direction the tire should be, for front or rear use.
13. Sidecarists and some 2-wheel riders install rubber pieces under the rim where the valve stem sticks through, and rubber on the outside, then have the stem nut and cup washer against that. The idea is that the tire, whether a tubeless type or not, will hold some air, for awhile at least, if the tire/tube is punctured. Normally, the proper installation is 'no' rubber things, and the nut that comes with tubes is threaded UP to the TOP of the valve stem, meeting the stem air cap. The idea being that if a flat occurs, the tube (you DID install it with tire TALC all over it surface, and tire insides too?) can move a slight amount, with tire movement on the rim... avoiding having the tube stem rip out, making for a very sudden flat. BMW even had a service bulletin about that.
14. Obviously if you have a tubeless tire, used as tubeless, you have NO inner-tube, and you have NO inner-tube type of valve stem to worry about.
15. On a rare occasion a tire will not balance properly without a large amount of tire weights added. It is OK to have the tire painted mark at 45 or even 90 degrees to the stem, if doing so reduces the amount of weights needed. VERY FEW motorcyclists do this, as they hate bead breaking after mounting a tire, and you must be careful with a tube.
16. Many modern motorcycle tires have very stiff sidewalls and beads ...and can be difficult to mount to your rim. In particular you may have difficulty getting the tire bead to seat all around concentrically on both sides of the wheel. Copious quantities of tire lubricant will often help; but be sure to have a smooth rim bead and outer edge area. Often the tire beads snap into place over a few minutes. A big help is to have the tire, wheel, tube, etc., all in the hot sun for quite some time, before and during any tire work. Use of too high pressures to get the tire to seat properly are dangerous. Not all that rarely there are problems and even with repeated inflation, deflation, inflation, a clean and polished rim bead area and well-lubricated bead, the tire may not seat all-around. This usually happens on just one side of the wheel and on a smallish part of the circumference of that particular bead. While it is true that ...in VERY rare instances, a tire is faultily made ...or a rim unequal on each side (usually due to straightening of the rim at some time), those are VERY rare instances.
To avoid problems, I recommend that you follow ALL my suggestions FIRST, ahead of time ...as best you can with your equipment; and, do NOT forget to have a CLEAN & SMOOTH RIM EDGE, and a CLEAN & SMOOTH BEAD AREA OF THE RIM, BOTH AREAS COPIOUSLY COATED WITH REAL TIRE LUBRICANT. ALL these things CAN BE critical to doing a good mounting job! If you combine those things with hot rim and hot tube and hot tire, and a quite fast air flow when inflating, the chances are high that you will have NO problems!
ALWAYS clean the rim inside bead area well, so it is clean & very SMOOTH ...this allows the tire bead to slide on the bead area easier during inflation. Clean the edge of the rim too, so the bead of the tire does not get caught-up there. The tire bead rubber will always try to grab onto these areas, so a clean and smooth bead area, including the edge of the rim metal is important. Use WATER and SOAP FIRST to remove old water-soluble tire lubricant, which acts something like glue when it is dry! Then use a strong hydrocarbon-based liquid solvents, perhaps acetone or MEK. Finish cleaning with fine sandpaper, then clean off any sand from the sandpaper, then WASH with soap & water again. I cannot over-emphasize the need for a truly clean & smooth rim where the tire bead will pass over and then seat. Having nicks in the rim edge from using tire spoons improperly is a prime cause for problems. The cleaning and smoothing is VERY helpful for both tube & tubeless tires in both spooning-on, AND in having the tire set fully concentrically to the rim. Doing it properly will reduce your swearing & labor CONSIDERABLY. A rather minor-appearing irregularity on the rim bead surface will be a point of substantial friction, which you do NOT want, once the tire bead is in contact with it during inflation.
17. Do NOT leave the Schrader valve core inside the valve stem when trying to seat the beads. That valve, together with perhaps your air source being of too low a pressure, or too small a tank or no tank, too restrictive a hose or chuck ....may not allow a fast-enough inflation. A slow inflation lets the rubber of the bead push into irregularities, and hang-up! You might be amazed at how a single rather small irregularity, can cause substantial installation problems.The PRIMARY SECRETS ARE: A VERY clean and SMOOTH rim, rim-edge, and bead, proper lubricant; and, FAST inflation from using proper equipment as noted. Otherwise, even a well-lubricated bead STARTS to move, & then hangs-up. Many have very considerably overinflated a tire, to quite dangerous pressures, & still could not get the bead to seat, mostly (IMO) from failure to listen to advice from us professionals, who have done many hundreds of tires; and, in shops like mine 90% of tire work was done by hand.
For tires withOUT tubes, there is another possible problem, & that is to get the tire to even start to seal to the rim, let alone fully seat/seal. This is ESPECIALLY a problem if you have a very low output compressor (12 volt, on the road??) or CO2 bottles. The answer is almost always a big belt or rope used as a tourniquet, around the entire circumference of the tire. If using rope, use a large tool of some sort, even a piece of wood, to tighten the tourniquet.
Heed my hints! I cannot overemphasize the need to do all of what is in this section!
HAVE THE TIRE & WHEEL HOT! Remove the valve core (Schrader valve) & use a compressor hose, & associated parts including fittings & airchuck, that flow fast in volume. DO USE a modified airchuck that will fill the tire FAST (with well-lubricated tire bead too, on very well cleaned and smoothed rim bead and edge). A several gallon size (OR MORE) TANK at the compressor, high pressure in the tank (at least 80 psi, but 125+ is nicer) is very helpful to supply the large amount of air FLOW needed. Check that the air HOSE is 3/8" inside diameter MARKED type, NOT smaller; or flow will be slow (low flow volume is BAD). Do NOT purchase an air hose that has too small of a hole inside at either end fitting. The hose length is not very critical, but the shorter the hose the better. The entire air supply system needs substantial INside diameter parts.I have found that SOME quick-release hose fittings are quite restrictive. It is best to avoid them. Modifying quick release fittings is iffy ...best to avoid doing that ...but I HAVE modified mine, and others, using progressively larger drill bits (or reaming). It takes very little diameter increase give a HUGE increase in air flow. Remember the formula for the AREA of a circle? π x r� The radius being squared means that a very small radius or diameter change is a big change in area flow.
OBTAIN AND MODIFY AN AIRCHUCK specifically for this tire work: REMOVE the center pin. LEAVE the rubber washer in the chuck (after you modify the chuck). DRILL the part of the airchuck that attaches to the air hose, for a larger size hole ...all the ones I have seen are too small in diameter. 15/64" or 1/4" will be OK.
USE REAL TIRE LUBRICANT, properly thinned. Use a 2" wide paintbrush to apply it quickly so both rim (and outer edge!) & tire bead are well-coated. If it starts to dry, re-apply or use the paint brush dipped in water. Avoid excessive water inside the tire (and don't use a spray bottle). Remember that water inside the tire or tube or both will eventually turn to water vapor, and that will have bad expansion characteristics.
18. I can't tell you a specific maximum pressure you might use to try to seat tire beads; frankly I do not know what is truly safe for any particular wheel, particularly since wheels are sometimes damaged and then repaired. Safe pressures for any particular tire are somewhat more available. Some motorcycle tire manufacturer's have said not to exceed the maximum sidewall printed pressure by more than 50%. Some said 150% ...which they meant to be 50% over the maximum sidewall printed figure, but that 150% could be miss-interpreted as sidewall printed maximum pressure PLUS 150%. THAT would be EXTREMELY SUPER DANGEROUS. Recently, perhaps lawyers got involved over litigious American's, as some tire makers are saying not to use higher than 40 psi when inflating. Some of these same manufacturer's have deleted their prior higher recommended pressures for RIDING too! This all may fly in the face of ~ 42 psi being a maximum on many sidewalls. I like the old recommendations myself: DO NOT use over 1.5 times the printed sidewall maximum.
I am NOT advising you to use 1.5 times. My information here is of how I PERSONALLY DO MY OWN WORK. I would NOT want to inflate a tire so high that a rim exploded, let alone the tire itself be injured by extra-high pressures. There is always the chance that a rim has been weakened in the past, making things even worse! I never ever go over 65 psi on common motorcycle wheels.
I usually use a compressor that fills its tank safely to 125 psi, & I use all my previously noted hints about hose size, air-chuck modifications, no Schrader valve core, etc. While the output of the compressor tank has a common adjustable regulator, and it can be set as high as 80 psi, I have an additional output fitting ahead of the regulator, so the full tank pressure can be used to fill tires fast-flow style. Be very careful if you use a similar system, as you do NOT want to over-inflate the tire to a rim/tire danger point.
Please keep in mind that while a pressure change from, say, 50 to 60 psi seems hardly much, the pressure is POUNDS PER SQUARE INCH ...and there is a lot of inside AREA for those pounds. Thus, the pressure on the wheel can be MANY THOUSANDS OF POUNDS; and an increase of 10 psi is a LOT, considering the total inside surface area.
19. I use REAL tire lubricant with a 2" paintbrush. Most tire lubricant comes in 5 pound cans, is concentrated, & looks like very thick jelly. I thin it with water per the can. DO NOT use lubricants that contain oils. I am well-aware that some of you will use saddle-soap, dish detergent, soap, etc. You have MY recommendations; and with MY recommendations you need not worry about corroding your alloy rims, nor rusting your steel rims, nor damaging the rubber over long periods of time! My recommendations also never leave the rim and tire bead contact area slippery after the lubricant dries; and, the outside can be washed easily to remove excess lubricant.
Once the WELL-LUBRICATED beads snap (usually) into place on both sides of the tire, & not exceeding what I believe to be a safe pressure, I check the RIDGE that is molded on the tire near the bead, to be sure it is EQUAL all around, on BOTH sides of the tire, that is, concentrically, all-around. IF NOT, I first WAIT a few minutes ...as sometimes it takes a bit of time ...and, again, here is where lubricant and hot tire and hot wheel from being in the sun helps. Not seated correctly? ....I deflate, break the bead, lubricate, repeat the process. I may have to increase the pressure, but never over 65 psi for common BMW rims. If you do this procedure the way I have outlined, you will almost always have good results THE FIRST TIME, AND NOT HAVE TO DEFLATE & TRY AGAIN.
Vibration, Thrumming, etc. :
A tire from any manufacturer is usually intended to be used with some other tire, perhaps a matching type, from the same manufacturer. In a majority of instances, tires can be mixed by model & manufacturer with no or few problems. In some instances they do not work well with each other; and, this does depend somewhat on the make and model of motorcycle, and how equipped, modified, etc. Every tire has its own type of vibrations set up by & in the tire & transmitted to the suspension, frame & you. The tread pattern design has a lot to do with this. Suspension items and operation also transmit vibration to & from the tire. Even if the tires are perfect, & balance of wheel & tire is perfect, vibrations still occur, & if the front & rear tire were not designed to work with each other, strange effects can come about. In many ways, the suspension system and even frame rigidity, and other such factors, influence tire vibrations. Effects in one tire can create something almost like a musical beat note with the other tire's noises; or, what is created is a rhythmic vibration and/or noise, something like a regular interval thrumming that rises & falls in amplitude as speed decreases & increases, from any one speed.
In some instances, even proper tire-mates can do this, depending on wear patterns, & other things. Some of these things, and/or causes, are not well-known or thought about. On Airheads, insufficiently tight motor mounts, for instance. Worn shock absorbers often have a dead place that is very narrow in stroke amount, & can cause vibration. If you change the loading on the bike, thrumming may mysteriously appear or disappear. Balancing tires & wheels might only help somewhat, if at all ...since often balance is NOT the basic problem. Just about anything that changes the characteristics of the bike in some way, will allow new or different vibration modes.
Other items that are often at fault are twisted forks, forks with stiction, looseness of something almost anyplace, & sometimes 'things' added to the bike that change vibration modes from the stock situation. A flattened center-section of the REAR tire from normal wear can cause thrumming, noises, and be VERY dangerous at speed, as it promotes high speed INstability, even of the type known as a Tank-Slapper.
In some instances vibration and thrumming began after the front tire was worn, this happened now & then even with the Metzeler Laser, which is very compatible, due to tread design, with almost any rear tire (and was designed to be compatible with many tires). The Metzeler Laser is hardly the only tire to have these problems now and then.
Braking/sliding that causes a worn place over one area of the tread, and not another, is a VERY prime cause. This often comes about from either very strong braking & sliding on an abrasive surface, that flattens, ever so slightly, part of the tire. The type of thrumming this causes can be exceptionally pronounced.
My point is, that before blaming tires & balancing, DO check your nuts & bolts, & check the front end for the steering head tightness (or looseness) & check the rear suspension. Check wheel bearings for looseness. Check the rear wheel fasteners; particularly on the single-sided models ....they do have a torque setting, & those threads are never to be lubricated, & that includes not ever using antiseize compound on them. If you cannot find the problem, remove the rear shock absorber(s), remove the springs from them, & test them over VERY SHORT movement conditions, in the SAME vertical/horizontal alignment as if on the bike; and do this checking at many places of the stroke. Occasionally fairing parts, bag mounts, etc., are found to be the cause for vibration, and noises.There ARE mechanical items in the driveline that can cause rhythmic vibrations (besides pending complete failures of such as transmission or rear drive bearings, etc.). Usually an experienced wrench can determine, from speed and modest riding tests, where the vibrations are coming from. One of the high frequency vibrations that is difficult to figure out because you must often remove it to SEE the problem ....is from a driveshaft of the type with two U-joints, that was installed with out-of-phase U-joints. See https://bmwmotorcycletech.info/phasing.htm.
SOME vibration/thrumming can be serious, such as a loosening of the nut at the nose of the rear drive (which often produces no symptoms until serious damage is occurring); an internally failing cardan bearing, a failing transmission, etc. Phasing problems are usually more constant, same for internal problems. MANY times, changing speeds will help identify a vibration or thrumming; sometimes changing the selected transmission gear helps; changing speeds; sometimes pulling in the clutch lever, and other common experienced Wrench' tests.
NOTES:
1. Modifying the rear fender, rear sides & rear bottom on some Airheads, usually just the twin-rear-shock Airheads, can make for MUCH easier tire/wheel removals. This is easy to do, can be done so no one hardly ever notices. The rear fender, a composite material, is relatively easy to cut with a hacksaw blade in a single blade holder, & easy to smooth that cut edge with a common half-round file. Using a piece of chalk (or?), mark the fender from the side opening, downward/rearward, smoothly, to the bottom of the license plate. Do on both sides of the fender identically.If you do the fender cut smoothly & neatly, and clean up your cut nicely; it will probably not be noticed by anyone as not being stock. It makes removal of the rear tire easier on the twin shock machines, the tire/wheel can be much more easily tilted and removed (the cut is done on BOTH sides of the fender, identically). The cut ENDS at the BOTTOM of the license plate, that is masked by the mudflap in the below photo.
This is a photo of my 1984 R100RT showing my fender modification, including a mudflap (optional item, see 2., below).
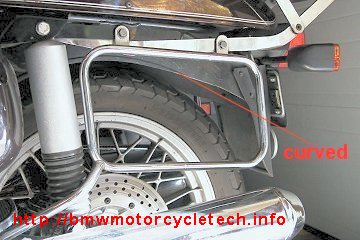
2. You can install a rubber mudguard (mudflap), such as from JC Whitney ...or the ones I prefer, the nicely-shaped BMW ones (pricey though). Check the dealerships' on-line parts fiche for number & fit/model; these numbers may be superseded or obsolete, but do check with German and UK, etc. suppliers.
Black, 46-62-1-236-384, to 9/78
Black, 46-62-1-230-766, to 9/78
Black, 46-62-1-230-797, from 9/78
Black, 46-62-1-238-996, from 9/78
White, 46-62-1-239-274, from 9/78
NOTE: Some may be obsolete, some come with nuts, bolts, washers, etc. Because sometimes the flap only item, that means supposedly without hardware, IS shipped with the hardware, I suggest you get whatever number is still available, fits, and in white or black. Check with a dealership on-line fiche, perhaps BMW has straightened out these numbers by the time you read this.
3. The Schrader tire valve, which is universal for just about all motor vehicles, uses a somewhat odd thread size, internally and externally. The outside thread is 7.7 mm, root diameter is 6.9 mm, and the pitch is 0.794 mm. In inch sizes, that is 0.305" outside, 0.271 root, and 32 threads per inch. 32 threads per inch is a common American size, but NOT in that diameter, except for a few things, such as the ancient specification Schrader Valve. The 5/16" x 32 tpi standard is quite close enough, however.
The internal thread is 5.30 x .706 mm pitch; and 0.209 x 36 turns per inch. 36 is an OLD standard.
You might like to have a rather small 4-way tool that handles internal and external threads (tap and die), valve removal and installation, ETC. Not at all expensive. Many suppliers, here is just one: Slime 20088 4-way valve tool (comes also with some Schrader valves), about $4 at WalMart. Spend more and get a Snap-On, if you wish.
This same thread size was used in some air conditioning systems. For the nerdy, the thread is called Unified Special.
4. Those with Reynolds Ride-Off center-stands or oversize tires will have to fashion their own methods for tire removal, as with that type of center-stand or oversize tire the front tire is typically on the ground at the same time the rear tire is, making for difficulties when trying to remove the front wheel for a rear tire flat; that is, for tilting the bike forward as described earlier, or, for front tire work. Parking the bike so the front wheel is over a curb, with the bike on the center-stand, is one idea. DO tie the center-stand to front exhaust pipe; or, see earlier ideas. I saw someone at a campsite with a tire problem who put the REAR wheel over a 'curb' to remove it ...he had tied the front wheel to the ground using heavy duty tent stakes and some rope!
At home, you can jack the bike in some fashion that works well. In my shop I typically placed a board under the center-stand for tire work on Reynolds Ride-Off equipped bikes. With a stock rear tire, changing the front tire to an oversize type, can cause similar such problems.
5. The Chitech folks have a booklet on doing tire changes. Good information, but rather obsolete in SOME ways now. May give you some ideas though.
6. Tire Pressures:
FOR YEARS I have been telling people that the tire pressures printed in your owners booklet, and in various literature, and very particularly so for BMW's made before ~1985 (after which tire pressure recommendations in the owners manual are more accurate), are too low for modern tires. MANY, if not nearly all, 'modern' tires require higher pressures than stated on the tag under the seat or in the owner's manual or even in many tire manufacturer's literature. Failure to increase the pressures will cause sloppy handling: mushy, shorter life, less crisp, and in some situations, can be dangerous.
BMW owner's booklets and under seat labels show BMW's recommended tire pressures for the standard tires BMW installed at the time of manufacture. In general, Haynes and Clymers manuals simply copied the BMW information. At times, BMW issued Service Information Bulletins (SI's) on tire recommendations. BMW sent SI's on tires to dealerships for quite a few years during Airhead production. BMW quit recommending tires for Airheads long ago. BMW's recommended pressures were a compromise between comfort, handling, and tire life; all for THOSE tires, THEN. From ~1985, BMW recommended pressures are more realistic for better handling, particularly by the 90's, although some advice & experience will help. It is my belief that these later pressures were PROBABLY reflecting more modern tire construction & performance; but, the reasons are really unknown, BMW never provided details, at least not in the BMWNA SI's.
BMW's tire pressure recommendations in owners booklets (replicated by such as Clymers and Haynes), before approximately 1985, are ALMOST ALWAYS TOO LOW. This is in MY opinion; but also substantiated by others. PARTICULARLY with modern tires. I suggest you be VERY cautious about BMW's old pressures with modern tires. Such original pressures were in the high twenties for front tires, & low thirties for rear tires ....depending on load and speed. THIS IS ALMOST ALWAYS TOO LOW NOW.
For the CLASSIC BMW airhead ride on early Airheads, I suggest you use the original stock sized tires, in the old original ribbed designs ....with the original manual-stated (or under the seat label) pressures for two-up and high speed large loading recommendations. These pressures are NOT correct, IMO, with all modern versions of Classic tires. I have been unable to do testing on them, and may never, so you may want to ask on the Airheads LIST; and, see what the manufacturer's recommend. To make this clear, if you are trying SR2/K112 or other classic tires, start with 2-up high speed settings, and then do your pressure changes and testing from that point; and, consult with the LIST, and with the actual manufacturer. If I get reports from reliable tire testers, the information will be put in my tire article:
https://bmwmotorcycletech.info/section5.htm
Not many of us ride on the original ribbed front tires any more. They do tend to follow rain grooves, contrary to what is said in some Clymer's publications. Still, you MAY want to try a SET, as they 'supposedly' deliver close to the classic ride & handling that the bike was designed-for. If you have a modified suspension, the classic ride & handling will be modified. I suggest the Continental RB2/K112; but Metzeler is re-making classic tires now, and they are not the only manufacturer's doing so. See my tire testing article: https://bmwmotorcycletech.info/section5.htm
From ~~1985, & certainly by the nineties, BMW recommended pressures were OK; ....not necessarily always right ....but correct-enough. BMW did not specify atmospheric temperatures, road temperatures, etc, for any correction factor. You will probably find that for "modern" tires the appropriate pressures are ~33 to 36 for the front and 38 to even as high as the sidewall limits (typically 40 or 42 psi) for the rear. Tire pressure needs varies with loading (are you heavy? two-up?) & speed you might travel at. Tire pressures also can be (does not mean they have-to-be) adjusted for the riding temperatures and type of roads expected. If you are doing this sort of adjusting, my suggestion is as follows: Using 68�F as the figure for which you adjust/pressurize your tires, BEFORE riding on them, adjust the tire pressures higher by about 1 psi for every 10�F that the outside temperature will be at. Add a bit if on black asphalt, which will be hotter than whitish cement.
These rules-of-thumb should work well for you. If putting on knobby tires, and expecting to do some significant road miles, especially if two-up, you probably want to use tire pressure limits, otherwise tire wear will be very high. In instances where I have done this sort of riding, I often inflated to 2 or 3 pounds above tire limits. Your choice. Keep in mind that quite high speeds mean you also need to increase tire pressures some. It is best to set tire pressures BEFORE you go riding....as riding heats up the tires, sometimes quite considerably.
At the end of this paragraph is a link, that used to work!....to a page with charts of recommended tire pressures. I mostly agreed with the advice. It was one of the very few tire pressure guidelines that did not have lawyers telling the tire makers to have charts recommending only what BMW (or other mfr) says in their literature WHICH PROBABLY IS NOT CORRECT FOR THE TIRE MAKER'S TIRES! Avon had decent recommendations for the various bike models from most manufacturers, including BMW, and the Avon chart was excellent. Not long ago, Avon dropped that make/model of bike recommendations, in favor of pressure recommendations for their tires. That was still rather good. IMO the pressures were close to my own findings from my rigorous testing. You might notice, even with a quick glance, that the guidelines don't have anything much or overly-specific to say about most TYPES of tires. That's because type differences, unless for specialized purposes, are usually not all that pertinent. You may notice that tire pressures recommended might be higher than in other tire makers literature, particularly if they use BRAND names for bikes. That's another way of saying that lawyers have too much influence on many tire makers! I have found very little other good information like this from other tire makers.
http://www.avonmoto.com/tech/ Click on Tire Pressure Guidelines.
February, 2019: UNFORTUNATELY, Avon is, AGAIN, making it very difficult to find the tire pressures guidelines. I cannot keep up with Avon's constantly changing website. I suggest you contact Avon and ask for the direct URL to the LARGE chart of information!
I did find this today, but there was a chart I did not find, with a lot more sizes and pressures, usage, etc. Note the change from avonmoto to avontyres in the URL.
https://www.avontyres.com/en-us/tyre-care/technical/tyre-pressure-guidelines/
THE TIRE PRESSURE LISTED ON A TIRE SIDEWALL IS ....NOT! .....THE RECOMMENDED TIRE PRESSURE. It is a maximum tire pressure, based on whatever standards the tire manufacturer and tire industry used. There are certainly occasions where you may be using that maximum ...such as on the rear tire, with maximum loads and high speeds.
You can POSSIBLY (??) determine the proper pressure for the tire, weight, speed, etc., for your type of riding. This is done by measuring carefully the pressure before any riding (tire is cool) ....and then very quickly after a decent ride at cruising speeds. The change is usually modest, on the order of about a pound to 4 pounds and difficult to read accurately. My Rule of Thumb, if you are not using the specific recommendations, is, for a 6-8%% rise after a fairly decent ride length, especially at goodly speed, and if less than 6%, DEcrease pressure, and vice versa. Oftentimes this rule of thumb does not work well, and it appears it does not work too well with very stiff sidewall and some belted tires, which seem to be best with less increase in pressure. Tire pressure measuring is tricky, and best you do not try; the method is listed here because it was so wide-spread in publications; a carry-over from decades ago.
I consider this method obsolete, and semi-obsolete IF...IF! ...you can get the specific information on your brand and model of tire, etc., from the tire manufacturer's own engineering books. A handling test is by far the best, but requires that you can detect differences of a few pounds. Testing is best done by setting a cool tire pressure, and riding on it, testing for braking, handling, etc. Change pressure after tire has fully cooled, then re-test.Motorcycle tire profiles are rounded, and even with various factory heat treatments during manufacture, including multiple types of rubber compounds in the same tire, pressure tests from actual riding are quite iffy.
You can do your own handling/testing, starting at low or high pressures. I suggest you start with highest pressures, perhaps 38 or even 40 front and 42 rear. That way, you may get a better feel for things, as they deteriorate with pressure lowering. I think you will find that FRONT tire pressures of about 33-36 will be correct; REAR 38-42, for most conditions and situations. The highest of those pressures would be for high speeds and/or high loads, or aggressive heavy riders in twisties; and especially for high road surface temperatures. Pressures are always measured with a KNOWN ACCURATE gauge, tires cool (that is, UNridden, & NOT sitting in hot sunlight).
More information on tire pressures and a lot more other information is in:
https://bmwmotorcycletech.info/section5.htm
For wheels: https://bmwmotorcycletech.info/wheels.htm
Rev:
07/26/2008: All prior updates incorporated, article revised extensively.
12/28/2008: Edit for clarity. NO substantial changes.
11/01/2010: Expand on #5.
02/19/2011: Revise numbering, add section on exactly how to repair inner-tubes.
04/11/2011: Expand on why I dislike CO2 cartridges.
08/29/2011: Add info on bestrestproducts TireIron BeadBrakR, inadvertently left out of this article several years ago!
03/16/2012: Update slightly for clarity.
05/03/2012: Add photos for second method of tilting motorcycle forward.
Clean up the article in various places.
10/15/2012: Add QR code, add language button, update Google Ad-Sense code, modify photo, other minor stuff.
12/15/2012: Add photo of studded front wheel at item (10).
03/11/2013: Minor improvements to the article. Add entire section on how/why flats occur.
04/22/2013: Add more on tire pressures.
04/24/2013: Add more information on difficult-to-mount tires. Revise whole article for better clarity.
04/25/2013: Additional tests proved that some couplers & excessive hose lengths DO detract. Added the information & did extensive final editing on all parts of this article. Sometime in 2013 removed language script and button.
05/26/2013: Add Tusk inner core valve stem tool description and photo, and revise section i.
07/02/2013: Add section on vibration/thrumming
09/26/2014: Clean up article.
11/02/2014: Add link, comments, etc., to #4.
04/05/2015: Add section on comments made to the airlist this date.
05/25/2015: Add more commentary about Stop'nGo plugs, and steel plies in tires, pros and cons.
05/29/2015: Begin incorporating items from catch.htm, tools, etc.
06/02/2015: Revise section on mudflaps.
06/19/2015: Add Slime photo and text.
11/15/2015: Clean up SOME. Add some links, especially to BestRestProducts.
12/24/2015: Update meta-codes; change entire article to larger fonts; justify more to left; narrow to display better on small screens. Make tables to keep text & photos aligned.
04/05/2016: Update meta code, layout, table, fonts, colors, elimi.
10/29/2016: Expand avonmoto information
12/14/2016: Revise 100% for clarity, redundancies, HTML excesses, scripts coding, re-arrange a lot of the article as was previously scattered about.
03/27/2017: Fix BestRest hyperlinks.
05/08/2018: Reduce excessive HTML, colors, fonts. Improve layout, improve tables, improve explanations, fix hyperlinks, fix some bad coding.
08/27/2018: Clarify use of bungees.
09/03/2018: Clarify procedures slightly, and add cautions.
02/18/2019: Again, modify the information about AVON's tire pressure chart.
04/03/2022: Clarifications about tire pressures, and the several methods.
� Copyright 2022, R. Fleischer
Return to Technical Articles LIST Page
Last check/edit: Sunday, April 03, 2022